Netflix, a leading streaming platform, has revolutionized how we consume entertainment. It offers users worldwide a vast library of TV shows and movies across various genres. With a Netflix subscription, you can stream content online or download your favorite videos for offline viewing. However, sometimes your device may run out of storage space for these downloads. One solution is to change Netflix download location on your device. If you’re facing this issue, this post is exactly what you need. In the following sections, you will discover the best methods for changing the download location on Android or Windows devices. Simply follow the detailed step-by-step instructions, and you will be able to do it easily and effectively.

Part 1. How to Change Netflix Download Location Android
Netflix provides its official app on many devices. Most users will choose to install it on their mobile devices due to the convenience. If you are one of the users who use Netflix on Android or Amazon Fire devices, it’s not difficult for you to change the location where Netflix downloads are saved. Because Netflix allows you to store your downloaded videos on a compatible SD card. Just try the following steps.
1. Prepare a valid and compatible SD card that has sufficient space. Then, insert it into your Android or Amazon Fire device.
2. Once done, you can open the Netflix app and sign in to your account.
3. In the lower right corner of Netflix’s home screen, tap My Netflix.
4. Then, tap the Menu icon at the top right.
5. After that, select App Setting > Downloads > Download Location.
6. Now, select your SD card and set it as the download location. Thus, the next time you download a video, it will be stored on the SD card automatically.
You should notice that this operation can only change the storage location of your future Netflix downloads. The TV shows and movies you have already downloaded will still be stored on your device. If you want to change the Netflix downloads that you saved before, you may need to find them on the Settings app on your device to finish the transfer progress.
1. Open the File or File Manager app on your Android device.
2. Then, select Settings and enable the Show hidden files option.
3. After that, go back to the home screen. Navigate to Internal Storage > Android > data > com.netflix.mediaclient > files > Download > .of.
4. Here you can find the folders that contain your current Netflix downloaded videos. Normally, the folders are named by eight-digital random numbers.
5. When you find your downloads, you can transfer them to any other local folder on your Android device.
Part 2. How to Change Netflix Download Location Windows 10
Unlike the Netflix app on Android, the Netflix app on Windows does not include a built-in setting to change the download location. Instead, you’ll need to manually adjust the download location through your system settings. This requires a few extra steps, but it can be done easily once you know where to look. By making this change, you can free up space on your primary drive and store Netflix downloads in another place on your computer.
1. Launch the File Explorer app on your Windows desktop.
2. At the top left toolbar, click View. Then, select Options in the upper right corner.
3. After that, switch to the View tab in the Folder Options window.
4. Scroll down to Files and Folders > Hidden files and folders. Select Show hidden files, folders, and drives > Apply > OK.
5. Next, you can find the Netflix downloads on your computer by visiting C:/Users/Your User name/AppData/Local/Packages/4DF9E0F8.Netflix_mcm4njqhnhss8/LocalState/offlineInfo/downloads.
6. Now you can see the downloads and move them to the location you want.
Part 3. Why Netflix Can’t Change Download Location
Although the Netflix app on Android devices provides the option to change the download location, many users have reported the issue of not finding this option. If you don’t have the option to store downloads on your SD card, it’s typically because of the issue with the SD card you use. Here are some troubleshooting tips to help you resolve this issue.
1. Reinsert the SD card
The easiest solution that is worth trying is to reinsert your SD card. Head to the Settings app on your Android device, and then select Storage & USB > Eject to remove it safely. After that, you need to turn off your device and take out the SD card from the slot. Wait for a while, and you can place the SD card back into your device. Turn on it again to see if the issue is fixed.
2. Try another SD card
If the above solution does not work, you can consider trying another SD card so that you can identify where the problems come from. If you are able to store downloaded Netflix videos on a different SD card, then there may be an issue with the original SD card. You can try to format it to make it work again. To know the exact steps of doing so, you need to contact the manufacturer of your device.
3. Update the Netflix app and reopen it
Another possible solution is to update the Netflix app on your Android device. This step can make a refreshment and clear the temporary bugs within the app. If there is no new version, you can reinstall and reopen it.
4. Try the alternative method to download Netflix videos
If you have completed the above solutions but are still unable to store Netflix downloads on your SD card, maybe your device or SD card does not support this feature. You can consider using an alternative to download Netflix videos and change their location. You can find more detailed information in the next part.
Part 4. Best Method to Store Netflix Downloads on Any Device
Through the methods above, you are able to remove the Netflix downloads to another location on your Android and Windows devices. However, you should notice that all these Netflix downloads are DRM-protected. That means you can not watch the downloads out of the Netflix app. This is an annoying issue for users who want to watch Netflix-downloaded videos on other apps and devices. Tunelf Netflix Video Downloader is a timely solution to this problem.
Tunelf Netflix Video Downloader is a powerful and professional tool designed to help Netflix users save TV shows and movies as local files. By intelligently removing DRM protection, it allows you to transfer your downloaded content to various locations, making it compatible with almost any media player or device. You also have the flexibility to customize video settings, including format, quality, audio channels, language, and more. Once downloaded, you can easily store the content permanently and enjoy offline viewing on any device whenever you want. Tunelf gives you complete control over your Netflix downloads, including the ability to choose their storage location.

Key Features of Tunelf Netflix Video Downloader
- Download TV shows, movies, anime, and various content on Netflix
- Convert Netflix to MP4 and MKV while keeping the original quality
- Support exporting Netflix content to videos, audio, and subtitles
- Allow to choose multilingual subtitles and soundtrack for Netflix
- Offer an abundant of features like automatic task completion
Step 1 Entry the Netflix website on Tunelf’s interface

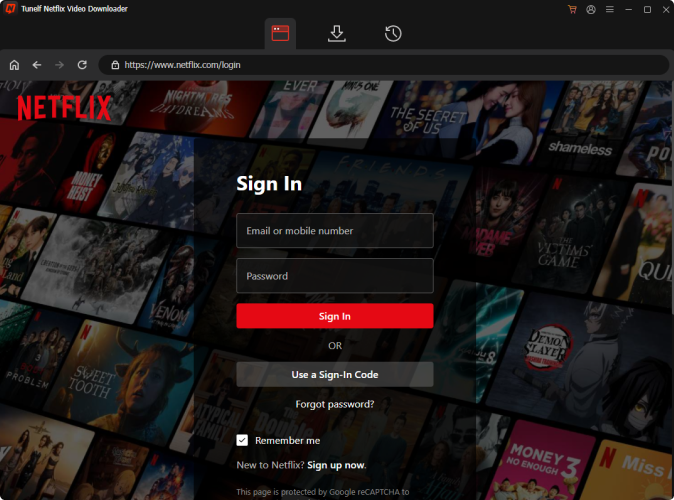
The Tunelf Netflix Video Downloader has 2 different versions: Windows version and Mac version. You need to download the right version that is supported by the operating system of your computer. Once done, launch the Tunelf software and you will be navigated to the Netflix website in the interface. Here you should enter your credentials to sign in.
Step 2 Configure the output video parameters

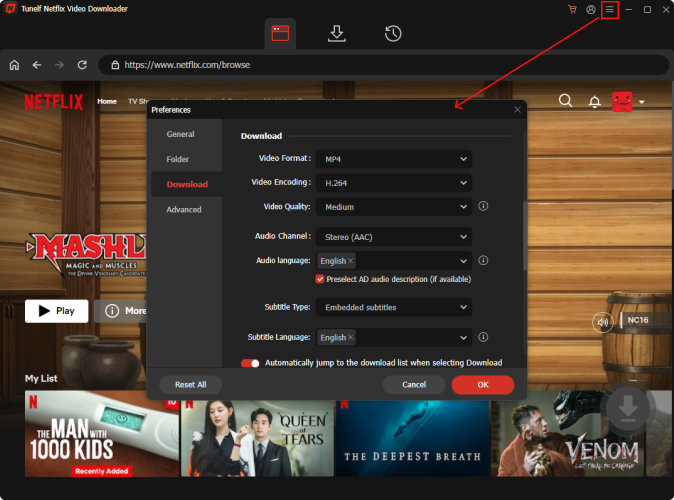
Click the menu icon at the top right, and then choose Settings. The Tunelf software will pop up a new window and you need to set the video settings on it according to your needs. First of all, choose one video format you need. MP4 is recommended due to its compatibility. Then, you can set other parameters as well. Just don’t forget to click the OK button to confirm your changes.
Step 3 Find the target videos to download

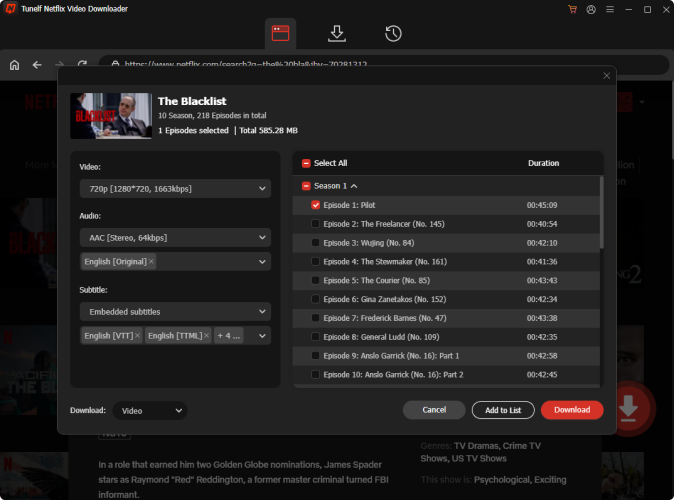
Once you finish the settings, you can browse Netflix’s library and find the videos you want to download. Select the title, and then click the red download icon in the lower right. After that, there will pop up a new window where you need to finish the advanced settings. If you select one TV show, you should pick the episode you need as well.
Step 4 Start to download Netflix videos locally

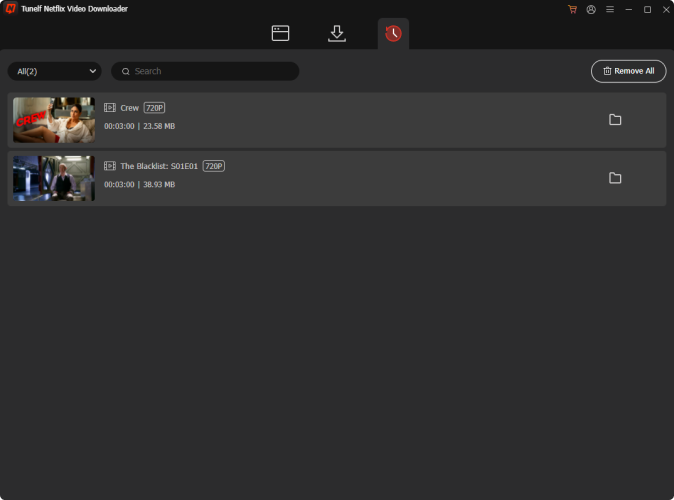
You now just need to click the Download button and you are done. All you need to do next is wait for the Tunelf software to help you save this video. If you want to save multiple videos at once, you need to choose Add to List instead. Then, add all the videos you need to the Download List tab and you are able to download them in batches. All the downloads will be saved on your computer’s local folder automatically. You can click the file icon next to each video to find its exact location. Next, feel free to transfer them to any device you wish, such as a USB drive, SD card, or external hard drive.
Part 5. Conclusion
For users who are using Netflix on an Android device, it’s not difficult to change Netflix download location. You can reach it on the Netflix app easily. Or, you can change the download location of Netflix videos on your Android/Windows device’s system settings manually. But the best method to freely transfer Netflix downloads to any location is using the Tunelf Netflix Video Downloader. After using it to save Netflix videos as local files, you can get full control of them.
Get the product now:
Get the product now:


