


Shazam is a powerful music recognition app that utilizes advanced audio technology to identify songs playing in your environment. Simply hold your phone near the audio source, and Shazam will analyze the sound and instantly match it to its extensive music database. Beyond basic song identification, Shazam also integrates with popular music streaming services, allowing you to seamlessly stream identified songs directly within the app. This leaves many music lovers wondering: How can I connect Shazam to Tidal? If you are also one of them, you are in the right place. In this guide, we will show you some simple and effective methods to create a seamless music experience between Shazam and Tidal. Without further ado, let’s dive into the post and achieve your goal.

Part 1. Can You Link Shazam to Tidal?
If you are a fan of discovering new music with Shazam, linking your Shazam account to other music streaming services is convenient since you can easily transfer and enjoy your favorite tracks. As we mentioned above, Shazam supports multiple platforms, like Spotify, Apple Music, Deezer, YouTube Music, and so on. For Tidal fans, this problem is essential: can you link Shazam to Tidal? Unfortunately, the answer is negative. As for now, there is no official integration between Shazam and Tidal, meaning you can’t directly sync your Shazam’s songs to your Tidal collection. However, all hope is not lost. There are still several workarounds and alternative methods that allow you to enjoy your Shazam discoveries on Tidal, which we’ll explore in the following sections.
Part 2. How to Add Shazam Songs to Tidal Manually
Since there is no official way to help you sync the songs you discovered on Shazam to Tidal automatically, the most straightforward way to listen to the song on Tidal is via manual transferring. You just need to manually search for the song in Tidal’s extensive catalog. Here are the steps:
1. Download and install the Shazam app on your mobile phone and you can begin to identify the song you like.
2. Once done, you can see the name of the track and artist.
3. After that, you can open the Tidal app on your mobile phone. Enter the name into its top search bar.
4. When you find the song on Tidal, you can add it to your music library by selecting Add to My Collection or Add to playlist.
Part 3. How to Transfer Shazam Playlist to Tidal via Third-party Tools
Adding Shazam songs to your Tidal library manually is an easy process but might be a little bit time-consuming and inconvenient, especially for users who have a large music collection. Therefore, when you have multiple Shazam playlists and you want to transfer them to Tidal at once, you should consider using some third-party tools. Many tools offer these features to help you transfer your music playlists across different music platforms. In this section, we will introduce 2 tools that are available for you.
Option 1. Via Soundiiz
Soundiiz is a unique music management platform that bridges the gap between different music streaming services. You can use it as a central hub to manage your music playlists across different platforms. Thus, it can be a good choice for you to sync new music from Shazam to Tidal.

1. Go to the interface of the Shazam website and enter My Library.
2. Find the playlist you want to transfer to Tidal and click Download CSV at the top of the list.
3. Open any browser on your desktop and visit the official website of Soundiiz. Here you need to log in. If you don’t have an account, you can register for one first.
4. Head to the Playlists tab and select Import Playlist > From File.
5. Choose the CSV file that contains your Shazam playlist. Then, upload it and select Tidal as the destination.
Option 2. Via MusConv
Another available tool you can use is MusConv. MusConv is a powerful music management tool, that allowing you to transfer your music library between various streaming services seamlessly. You can effortlessly move your music collection between Shazam and Tidal by following the steps below:

1. Install the MusConv app from its official website to your desktop.
2. Once done, log in to your account. Then, you can select Shazam as the source in the interface.
3. Follow the on-screen instructions to connect your Shazam account.
4. After that, you can select the playlists you want to transfer to Tidal and click the Transfer option.
5. Pick Tidal as the destination service. Then, you need to enter your Tidal email account and passwords in the pop-up window.
6. When it is connected, MusConv will begin the transferring process automatically. Once finished, your playlists will be available on Tidal.
Part 4. Bonus: How to Keep Shazam Tidal Songs Permanently
Through the methods above, you now can access the songs identified by Shazam on Tidal with ease. You can stream them online on the Tidal app or its web player. If you want to enjoy an uninterrupted listening experience, downloading them offline is a good choice. But you should notice your Tidal content will expire and can not be accessed once your subscription ends. If you want to keep your Shazam Tidal songs available forever, consider downloading them offline via an alternative method instead of the Tidal app. It’s the time when you need the Tunelf Tidal Music Converter.
Tunelf Tidal Music Converter is a professional and versatile converter designed for all Tidal users. It allows you to download and convert Tidal songs, albums, playlists, and podcasts to various audio formats like MP3, WAV, FLAC, AAC, and so on. After converting, you can not only have the DRM-free files of your favorite music tracks but also transfer them to multiple devices for offline playback without hassles. The best thing about the Tunelf software is that it automatically keeps the high sound quality and ID3 tags so that you don’t need to worry about your listening experience.
Key Features of Tunelf Tidal Music Converter
- Download any Tidal content, including songs, albums, playlists, and artists
- Support exporting Tidal music to MP3, AAC, FLAC, WAV, M4A, and M4B
- Preserve a whole set of ID3 tag information in the downloaded Tidal songs
- Handle the conversion of Tidal music up to 5× faster speed and in batch
Step 1 Add music tracks from Tidal to Tunelf

Make sure you have downloaded the Windows or Mac version of Tunelf Tidal Music Converter and the Tidal app on your desktop. Then, you can launch the Tunelf software. It will help you open Tidal simultaneously. You can find the music track or playlist you want to keep on your device forever. To add it to the Tunelf software, you need to copy its URL link and paste it into the top box on Tunelf’s interface. Click the add icon and the song or playlist can be loaded successfully. Since the Tunelf software supports batch downloads, you can add as many tracks as you want.
Step 2 Configure the output settings
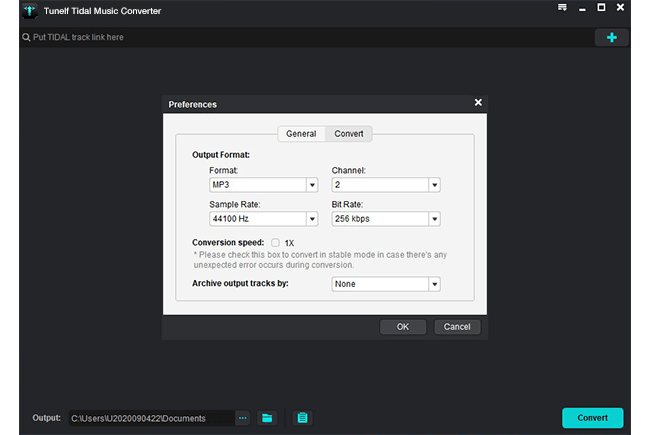
After adding all the tracks you need, it’s high time to decide which format you want. You can click the menu icon in the upper right corner. Then, select Preference > Convert. In this new window, you can select any format you need from MP3, WAV, FLAC, AAC, and more. Also, it’s possible for you to personalize other settings, such as bit rate, sample rate, and channel. Don’t forget to click OK so that your changes can be saved.
Step 3 Download Tidal tracks to keep permanently

If you are prepared, you can click the Convert button at the bottom to begin downloading the Tidal tracks you add. How long the downloading process takes depends on the number of tracks you added. When it is finished, you can easily find the DRM-free Tidal music files on your computer by clicking the Converted icon. Now, feel free to enjoy them offline on any device anytime you want.
Part 5. Final Thoughts
It’s a pity that there is no direct Tidal Shazam integration. However, with these methods, you can still connect Shazam to Tidal and enjoy your Shazam discoveries on Tidal without hassles. If you want to save the music tracks permanently or play them on other platforms freely, the Tunelf Tidal Music Converter is your ideal option.
Get the product now:
Get the product now: