Nowadays, listening to music has become people’s lifestyle. Numerous music streaming platforms sprung up to join the fierce competition in the music industry. But Spotify’s position as the most popular service is untouchable. The biggest reason for Spotify’s popularity is the convenience for users to explore diverse and exclusive content on Spotify. Spotify Jam is one of the features that enhance people’s music experience. In this article, we will provide all the information you want to know about it and teach you how to start a jam on Spotify as well. In other words, this article is a guide for users who want to have a better understanding of the jam feature on Spotify. Now, let’s explore together and learn more in the following parts.

Part 1. What Is a Spotify Jam?

Spotify Jam is a specific feature released by Spotify in 2023. It is a personalized and real-time listening session for you and your friends to enjoy together. With this feature, there is nothing easier than sharing and enjoying music with your friends. As long as you start a Spotify Jam, you can invite your friends as members to this session. Every member can add or remove songs from the current queue so that you can get a unique and new music experience to listen together with friends. Listening to your favorite music with your friends at the same time makes a more fun, intuitive, and collaborative social listening experience.
This feature is valid for all Spotify users globally. Whether you are a Free user or a Premium user, you can join a jam session and add songs to it. Everyone can enjoy music with friends on Spotify Jam just via a QR code or inviting link. However, it is noted that only Premium subscribers have the ability to create and start a jam on Spotify and invite members to edit together. This feature can be accessed only on mobile or tablet devices. In addition, if you want to use this feature properly, you will require the newest Spotify app.
How does Spotify Jam work? This question may come to your mind. Well, when you use your Premium account to start a jam session, you can invite other users to join in this listening space. After that, all users can jointly add music to this shared music queue and listen to the same song simultaneously. Based on the group’s music taste and listening activity, Spotify will even give you dynamic recommendations so that you guys can have the opportunity to discover new music. As the host, you will have more authority, like seeing who added which song, adding/removing members, changing the songs’ order, and removing the songs that don’t fit the vibe.
Part 2. How to Start a Spotify Jam
With all the statements above, now you have a basic understanding of the jam feature on Spotify. I’m sure that you can’t wait to start a jam and have the best music experience with your friends. Let’s dive into the details below, learning how to start a jam on your device. Some other operations are also provided for you to use jam properly and smoothly.
Step 1. Start a Spotify Jam

1. Go to the Spotify app on your iPhone or Android device.
2. Find the public playlist to which you want to start a jam.
3. Choose one song in this playlist and play it. Then, enter the Now Playing screen by tapping the playing bar on the bottom.
4. Tap the device icon which is located in the lower left corner, then choose Star a Jam.
Note
If you want to end a jam, just enter the host screen and tap the End button.
Step 2. Invite/Remove Friends from the Jam
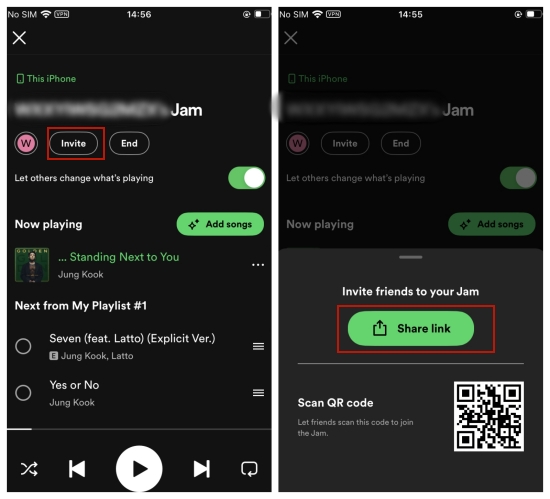
1. After you start the jam, you can click the Invite icon on the detailed screen.
2. You can choose Share link to invite your friend or let your friend scan the QR code on the screen.
3. If you tap the Share link, you can send the link to your friends via Message, Mail, or other social platforms.

4. Alternatively, you can tap your phone with your friends’ phone as long as your Bluetooth is enabled and you are all logged in on the Spotify app.
5. If you want to remove the members in your jam, you can tap the current device you are listening to and choose Remove all participants. Or, you can tap the three dots icon next to one participant and choose Remove from this session.
Note
When you are connecting to a Bluetooth speaker to listen to music, Spotify will automatically start a jam. Users who use the same WiFi as you will receive the invitation to join your jam if their Bluetooth is enabled.
Step 3. Add/Remove Song in Jam Session
1. Tap the Add songs button on the right of the host screen.
2. Then you will be navigated to a list that contains the recommended songs from Spotify. You can also swipe left to view your Liked Songs in the Library.
3. Just tap the plus button on the right and you can add the song to your session.
Part 3. Troubleshoot: Spotify Jam Not Working
By following the steps above, you will know how to start a jam on Spotify. But sometimes, many users find the problem of Spotify jam not working and don’t know how to fix that. Here are some tips for you to resolve this problem.
1. Check your device compatibility. Make sure that you are using a mobile or tablet to start the jam because this feature doesn’t work on desktops.
2. Check your subscription. The jam feature requires you to have a premium account. Thus, you’d better check and make sure that your premium subscription is active and can be used normally.
3. Connect to the right device. If you are connecting to a device that is not compatible with Spotify, you will fail to start a jam. Make sure that you choose the right speaker from the available devices list.
4. Close Spotify and restart it. The temporary glitches and bugs in Spotify are also possible reasons that cause your failure in starting a jam. At this time, you can restart the app to fix this problem.
Part 4. Bonus: How to Share Spotify Playlist without Premium
As a subscription-based streaming platform, Spotify has many restrictions for free users. What should you do if you don’t have a premium account but still want to share Spotify music with friends? Except for Spotify Jam, we found an alternative for sharing Spotify music – downloading the music you like in MP3 format and directly sharing the music file. This is an effective way. But you may say that Spotify only allows premium users to download music. That’s right, only premium users can get the music offline but only with the cached file. Therefore, we’d like to recommend Tunelf Spotify Music Converter to you, which can clear your mind of all worries.
Tunelf Spotify Music Converter is a professional music converter. It is equipped with advanced technology, helping you remove the DRM protection of Spotify music and download it to your computer as a plain audio file. That is to say, you can utilize this program to get any Spotify song, playlist, and album you like and save them locally for a lifelong time. What’s more, it allows you to convert the music files to other formats like MP3, AAC, WAV, FLAC, and so on, As a result, you can share Spotify playlist by downloading playlist in MP3 and sending the file to your friends without a premium account.
Key Features of Tunelf Spotify Music Converter
- Download Spotify playlists, songs, and albums with free accounts easily
- Convert Spotify music to MP3, WAV, FLAC, and other audio formats
- Keep Spotify music tracks with lossless audio quality and ID3 tags
- Remove ads and DRM protection from Spotify music at a 5× faster speed
Step 1 Load playlist from Spotify to the Tunelf program
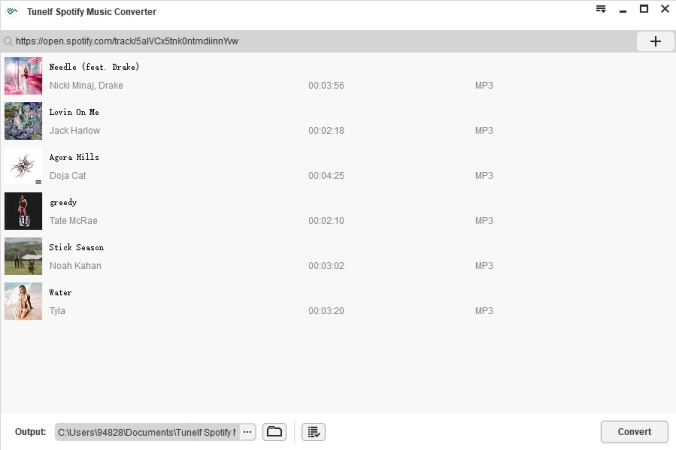
You should first install and launch the Tunelf Spotify Music Converter on your desktops. Then, the program will help you to initiate the Spotify app at the same time, Log in to your account and find the playlist you want to share. To load it to the interface of the Tunelf program, you will need to copy its link and paste the link into the program’s search bar. Next, click the add icon next to the search bar and all the songs from the playlist will appear in the convert window.
Step 2 Set output format as MP3
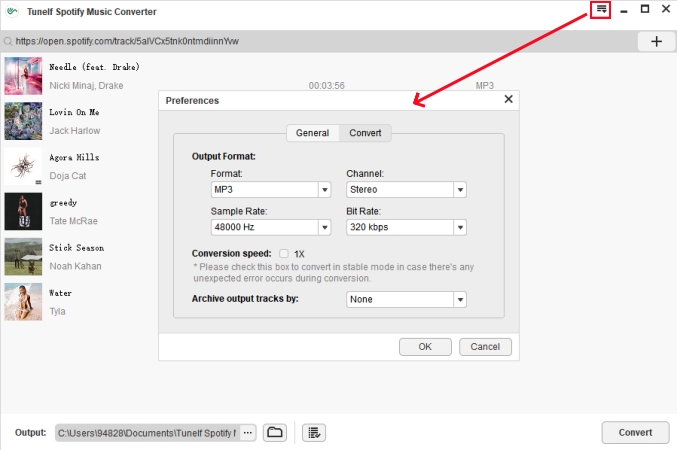
MP3 is the most commonly used audio format. We recommend you set the output format as MP3 so that you can share the music file with your friends easily. Go to the interface of the Tunelf program, then click the menu icon at the top right corner. Next, choose Preferences > Convert. Here you can select MP3 as the output format and adjust other settings, like channel, bit rate, and sample rate.
Step 3 Begin downloading Spotify playlist for sharing
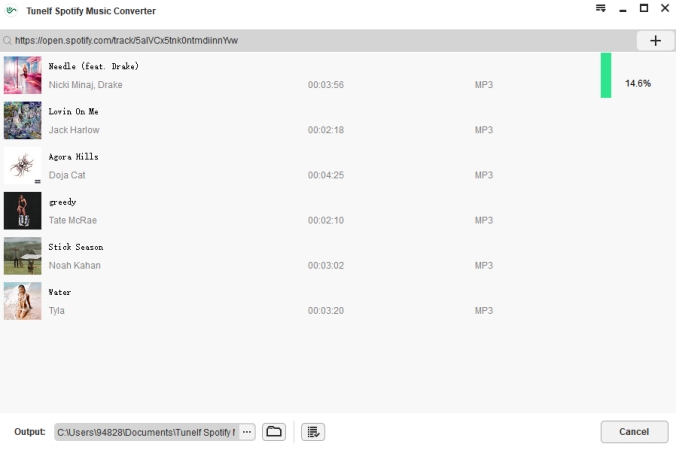
Everything is ready. Now you just need to click the Convert button to initiate the downloading process. When it is finished, click the Converted icon and you can find the location of the downloaded music files on your computer.
Now, feel free to send the music file to your friends and enjoy music together.
Part 5. FAQs about Spotify Jam Session
Q1: What version of Spotify do I need to use Spotify Jam?
A: The requirement for the Spotify version is 8.8.68+. Generally, as long as you update the Spotify app to the newest version, you can access to the jam feature.
Q2: Is it possible to enjoy Jam music on speakers?
A: Absolutely yes. After starting a jam, you can stream music on any Bluetooth, AirPlay, or WiFi connection speaker, such as Sonos and Bose.
Q3: How do I start jam on Spotify PC?
A: It’s a pity that you are not able to do so. Since the Spotify Jam feature is now only available on mobile or tablet devices, you will need an iPhone or Android device to access it.
Q4: Can I use my own device to listen to music remotely after joining a jam?
A: The answer is positive. If you are a premium subscriber, you can get the option to join the host device or use your own device after joining one jam via a link.
Q5: What is the difference between Spotify Jam and Group Session?
A: You can perceive Spotify Jam as the upgraded version of Group Session. Jam is a group session in which you can listen to music at the same time. Compared with Group Session, Jam has more functionalities. It also allows Free users to join the session and lets the host have more permissions to edit the queue.
Q6: Can I start a jam in any playlist?
A: Actually, no. The playlist in which you start a jam should be a public playlist. Thus, if you want to start a jam in your private playlist, don’t forget to make it public first. You just need to click the three dots icon under the playlist’s name, and then choose Make public from the drop-down list.
Conclusion
This article is the best answer to the question of how to start a jam on Spotify. It contains almost all the information you will need. Follow the comprehensive guide and it’s a piece of cake for you to enjoy music with your friends via Spotify Jam. But if you don’t have a premium account and can not use jam to share music, you can utilize Tunelf Spotify Music Converter instead. Just use it to download the music you want to share and directly send the MP3 files.
Get this product now:
Get this product now:


