Open Broadcaster Software, short for OBS, is open-source screencasting and streaming software that can be used for video recording and live streaming. If you’re using OBS, you may decide to have background music in a stream to keep your audience engaged. So are you looking for a way to add music from Spotify to your stream and give your viewers a pretty ambience? Look no further! Today, I’ll tell you how to add Spotify to OBS so you can display what you’re playing from Spotify on stream.
Part 1. How to Get OBS Spotify Now Playing Widget
The easiest way to add Spotify to OBS is to let Spotify play in the background and OBS will pick it up automatically. OBS has a built-in recording feature called Window Capture, which allows you to capture a specific application with its interface and audio, rather than the system’s audio as a whole. Here’s how to.
Step 1. Launch the OBS program on your computer and make sure the Spotify player is playing.
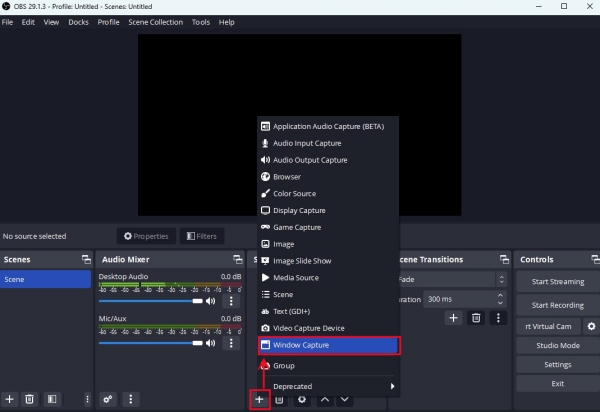
Step 2. Click + under the Source section.
Step 3. Choose Window Capture and name it Spotify. Click OK to continue.
Step 4. Under the Window dropdown options, select [Spotify.exe] or [browser.exe] if you’re playing with the Spotify web player.
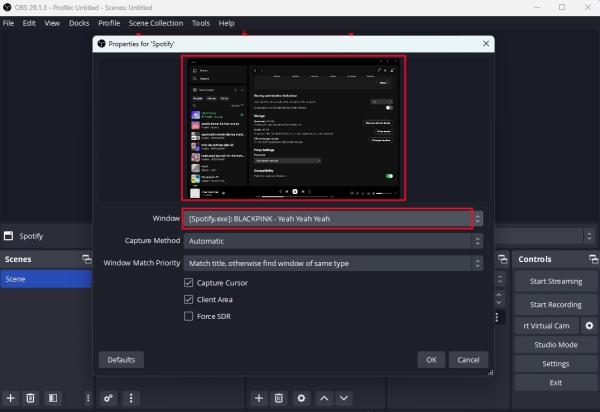
Step 5. Now, you have got the entire OBS Spotify now playing window on OBS.
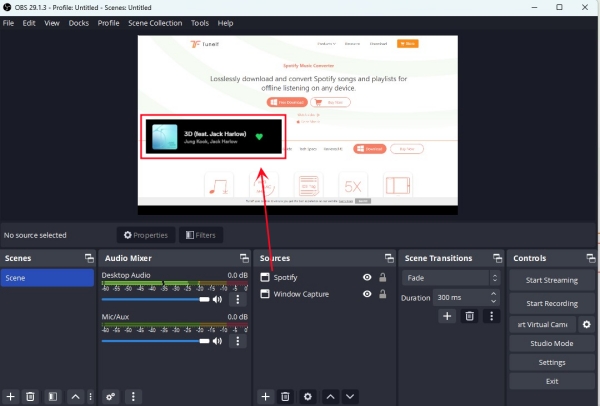
Step 6. You can hold the Alt key to crop the Spotify widget OBS so it’s just showing the now playing track.
Note
You need to have your Spotify window opened up all the time, otherwise, you cannot get the updated Spotify OBS overlay each time a new song comes on.
In addition to the above recording way, there are a few users who share the same tool called Snip. If you are using this tool to link your Spotify account for adding Spotify to OBS, you may find it refuses to show Spotify lyrics and artworks on OBS when you drag it to the Sources section. Hence, this method won’t work in 2023. But don’t beat yourself up over it, we list the best way to add Spotify music to OBS in the following part.
Part 2. How to Add Spotify to OBS As a Source
You may know that OBS allows users to add local media files as sources. In other words, you can upload Spotify music files to OBS. So the issue is how to get Spotify music files? Luckily, this is no longer a question with Tunelf Spotibeat Music Converter.
As a dedicated Spotify music downloader, Tunelf Spotibeat Music Converter has the ability to download music from Spotify to MP3, AAC, WAV, FLAC, M4A, and M4B. The best thing about Tunelf Spotibeat Music Converter is it works without Spotify Premium. By using top-leading decryption technology, Tunelf saves all Spotify songs to your local drive with lossless quality kept. Moreover, Tunelf preserves original ID3 tags so you can easily get Spotify artwork to show on OBS. Now, let’s walk through the step-by-step tutorial on how to play Spotify on OBS.
Key Features of Tunelf Spotify Music Converter
- Download Spotify playlists, songs, and albums with free accounts easily
- Convert Spotify music to MP3, WAV, FLAC, and other audio formats
- Keep Spotify music tracks with lossless audio quality and ID3 tags
- Remove ads and DRM protection from Spotify music at a 5× faster speed
Step 1 Select and Add Spotify Songs to Tunelf
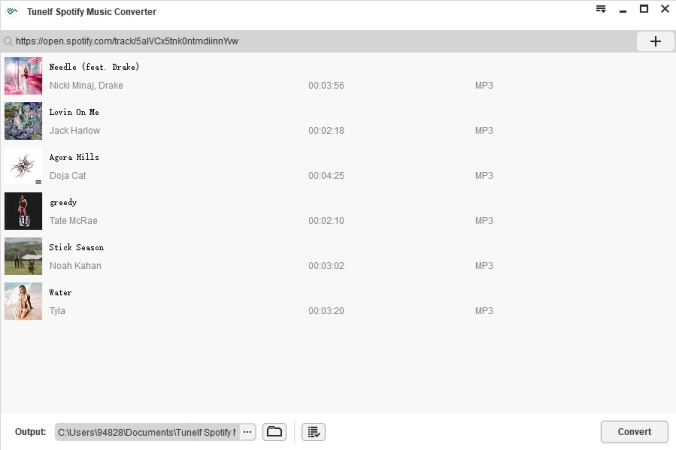
Start by launching Tunelf Spotibeat Music Converter then it will soon load Spotify on your computer. On Spotify, start to select the songs or playlists you want to play with OBS. Now you could use the drag-and-drop function to add Spotify songs to the converter. Or you could also copy the URL link of the song or playlist into the search box.
Step 2 Set the Output Format
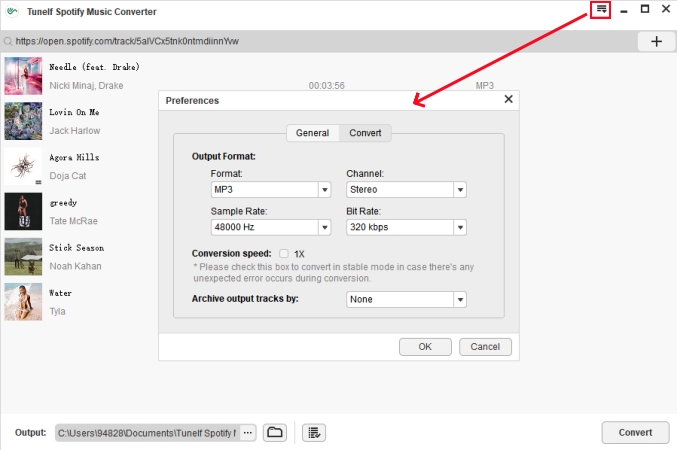
After all your required songs are added to the conversion list, go to the menu bar and select the Preferences option then switch to the Convert window. In the Convert window, you’re able to select one format from the provided format list. It is suggested to keep the default MP3 format. Apart from that, you can also adjust the bit rate, sample rate, and channel for better audio quality.
Step 3 Download Spotify Songs Locally
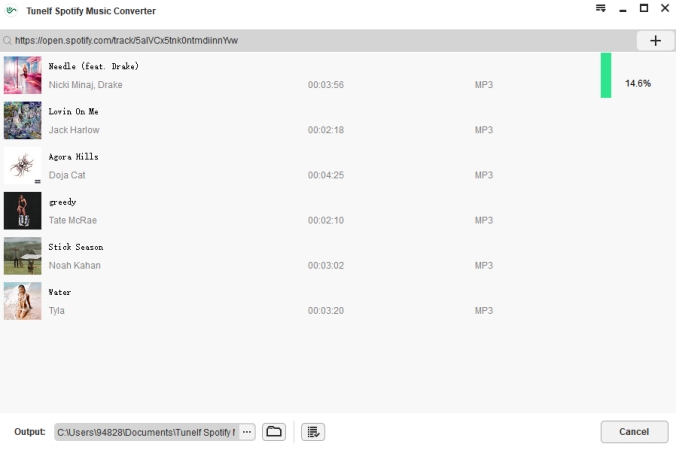
Just click the Convert button after configuring your desired options to initiate the final step. Then the software will download Spotify songs to your computer. After the conversion is complete, go to browse your downloaded Spotify songs in the converted list by clicking the Converted icon. Remember to utilize the search icon to locate them in the local folder.
Step 4 Add Spotify to OBS As A Source

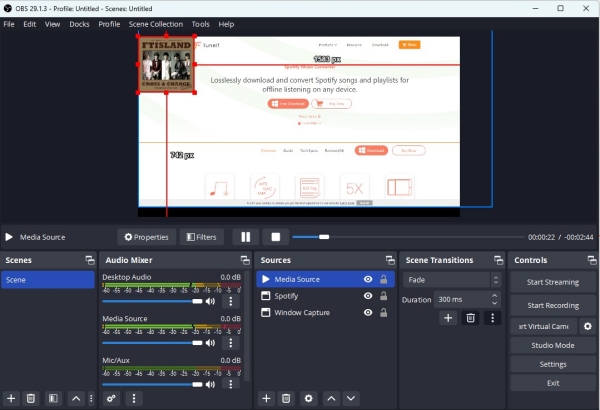
Back to the OBS program and click + under Sources. Then select Media Source > OK. Navigate to the folder that contains your converted Spotify songs and click OK to upload it. Now, the converted Spotify music displays on OBS. If you hit it, the artwork will appear on the Preview window and the audio is available in Audio Mixer.
Extra Tips for OBS Spotify Connection
#How to add Spotify to OBS Audio Mixer
Once you add Spotify to OBS with the above methods, the Spotify audio appears in the Audio Mixer section. Just locate it to learn about the best volume levels in your streams or recordings.
#How to get OBS Spotify overlay
- Customize the size of the Spotify widget OBS to your wanted size by holding the Alt key.
- Then, continue to add one more window capture.
- Move the Spotify window up. Even if there are other windows here, the OBS Spotify now playing widget will be shown at the top.

#How to make OBS not capture Spotify
It is easy to stop OBS from recording Spotify. Once you disable the sound from Spotify or shut down the Spotify application, OBS will not capture any sound from this application anymore.
Conclusion
Adding Spotify to OBS makes your stream stand out and helps create an amazing environment for your viewers. By reading this post, you’ve known how to get Spotify on OBS with 2 methods. Either using the Window Capture function or Tunelf Spotibeat Music Converter, you can learn how to pick the right Spotify songs to play in the background.
Get this product now:
Get this product now:


