Spotify Queue not working. Spotify does not add songs to queue even though I add them there. The queue only accepts approximately 20 songs. After that, even though the sign “Added to queue” appears, the songs do not show there.
— User from the Spotify CommunityNothing is more bothered than selecting songs one by one on a playlist and awaiting the next song. When you want to pick out a few songs to listen to without creating a new playlist, Spotify’s Queue feature is a lifesaver. It can help you organize your favorite tracks and playlists with ease. However, it can be frustrating when Spotify Queue not showing or working correctly. Many Spotify users grumble about Spotify Queue function breakdown sometimes. If you’ve encountered this issue, don’t worry—we’ve got you covered. This guide will walk you through why the problem occurs and provide a comprehensive list of solutions to fix it. Plus, we will share some helpful tips for optimizing your queue management and the best way to help you enjoy your favorite tracks from Spotify Queue offline without Premium.

Part 1. Why Is My Spotify Queue Not Working?
You may wonder why is my Spotify Queue not working. The answer is that it may be caused by various reasons. Here we listed some of the most common reasons.
Issues with Internet Connection
Issues with your internet connection can cause the Queue feature to not work or show. If your device is connected to an unreliable or unstable internet, Spotify may not work as expected accordingly.
Outdated Spotify App
An outdated app can also cause many functions to not work well, and the Queue feature is no exception. So make sure your Spotify app has been upgraded to the latest version.
Damaged Cache Data of Spotify
Sometimes, the cache data preserved on Spotify may be damaged accidentally, which can cause the app to work not correctly.
Queue Limits and Mismanagement
Adding an excessive number of songs, playlists, or albums to the queue can overwhelm its capacity, potentially causing it to malfunction. When the queue hits its upper limits, you may experience delays, unresponsiveness, or the queue failing to function entirely.
Account Sync Issue
If you use Spotify on multiple devices, your account information may fail to synchronize properly between devices sometimes. This lack of synchronization can disrupt the functionality of the Spotify Queue
Devices Problems
Issues with the Spotify Queue can often stem from device-related problems. This could include incorrect configurations or settings on the device. Additionally, device-specific bugs, such as glitches in the operating system or compatibility issues with Spotify, can disrupt the queue feature.
Part 2. Comprehensive Fixes for Spotify Queue Issues
Understanding the causes of the issue will help you troubleshoot more effectively. If you have been enlightened by the above reasons and already know why Spotify Queue not working on your device, you can perform the related solution to fix it quickly. Otherwise, you can try the following to further determine why the issue is occurring.
Fix 1. Check the Internet Connection
To operate Spotify properly, you need to connect it to a reliable and stable internet. Ensure your device is connected to a strong, reliable, and stable network. To test the network speed, you can run a speed test. If your network is too weak or unstable, then switch to another one to try again.
Fix 2. Check Your Spotify Account
Another important thing you need to check is the status of your Spotify Premium account. Make sure your Premium subscription is still active since Spotify Free users can not add songs to the Queue. Listening to Spotify music on demand is a Premium feature.
Fix 3. Check Spotify Queue Space
You can add a maximum of 10000 songs to a Spotify Queue. There must be some music which is corrupted or you don’t like anymore. You can remove them from the Queue to release some space. In this case, you can reduce the possibility of Spotify Queue not showing.
Fix 4. Check Your Device’s Storage Space
The problem of insufficient storage space on your device can affect the app performance, including Spotify. This problem will cause Spotify features not working properly. You need to check the storage space of your device and make sure there is enough space to run the Spotify app.
Fix 5. Try on Another Device
A simple way to determine if the issue is specific to your device is to log in to your Spotify account on a different device. Check if the same problem persists. If the issue is confined to one device, it may be resolved by restarting that device. However, if the problem occurs on multiple devices, it’s likely related to your Spotify account or the Spotify service itself.
Fix 6. Force Close and Restart Spotify
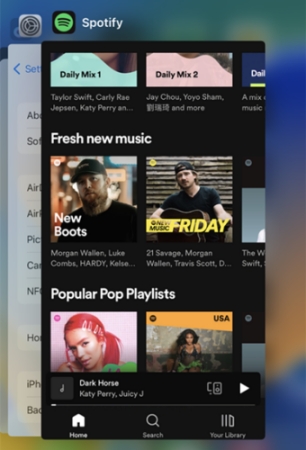
Spotify sometimes may crash or freeze. Try to force close it to let the app stop running in the background. Leave it for a while, then restart it. After restarting, try Spotify Queue again.
Part 3. Advanced Solutions to Fix Spotify Queue Not Showing/Working
If the issue persists despite your initial efforts, don’t worry. We’ve compiled 7 reliable solutions to help you resolve the problem and bring your Spotify Queue back on track. These methods are designed to address various underlying causes, and we recommend trying them one by one until you find the one that works for you.
Solution 1. Update the Spotify App
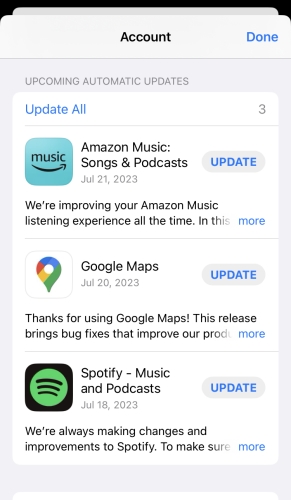
The outdated app may cause many problems. Make sure your Spotify app is updated to the latest version, or it may cause your Spotify Queue to not work. Search for Spotify in the app store on your phone and tap on the Upgrade button to upgrade it to the latest version.
Solution 2. Uninstall and Reinstall the Spotify App
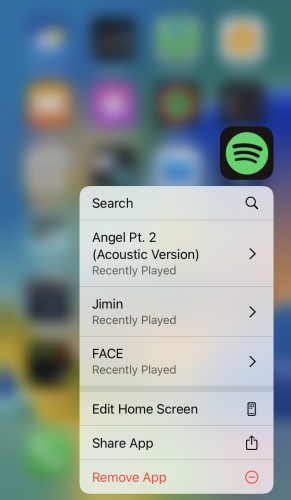
If there is new version of the Spotify app, you should try to perform a clear reinstallation. Uninstalling an app will delete all the previous application data and settings from your device. Reinstalling will allow you to start Spotify afresh. Once reinstalled, try Spotify Queue again.
Solution 3. Sign out and Sign Back in
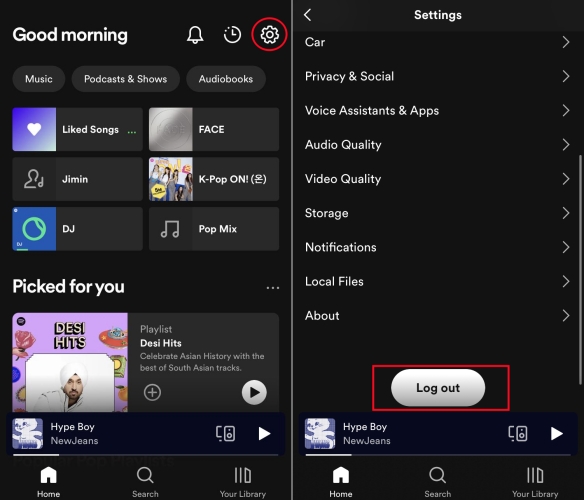
If you have tried upgrading and restarting the Spotify app, the Queue feature is still not working. Then try signing out and signing back in Spotify. This will help the app reconnect to the Spotify server, resolving Spotify temporarily out of order. Also, it can make a refreshment, letting the Spotify app to re-sync your account information. To sign out of the Spotify app, tap the Setting option and scroll down to tap on Log out. Leave it for a while, then sign back to your Spotify account and check if the issue is solved.
Solution 4. Clear the Queue on Spotify
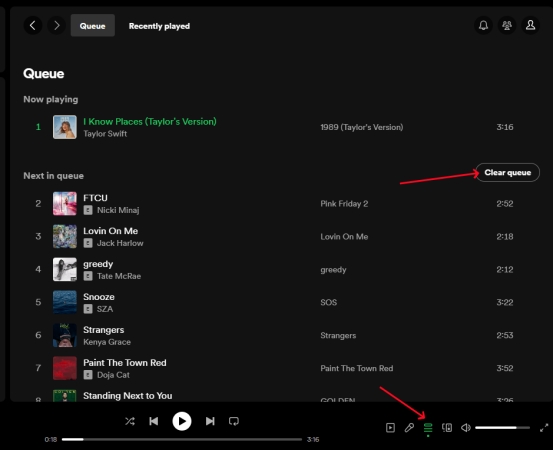
Sometimes, there might be some special music files in the Spotify Queue, which are hard to remove or operate. Under these circumstances, you need to clear the Queue. Just click the Queue icon and select Clear Queue. But remember this will clear the whole Spotify Queue.
Solution 5. Clear Spotify Cache
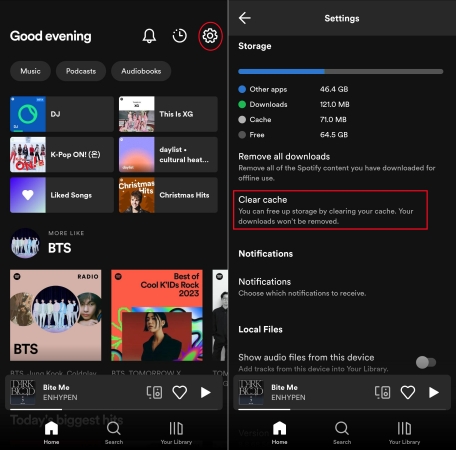
The cache is a temporary memory of your application actions. The data saved on your phone may be corrupted or outdated from time to time, which will cause the Queue to not work. In such a case, you have to clear the cache data thoroughly to refresh the Spotify app.

Do you need help figuring out how to clear Spotify cache and free up Spotify storage? This article enables you to know all the answers.
Solution 6. Remove SD Card and Restart Your Device [Android]
For users who are accustomed to listening to Spotify music on their Android mobile phone, Spotify allows they to store music on an SD card. But if you encounter issues when using Spotify Queue, removing the inserted SD card is a helpful solution. After removing, you’d better restart your device as well. Then, you can go back to Spotify and try the Queue feature again.
Solution 7. Disable Battery Optimization
Battery optimization is a standard feature on most modern mobile devices, designed to conserve power and extend battery life. While this can be beneficial for overall device performance, it may inadvertently interfere with the functionality of certain apps, including Spotify. To ensure Spotify operates smoothly, navigate to your device’s system settings and verify that battery optimization is disabled for the app.
Part 4. How to Play Spotify Queue Songs Offline without Premium
As we know, there are some limitations to operating the Queue function if you are not a Spotify Premium user. For instance, the capacity to skip or reorder songs is only available to Spotify Premium users. So, if you are a Spotify free user, how can you enjoy your favorite songs from Spotify Queue? Don’t worry, here’s the solution for you.
You can achieve this through a strong tool – Tunelf Spotify Music Converter. This tool is the best Spotify music downloader, which allows you to listen to Spotify music offline without a Premium subscription. By using Tunelf Spotify Music Converter, you can play your Spotify Queue songs as you like. Once installing this tool to your computer, you can convert and download your Spotify songs and playlists to various formats, including MP3, M4B, WAV, M4A, AAC, and FLAC. What’s more, you can also customize the output settings, such as channel, bit rate, and sample rate. Let’s see how to use it.

Key Features of Tunelf Spotify Music Converter
- Download Spotify playlists, songs, and albums with free accounts easily
- Convert Spotify music to MP3, WAV, FLAC, and other audio formats
- Keep Spotify music tracks with lossless audio quality and ID3 tags
- Remove ads and DRM protection from Spotify music at a 5× faster speed
Step 1 Import Spotify Queue Songs to Tunelf
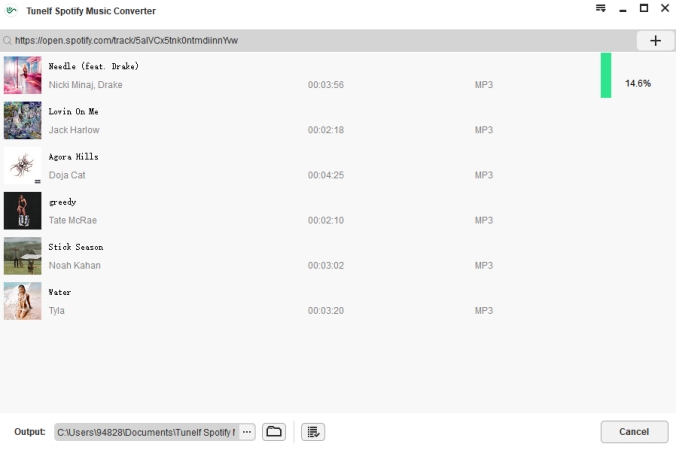
First, install Tunelf on your computer. Launch Tunelf and the Spotify app will pop up automatically. Choose the songs you want to download on Spotify. Then drag and drop the selected songs into the conversion field. Or you can copy the links of songs and paste them into the search bar. Then click the + button to add them to the conversion list.
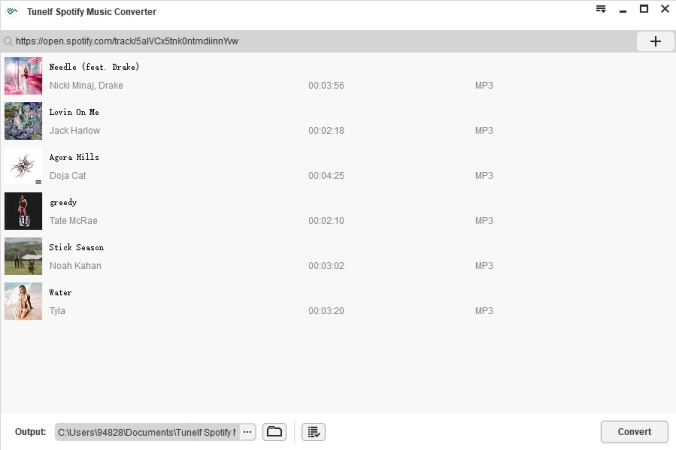
Step 2 Customize the Output Songs Parameters
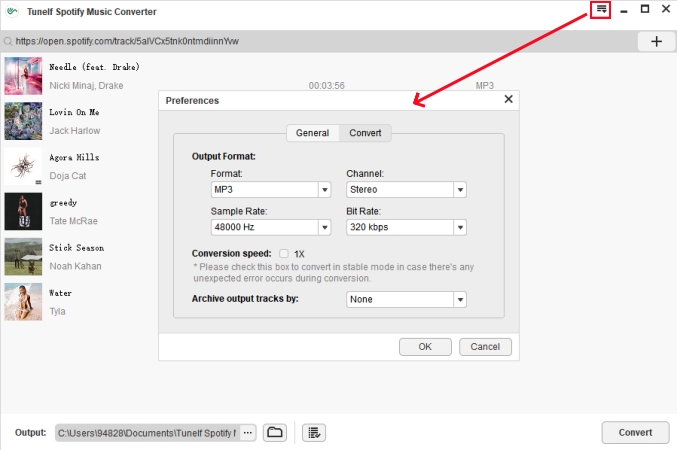
Head to the Menu bar, and click on the Preferences option to customize your output format, channel, and bit rate. You can convert your songs to MP3, M4A, AAC, M4B, WAV, and FLAC formats. Then click the OK button to keep the parameter settings.
Step 3 Start Downloading Spotify Songs
After finishing the parameter settings, click the Convert button to start converting Spotify songs to your computer. Wait for a few seconds, your songs will be downloaded to your computer. Then you can click the Converted button to browse all downloaded tracks.
Step 4 Reorder Spotify Songs without Premium
As we mentioned above, Spotify free users cannot reorder Queue songs. Now, with Tunelf, you can achieve this easily. For example, you can upload the downloaded songs to Windows Media Player. Just open your Windows Media Player on your computer. Choose Add Files in the upper right corner of the screen. Then add the music you just downloaded from Spotify to the play queue. After adding, you can reorder the songs in the media player playlist without restriction.
Part 5. Bonus Tips for Spotify Queue Management
Managing your Spotify Queue effectively can enhance your listening experience. If you are unfamiliar with this feature, here are some helpful tips:
How to See Queue in Spotify
On iPhone/Android
Step 1. Open the Spotify app on your phone.
Step 2. Tap on the Now Playing section at the bottom of your screen.
Step 2. Then tap on the Queue icon, and the queued songs will appear under Next In Queue.

On Desktop
Step 1. Open the Spotify app on your computer.
Step 2. Click on the Queue icon in the Now Playing section at the bottom right corner of the screen.
Step 3. Then the queued songs will be displayed under Next In Queue.

How to Remove Songs from Spotify Queue
On iPhone/Android
Step 1. Head to the Next to Queue section.
Step 2. In the Queue, tap the circle next to the songs you want to remove.
Step 3. Tap the Remove option on the bottom of the screen.

On Desktop
Step 1. Open the Queue playlist, and right-click the tracks you want to remove.
Step 2. Click Remove from Queue.

How to Change Queue Order on Spotify
On iPhone/Android
Step 1. Tap and hold the Three Bar icon next to the track in the Queue playlist.
Step 2. Drag and drop it to the position you want to reorder it to.
On Desktop
Step 1. In the Queue, click and hold the track you want to reorder.
Step 2. Drag and drop it to the position you want to reorder it to.
Conclusion
In this post, we offered you some effective solutions to fix Spotify Queue not working. If you don’t have a Spotify Premium account, we recommend you use the Tunelf Spotify Music Converter to download Spotify music for offline listening. With Tunelf Spotify music downloader, you will never encounter Spotify Queue not working issues again.
Get this product now:
Get this product now:


