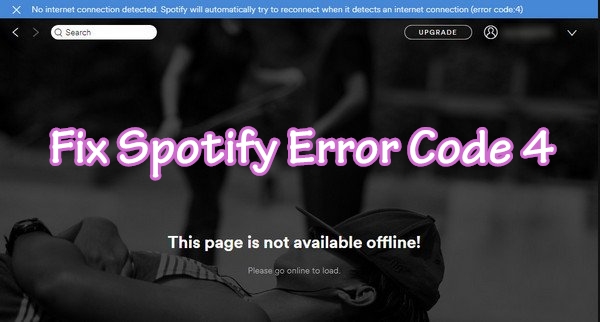
In today’s media-driven world, music streaming has become a hot market and Spotify is one of the leading names in that market. It is available on most modern devices, including Windows and macOS computers and iOS and Android smartphones and tablets. In the processing of using this service, some users would meet some issues like Spotify Error Code 3, Spotify Error Code 4, and more. Today, here, we’ll talk about how to fix Spotify Error Code 4 with ease.
Part 1. What is Causing Spotify Error Code 4?
Some users would encounter the prompt “No internet connection detected. Spotify will automatically try to reconnect when it detects an internet connection (error code: 4)” displays at the top of the Spotify program when using Spotify for listening to music. However, most people don’t know the reason why they met this issue on Spotify.
Spotify Error Code 4 could also be called Spotify Offline Error Code 4 which is caused by improper Internet connection settings. It’s designed to remind the users to check the internet accessibility in order to run Spotify properly. The incorrect Internet connection settings including DNS and proxy issues and software compatibility issues like incompatible firewall settings can cause the error.
Part 2. How Do I Fix Error Code 4 on Spotify?
Now you have known what is Spotify Error Code 4 and why you would meet this issue. Here we’ve collected the top 6 best workarounds for fixing Spotify Offline Error Code 4 in this section. Just try these solutions below to easily solve this issue.
Solution 1. Fix Spotify Offline Error Code 4 through DNS
The issue is often caused by improper Internet connection which cannot be accepted by Spotify servers. Thus, when you met this issue, the first thing you need to do is to check the DNS server on your computer. Just try to change your default DNS settings to fix the issue.
For Windows
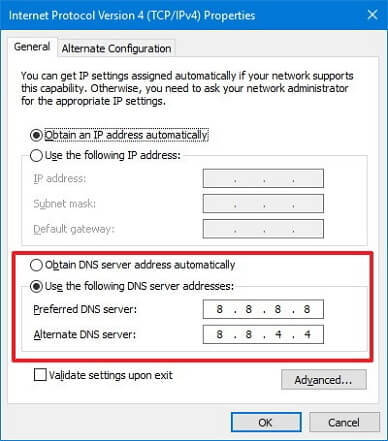
Step 1. Go to the Control Panel then click Network and Internet > Network and Sharing Center > Change adapter settings.
Step 2. Select the connection for which you want to configure Google Public DNS. For example:
- To change the settings for an Ethernet connection, right-click the Ethernet interface and select Properties.
- To change the settings for a wireless connection, right-click the Wi-Fi interface and select Properties.
Step 3. Select the Networking tab. Under This connection uses the following items, select Internet Protocol Version 4 (TCP/IPv4) or Internet Protocol Version 6 (TCP/IPv6) and then click Properties.
Step 4. Click Advanced and select the DNS tab. If there are any DNS server IP addresses listed there, write them down for future reference, and remove them from this window.
Step 5. Click OK then select Use the following DNS server addresses.
Step 6. Replace those addresses with the IP addresses of the Google DNS servers:
- For IPv4: 8.8.8.8 and/or 8.8.4.4.
- For IPv6: 2001:4860:4860::8888 and/or 2001:4860:4860::8844.
For Mac
Step 1. Launch System Preferences by clicking the System Preferences icon in the Dock.
Step 2. Click Network in the System Preferences window to open the network preferences screen.
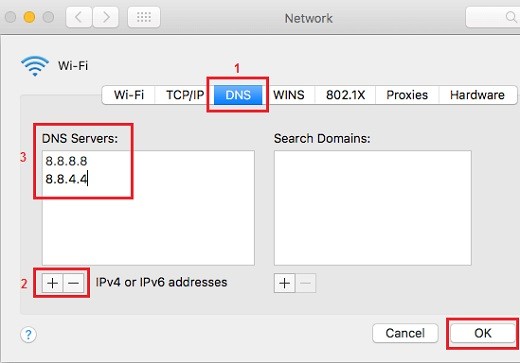
Step 3. In the Network settings, click the Advanced button then click the DNS tab to display two panes.
Step 4. Click the + (plus sign) in the bottom left corner of the screen to replace any listed addresses with, or add, the Google IP addresses at the top of the list:
- For IPv4: 8.8.8.8 and/or 8.8.4.4.
- For IPv6: 2001:4860:4860::8888 and/or 2001:4860:4860::8844.
Step 5. Finally, click the OK button to save the modification. Restart the Spotify app on your computer again and the Error Code 4 Spotify issue should be addressed.
Solution 2. Change Firewall to Fix Error Code 4 Spotify
Sometimes, there is no problem with your DNS settings. So, you could focus on Firewall settings now. If Spotify is blocked by the firewall settings on your computer, Spotify won’t access the Internet. To allow Spotify to connect to the Internet, just perform the below steps.
For Windows
Step 1. Open Control Panel on your computer by typing it in your search bar at the bottom left corner.
Step 2. Then choose the System and Security option then click the Windows Defender Firewall.
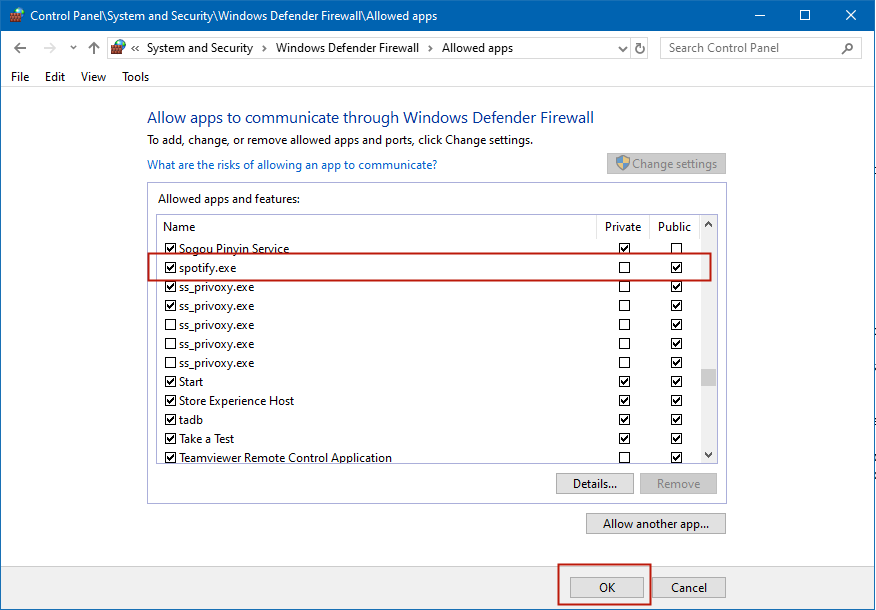
Step 3. Click Allow an app or feature through Windows Defender Firewall in the sidebar of the Windows Defender Firewall.
Step 4. Scroll down to find Spotify.exe from a collection of applications and check the corresponding box if it’s not ticked yet.
Step 5. Click the Ok to save the modifications.
For Mac
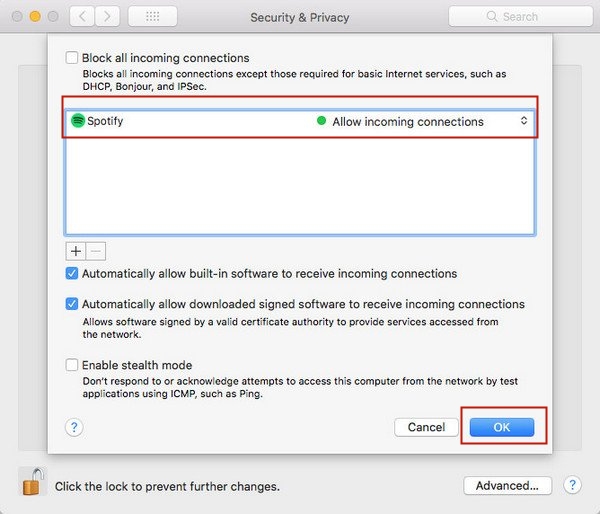
Step 1. To open Firewall panel on your Mac, choose Apple menu > System Preferences, click Security & Privacy then click Firewall.
Step 2. Click the lock icon at the bottom left corner to unlock Security & Privacy preferences. You will see a pop-up window where you need to enter an administrator name and password to unlock it so as to make further changes to firewall settings.
Step 3. In Firewall Options, click Advance then click Add button. You’ll be directed to the Application folder where you select the Spotify item on the list.
Step 4. Now use the Up Arrow and Down Arrow keys to set the limits for the Spotify app. Click Ok to apply the changes after let your Mac allow the incoming connection from Spotify.
Solution 3. Add Spotify to Antivirus App Exception List
Except for the firewall, the anti-virus software on your computer could also block the startup of Spotify by mistake. If you have anti-virus software installed on your computer, you could try to adjust the settings so as to raise the blockade.
Step 1. Fire up ESET Smart Security or ESET NOD32 Antivirus.
Step 2. Click Antivirus and Antivirus and antispyware > Exclusions > Add after activating the Advanced Setup window.
Step 3. Browse “C:\Users\(Your Username)\AppData\Roaming\Spotify” and find Spotify.exe.
Step 4. Click the Ok button to save the modification.
Solution 4. Fix Error Code 4 on Spotify via Proxy Settings
The settings of Proxy on the Spotify app also influence the use of your Spotify. To fix this error code issue, you could simply modify the settings of Proxy within the app with the below steps.
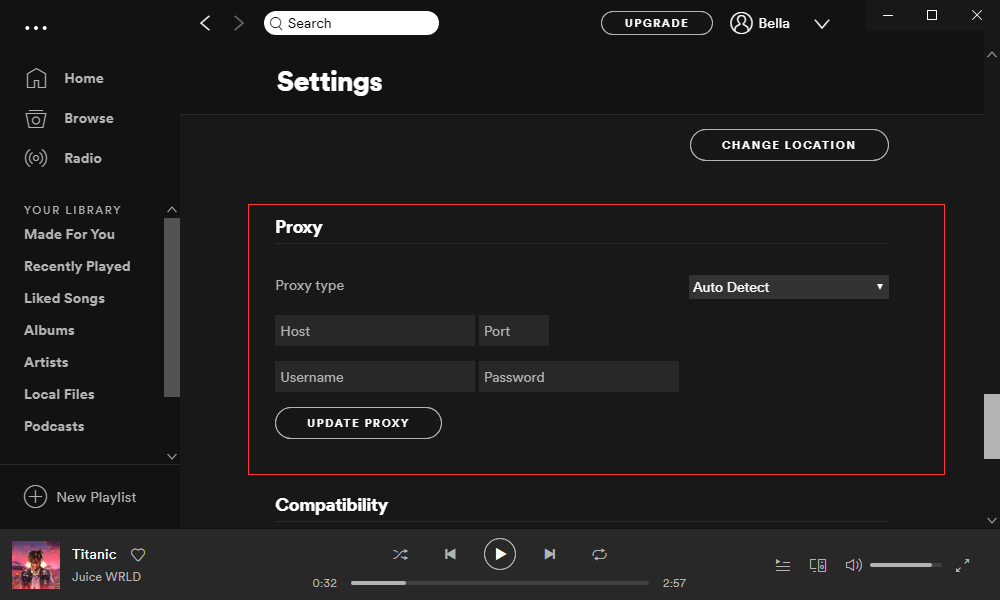
Step 1. Fire up the Spotify app on your computer and click the menu bar to go to the Settings window.
Step 2. Scroll down to the bottom of the page to find the Show Advanced Settings button and click on it.
Step 3. In Proxy settings, click Auto Detect and choose HTTP from the drop-down list.
Step 4. Finally, click Update Proxy to apply the modification for fixing the problem.
Solution 5. Uninstall and Reinstall Spotify on the Computer
If the error code still appears on your Spotify, the problem isn’t an Internet connection on the computer and could be fixed with the reinstall. You could try to uninstall the Spotify app on your computer then reinstall it again. Here’s the tutorial:
For Windows
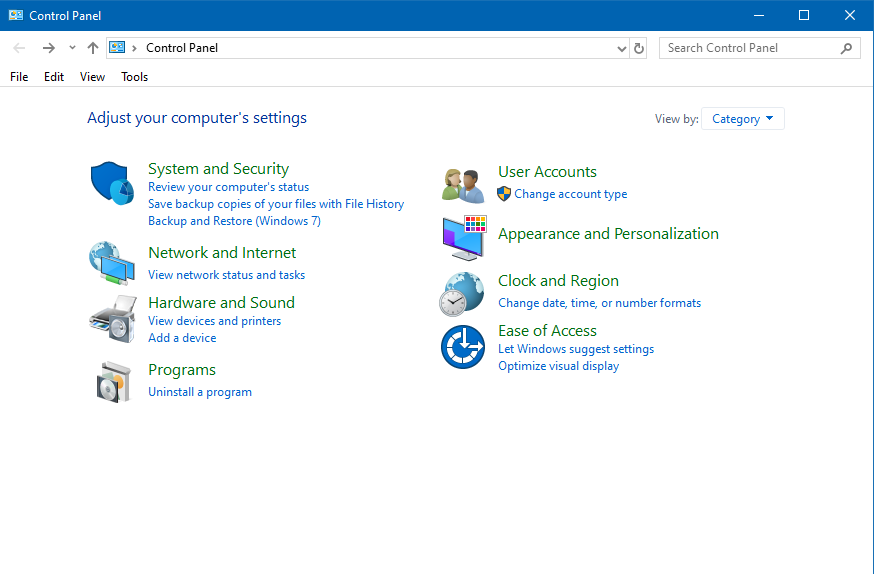
Step 1. Launch Control Panel on your computer by searching for it in your search bar.
Step 2. Click the Programs button and then click the Uninstall a program button under Programs and Features.
Step 3. Scroll down to find the Spotify app from a list of applications and right-click on the Spotify application then choose the Uninstall option.
Step 4. Then the Spotify app will be removed from your computer and you can launch Microsoft Store to install the Spotify app to your computer again.
For Mac

Step 1. Locate the Spotify app by clicking Applications in the sidebar of any Finder window. Or use Spotlight to find the Spotify app, then press and hold the Command key while double-clicking the Spotify app in Spotlight.
Step 2. To delete the Spotify app, just drag the Spotify app to the trash, or select the Spotify and choose File > Move to Trash.
Step 3. Then you’re asked for entering the password of an administrator account on your Mac. This is just the password you use to log in to your Mac.
Step 4. To delete the Spotify app, choose Finder > Empty Trash. Then try to log in to Spotify with your Spotify account again and your problem will be solved.
Step 5. Navigate to Spotify’s official website and try to install the Spotify application to your computer again.
Solution 6. Use Tunelf Tool to Download Offline Spotify Playlists
Still, bothered by Spotify no Internet connection detected with Error Code 4 on your Windows or Mac computer? You try to use Tunelf Spotibeat Music Converter. It is an easy-to-use yet professional downloading tool for Spotify that can download and convert Spotify music to several popular audio formats with a Free account.
Tunelf application can help you download all the playlists you crafted on your Spotify offline so that the incorrect Internet connection will not take effect on your Spotify. With its help, you could save Spotify music to the universal audio format like MP3 so as to play Spotify music on any media player and device offline without limit.

Key Features of Tunelf Spotify Music Converter
- Download Spotify playlists, songs, and albums with free accounts easily
- Convert Spotify music to MP3, WAV, FLAC, and other audio formats
- Keep Spotify music tracks with lossless audio quality and ID3 tags
- Remove ads and DRM protection from Spotify music at a 5× faster speed
Step 1. Add Spotify songs to Tunelf interface
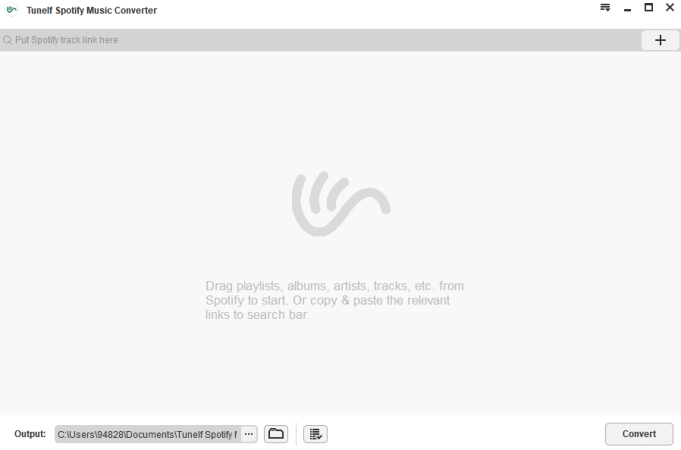
Launch Tunelf Spotibeat Music Converter then it will load the Spotify app on your computer automatically. Navigate to your library on Spotify and select songs which you want to listen to. Then you can either drag and drop them to Tunelf interface or copy and paste the URL of the track or playlist to the search box on Tunelf interface.
Step 2. Select the output format for Spotify music
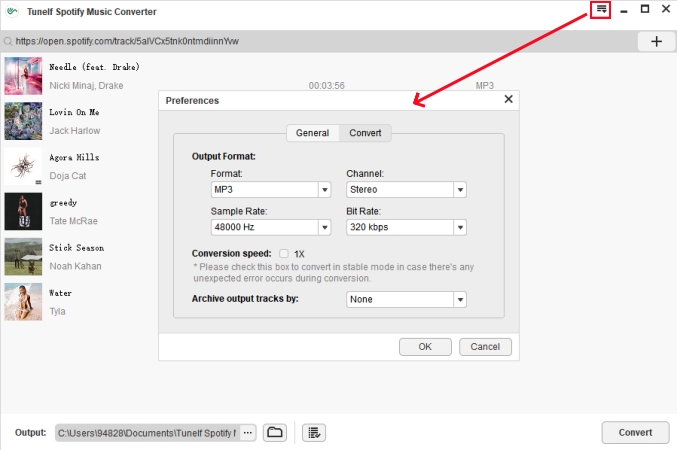
Now you’re required to complete the settings of the output audio. Just click the menu bar then choose the Preferences option. Switch to the Convert window, and you could choose the output audio format. Besides, you also could customize the bit rate, channel, and sample rate for better audio quality. Remember to click the Ok button to save the settings.
Step 3. Start to download music from Spotify
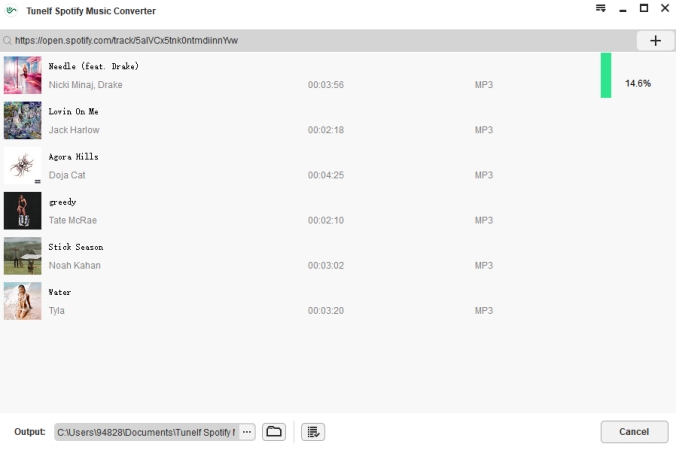
Back to the interface of Tunelf application then click the Convert button at the bottom right corner. Then Tunelf application starts to download and convert music tracks from Spotify to your computer. Once the conversion is made, you can browse all the converted songs in the converted history by clicking the Converted icon.
Bottomline
The above methods are supposed to address the Error Code 4 issue on Spotify with ease. However, with the assistance of Tunelf Spotibeat Music Converter, you could solve the problem once and for all as the problem is caused by the Internet connection in fact. Tunelf application can help you download offline Spotify music tracks.


