Spotify is the most popular online music streaming service around the world. Many users like Spotify not only because its music library which contains a vast catalog of tracks and playlists, but also because it provides all kinds of functionalities. For example, to satisfy users’ social demands, Spotify allows you to connect your Spotify with your Facebook account. Once you do so, you can easily share music with your friends and see what they are listening to.
However, the Facebook data scandal has raised significant concerns among users regarding privacy issues. Additionally, some users don’t like the automatic Spotify music sharing on Facebook. Taking all these factors into consideration, many users want to disconnect Spotify from Facebook. If you are also looking for the methods to reach it, you should not miss this post. Let’s follow this post to learn how to sever the connection between your Spotify and Facebook accounts in 2 effective methods. By following the detailed tutorial in this post, you can disconnect Spotify from Facebook quickly and safely.

Part 1. How to Disconnect Spotify from Facebook via Facebook
Using the Facebook app or its official website is an easy method to disconnect your Spotify account. In the Settings section of Facebook, you can see all the services that your Facebook account is connected to. The steps below can help you to unlink Spotify from Facebook directly.
• On Computer
1. Open the browser on your desktop and visit facebook.com to log in to your account.
2. Click your account icon in the upper right corner. Then, you should select Settings & privacy > Settings.
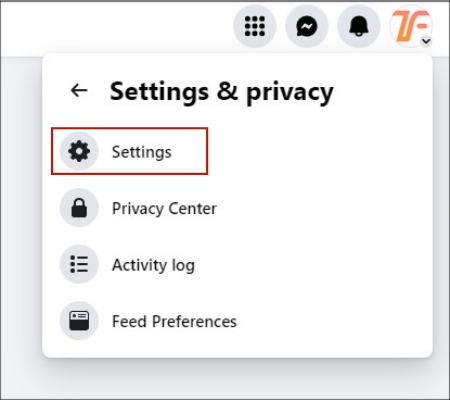
3. After that, you will be led to the Settings section. Scroll down the left bar to find and click Apps and Websites.
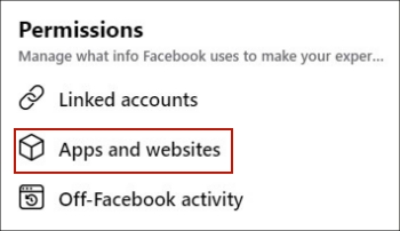
4. Now you can see all the apps and websites that you’ve connected to your Facebook account by logging in or connecting an account. Find Spotify and click the Remove button next to it.
5. Once done, you removed Spotify from your Facebook account successfully.
• On Mobile Phone
1. Make sure that you already installed the Facebook app on your mobile device. Then, you can open it and sign in.
2. Tap the Menu icon at the far right of the bottom toolbar.
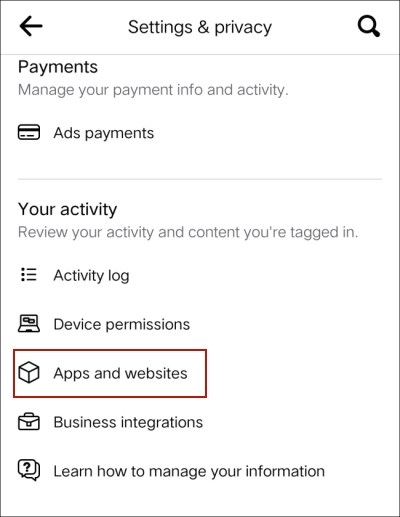
3. Select Settings & Privacy > Settings.
4. After that, you need to find and tap Apps and Websites > Spotify > Remove. Then, you will succeed in unlinking your Spotify and Facebook.
Part 2. How to Disconnect Spotify Account from Facebook via Spotify
There are multiple ways to sign in to Spotify, one of which is through your Facebook account. If you wish to disconnect Spotify from your Facebook account, you have the option to remove the Facebook login integration from your Spotify account settings. However, it is important to know that you can’t disconnect the accounts through Spotify if you signed up for Spotify with your Facebook account. In this case, you will need to create a new account and choose another method to log in.
Disconnect Facebook from your Spotify account
1. Open the Spotify desktop app and go to the Settings section. You can find it by clicking your profile icon > Settings at the top right corner.
2. Scroll down to click DISCONNECT FROM FACEBOOK under Social.
Remove the Facebook login method
1. Launch the Spotify app on your desktop, and then click your profile icon > Account.
2. Alternatively, you can visit the Spotify web player and go to your account page directly.
3. Under the Current login methods section, find Facebook and click the Remove option next to it.
4. Select Yes, remove to make a confirmation, and remove it completely.
Note
The Spotify mobile app does not support all these operations. No matter whether you want to connect or disconnect your Facebook account on Spotify, you will need to complete all the steps on your desktop.
Part 3. More Tips: How to Keep Spotify Music After Disconnection
It’s not difficult to break the connection between Spotify and Facebook via the aforementioned methods. However, a unique scenario arises if you initially signed up for Spotify using your Facebook account. In this case, you will find that there is no remove Facebook option within Spotify’s settings. Now you have 2 options. First, you can deactivate your Facebook account but still log in to Spotify with the email and password of your Facebook account. Second, you can create a new Spotify account without your Facebook account.
If you select the second option, your listening history and all the saved music in your music library will be lost. Here comes the problem – how to keep the Spotify music in your library after disconnection? This post provides one possible solution, which is to download the Spotify songs and playlists you like on your local device to save them permanently. To do so, a powerful third-party tool is indispensable – Tunelf Spotify Music Converter.
Best Tool to Download Spotify Music Freely: Tunelf Spotify Music Converter
Tunelf Spotify Music Converter is a professional music converter designed for Spotify users. Whatever Spotify account you have, you can easily use this tool to download the Spotify music you like. Since the Tunelf program smartly removes the DRM protection, you are able to save the downloaded music files permanently without worrying about your subscription expiring. If you want, you can also utilize the Tunelf program to convert the music to multiple formats, like MP3, WAV, FLAC, AAC, M4A, and M4B. What counts most is that the whole downloading and converting process is lossless. Tunelf program ensures your music listening experience by maintaining the original music quality and ID3 tags. After downloading, it’s a piece of cake to import them to an MP3 player or other devices for offline playback.
Key Features of Tunelf Spotify Music Converter
- Download Spotify playlists, songs, and albums with free accounts easily
- Convert Spotify music to MP3, WAV, FLAC, and other audio formats
- Keep Spotify music tracks with lossless audio quality and ID3 tags
- Remove ads and DRM protection from Spotify music at a 5× faster speed
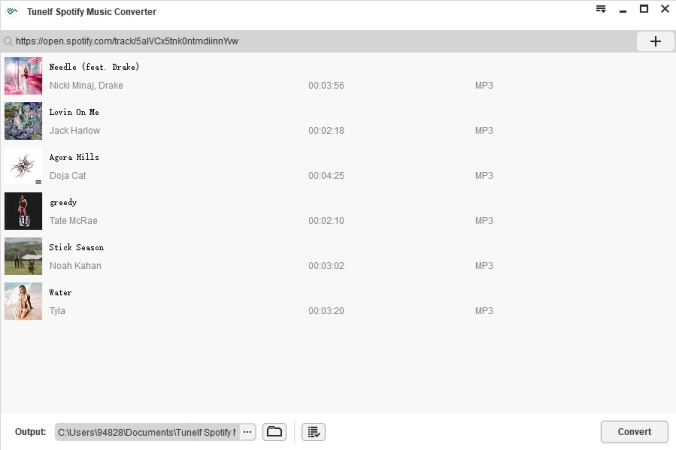
Step 1 Add your Spotify music to Tunelf
Depending on the operating system of your computer, you can download and install the Tunelf Spotify Music Converter Windows version or Mac version. Once installed, double-click its icon to launch it on your desktop. Then, it will help to open the Spotify app at the same time. Next, you can log in and decide on the tracks or playlists you want to download. You can directly drag and drop them to the interface of the Tunelf program. Or, you can consider copying and pasting the URL link of the music into the search bar.
Step 2 Set the audio output settings
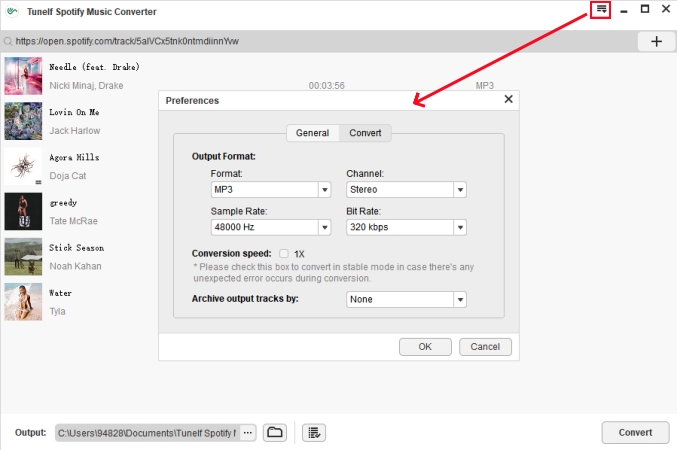
Head to the output settings section by hitting the menu icon > Preferences > Convert. Here you can customize the music parameters, including output format, channel, bit rate, and sample rate. When you finish the adjustment, just click OK to save it.
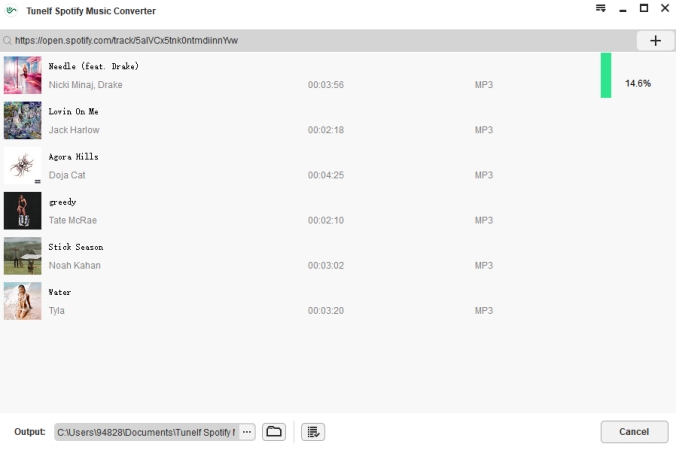
Step 3 Download and convert Spotify music to save forever
If you already added all the songs or playlists from your library, you can now click the Convert button to begin downloading. Wait for a while, then you can click the Converted icon to find the downloaded music files on your local computer. Now, feel free to enjoy the downloads offline at any time you want.
Part 4. Conclusion
Connecting Facebook and Spotify accounts used to be a good choice for social intentions. If now you want to disconnect Spotify from Facebook, you can either reach it on the Facebook website or the Spotify settings. After disconnection, you may lose your preferred songs in your library. To save and keep them permanently, you will need a good helper – Tunelf Spotify Music Converter. It can remove Spotify’s DRM protection and help you get the music you like locally.
Get this product now:
Get this product now:


