Spotify is an outstanding music streaming service, giving you access to a vast library of millions of songs and expertly curated playlists. To enhance your listening experience, Spotify includes a queue feature that lets you control the order of upcoming tracks without changing your current playlist or album. If you’re looking to reset your music lineup or start fresh with a new selection, learning how to clear queue on Spotify can be helpful. Fortunately, this post provides a complete tutorial on how to clear your Spotify queue across multiple devices, including iPhone, Android, Windows, and Mac. Take a few minutes to go through it, and you’ll find all the information you need!

Part 1. What Is Queue on Spotify?
With the queue feature on Spotify, you will have the ability to arrange a list of songs that will play next. Basically, Spotify queue offers you control of the order of your music tracks. You can perceive it as a temporary mini playlist where you can add, remove, clear, or reorder to customize what plays afterward. It is helpful when you want to mix songs in different genres or moods without cluttering up your curated playlists. Without doubt, it is an amazing feature that gives you flexibility and convenience while enjoying Spotify music. You can utilize it to customize your listening experience and make a dynamic music flow.
Spotify queue contains 3 sections:
Section 1. Next from
This is the primary section of your Spotify queue. When you play a playlist, album, podcast, or artist, the upcoming songs or episodes appear here in sequence. If Shuffle isn’t enabled, these tracks will display in their original order.
Section 2. Next in queue
This is the section that contains the music tracks that you added manually. You can add songs, albums, or playlists to this section by clicking the three dots icon > Add to queue.
Section 3. Next up
This section only shows when you enable the Spotify Autoplay feature. It displays the automatically generated songs.
Part 2. How to Clear Spotify Queue on iPhone/Android
After learning the basic information about Spotify queue, it’s high time to focus on how to remove and clear songs from your queue. And next up we are going to show how to do that on the Spotify app on your iPhone or Android devices.
1. Open Spotify on your mobile phone and sign in to your Spotify Premium account.
2. Tap the Now Playing bar at the bottom of the screen. If you don’t see it, you may need to play a song first.
3. In the lower right corner of the Now Playing screen, tap the Queue icon.
4. For music tracks on the Next in Queue section, you can clear them all at once by selecting the Clear Queue button.

5. Alternatively, you can tap and select the box before one song and then hit Remove to clear it.

Part 3. How to Clear the Queue on Spotify Desktop
If you are accustomed to enjoying Spotify music on your Windows or Mac computers, you should follow the guidance in this part. Whether you are using the Spotify desktop app or its web player, the steps below work.
1. Launch the Spotify app or visit its web player on any of your browser apps.
2. Hover your cursor over the right corner of the bottom Now Playing bar, and click the Queue icon.
3. Find the Next in queue section, and then you can click the Clear queue button to remove all the tracks in it instantly.
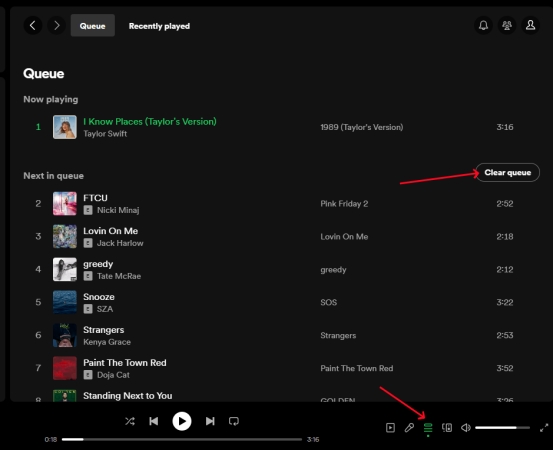
4. For other songs under the Next from or Next up section, you need to right-click the song and select Remove from queue.

5. If you need to remove multiple songs, you can utilize the Ctrl or Shift keys to select them all quickly. After that, press the Backspace key and you can clear them at once.
Part 4. How to Manage Spotify Queue Offline Without Limits
Through the tutorial above, it’s a breeze for you to clear your Spotify queue. However, some of you may encounter issues like the Spotify queue feature not working or can not find the queue icon. Well, this feature requires you to have a Spotify Premium account. For those who are using Spotify Free, this can be a troublesome issue that affects their music experience. No worries. Here we’d like to introduce an alternative method that allows you to manage your Spotify music queue without any limit. That is to download your Spotify music tracks as local files and play them on any other media player. This is easy to talk hard to do since Spotify applies DRM protection on all its music. A timely solution you can use to remove DRM is the Tunelf Spotify Music Converter.
Tunelf Spotify Music Converter is a powerful and functional converter designed for both Spotify Premium and Spotify Free users. You can use it to download songs, playlists, albums, and podcasts from Spotify to your local computer. It even supports various audio formats to clear your worry about compatibility issues. What you can choose from includes MP3, WAV, FLAC, AAC, M4A, and M4B. The music tracks downloaded by the Tunelf software can be saved on your device permanently and imported to other players or devices for offline playback. If you are looking for a personalized experience, you can not miss the Tunelf software since it allows you to reset the audio settings as you wish.
Key Features of Tunelf Spotify Music Converter
- Download Spotify playlists, songs, and albums with free accounts easily
- Convert Spotify music to MP3, WAV, FLAC, and other audio formats
- Keep Spotify music tracks with lossless audio quality and ID3 tags
- Remove ads and DRM protection from Spotify music at a 5× faster speed
Step 1 Add songs or playlists from Spotify to the Tunelf software
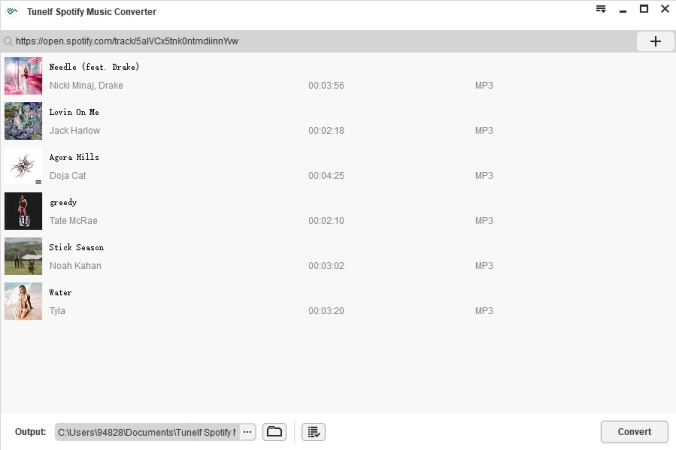
Choose the Windows or Mac version of the Tunelf Spotify Music Converter and install it on your desktop. Then, launch it and it can help you open the Spotify app automatically. Now, you are able to load the songs or playlists you want to download by dragging and dropping them to Tunelf’s interface. Alternatively, you can copy their URL links and paste them at the top box on Tunelf’s interface. Then, click the add icon next to it and you are done.
Step 2 Reset the audio output settings
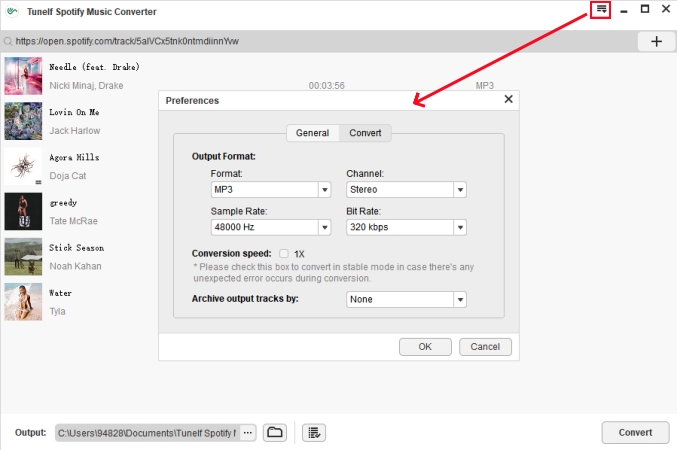
Click the menu icon in the upper right to bring up the Preferences window. Then, switch to the Convert tab. Here you need to set the audio parameters depending on your needs, such as audio format, channel, sample rate, and bit rate. When you finish, click OK to save your changes.
Step 3 Download Spotify songs/playlists to local files
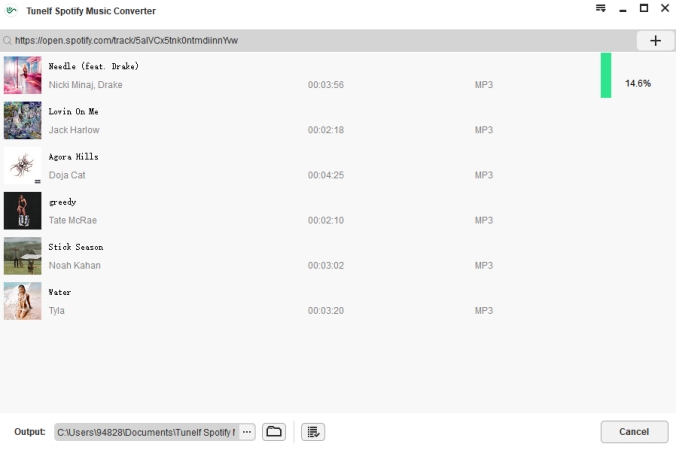
Click the Convert button and the Tunelf software will do the rest for you. You just need to wait for a while, and the songs you added to Tunelf will be downloaded and stored on your computer. To find its exact location, you need to click the Converted icon. Now, feel free to import them to other players or devices for offline playback.
Part 5. FAQs about Spotify Queue
Q1: What does add to queue mean in Spotify?
A: Add a song to the queue on Spotify means to add it to the end of the queue. It will play next after the currently playing song.
Q2: Why can’t I see the queue button?
A: The queue will only appear for Spotify Premium subscribers. You should check your Premium account status and make sure it is still valid. You’d better update to the newest version of the Spotify app as well.
Q3: How to shuffle queue Spotify?
A: You can not shuffle the queued songs that you added manually. You can only shuffle playlists or albums on Spotify. If you want to listen to something that meets your music taste at random, enable the Smart Shuffle feature.
Q4: How to fix Spotify queue not working?
A: If you encounter the Spotify queue not showing or not working issue, you can try solutions like updating Spotify or clearing Spotify cache. Read the post below to get more helpful solutions in detail.

Is your Spotify Queue not showing properly? Here we find some solutions for you. Check his post to make your Spotify Queue work again.
Part 6. Summary
Clearing your Spotify queue is a simple way to keep your listening experience organized and free of unwanted tracks. After reading this post, I believe you will not be bothered by the question of how to clear queue on Spotify anymore. Remember, whenever you need the best Spotify music experience, use the Tunelf Spotify Music Converter.
Get this product now:
Get this product now:


