A ringtone is a piece of music made by phone when you receive an incoming call. Do you remember what kinds of ringtones you have set? These days, there are still many people who would like to set the music they love as a ringtone. But now, that’s not easy for us to use a song from streaming services, such as Apple Music. If you are an Apple Music user, you may want to know how to set Apple Music as Ringtone. Luckily, you have landed in the right place. Here we will tell you how to set Apple Music as ringtone on your phone with simple steps. Just follow us and you will figure out the answer.

Part 1. Can I Make Apple Music a Ringtone?
Before reading this article, you may fail to set Apple Music as a ringtone directly. Actually, Apple Music can’t be set as a ringtone since it is in an encoded AAC or ALAC format. The Apple Music M4P file can only be played within the Apple Music app and some certain apps. So you will fail to set Apple Music as a ringtone. But that’s not totally impossible. You will need to remove the limitation of Apple Music. Therefore, what you need to do is to convert Apple Music to a plain format, such as MP3. When you get the normal Apple Music files, you can set Apple Music as a ringtone without limit. For your information, ringtones stored on iPhone use the MPEG-4 file format, with an extension .m4r. Android smartphone supports MP3, M4A, WAV, and OGG formats to be set as a ringtone.
Part 2. How to Download and Convert Apple Music to MP3
As mentioned before, to remove the limitation of Apple Music, you need to convert Apple Music encrypted AAC files to MP3 files. In this part, we will introduce a great tool for converting Apple Music to MP3. To download and convert Apple Music to MP3 with high quality, you may need Tunelf Audio Converter. Tunelf Audio Converter is a comprehensive tool to remove the limitations of Apple Music and convert it to MP3, AAC, FLAC, WAV, M4A, and M4B. The info tags of the Apple Music songs will be preserved too. It also supports batch conversion at 30× faster speed which can make you free and save much time. Moreover, the tool can keep the original audio quality after the conversion, so you can get a good listening experience. The key features of Tunelf Audio Converter are as below.
Key Features of Tunelf Audio Converter
- Convert Apple Music to MP3, WAV, FLAC, AAC, and other audio formats
- Remove DRM from Apple Music, iTunes audios, and Audible audiobooks
- Preserve the converted audio with lossless audio quality and ID3 tags
- Support the conversion of audio format at a 30× faster speed in batch
The following tutorial will show how to use Tunelf Audio Converter to remove the limit of Apple Music and convert it to MP3. To download and install Tunelf software on your computer, click the download button above. And make sure the iTunes app is installed on your Windows computer.
Step 1 Import Apple Music You Need
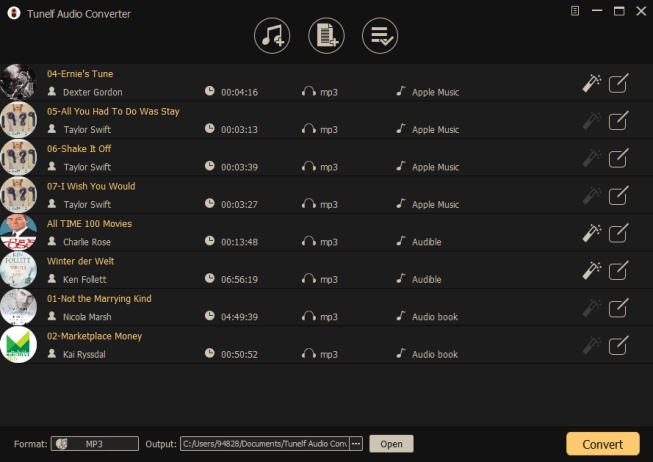
Launch Tunelf Audio Converter on your computer and then click the Add button to import the Apple Music files you need to convert. You may also drag and drop audio files from the software to the Tunelf converter’s primary interface.
Step 2 Set MP3 as the Output Format
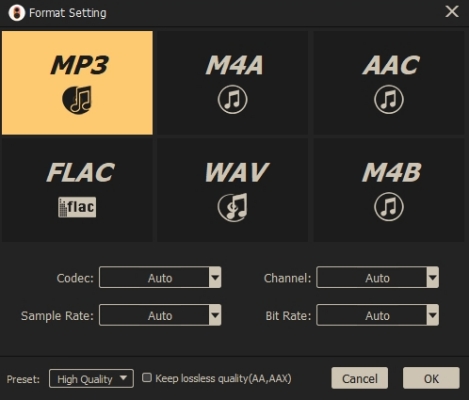
You may now change the files to make them compatible with your device. To convert an audio file, it provides a number of output formats. Go to the Format tab and select MP3 as the output format. Other audio settings, such as codec, bit rate, sample rate, and channel, can be customized. At last, to confirm all the settings, click the OK button.
Step 3 Convert Apple Music for Ringtone
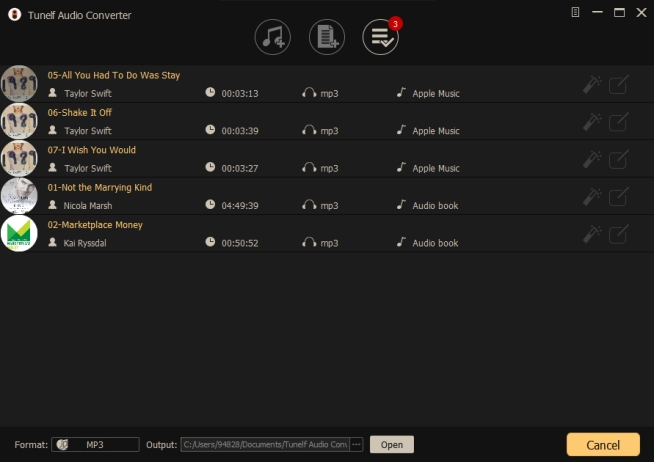
After you have completed the output parameters, click the Convert button to begin the conversion process of converting the Apple Music files to MP3. You can find the converted music files when the procedure is finished. Choose the Converted option when the conversion is done. Here you can get the converted Apple Music files in MP3.
Part 3. How to Set Apple Music as Ringtone on iPhone
When you get the MP3 Apple Music files, you can set Apple Music as a ringtone easily. If you want to set Apple Music as a ringtone on your iPhone, you need to convert MP3 Apple Music files to M4R for iPhone ringtone with iTunes. Or you can utilize the GarageBand app to reach it.
3.1 Make Apple Music Ringtone via iTunes
Step 1. Add the converted Apple Music tracks to your iTunes library.
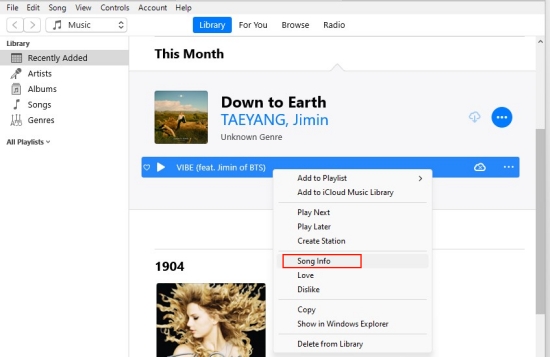
Step 2. Select Song Info from the context menu of any song you wish to use as a ringtone.
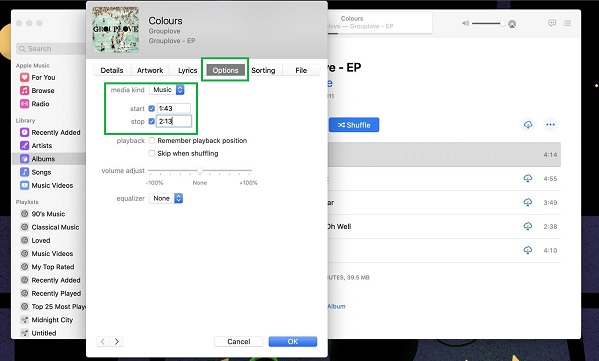
Step 3. Select Options to customize the ringtone’s start and stop times.
Step 4. Click OK, then right-click the song and select Create AAC Version.

Step 5. Drag the updated 40-second version out of iTunes and into your preferred folder.
Step 6. Delete that version from iTunes and restore the original’s Start/Stop Time settings.
Step 7. Navigate to the folder holding the 40-second AAC file you dragged from iTunes, then change the file extension from .m4a to .m4r. To add it to iTunes’ Tones collection, double-click it.

Step 8. Sync your iPhone and iTunes, then the Apple Music songs will be added to your ringtones list.
Step 9. It’s time to open your phone and go to Settings. Then, you should choose Sounds & Haptics – Ringtone. You can choose the Apple Music song and set it as your ringtone.

3.2 Make Apple Music Ringtone via Garageband
Step 1. Upload the downloaded Apple Music songs to iCloud.
Step 2. Open GarageBand on your Mac computer and create a new project. Import the music file you want to set as a ringtone to it, then choose Share > Project to GarageBand for iOS.
Step 3. Head to the GarageBand app on your iPhone and tap Browse > Select. Thus, you can see the files you shared from your Mac computer. Choose one according to your preference.
Step 4. Now you can edit and mix it on GarageBand as you wish. You need to pay attention to its length. If you want to apply it as a ringtone, don’t forget to shorten it within 30 seconds.
Step 5. When you finish, select the Share icon > Ringtone. Then, you should enter one name and tap Export.
Step 6. After the audio is finished exporting, you can go to Settings > Sounds & Haptics > Ringtone to set it as your iPhone ringtone.
Part 4. How to Use Apple Music for Ringtone on Android
For Android users, you can directly import the downloaded Apple Music and set it as a ringtone. You can follow the guide below step-by-step.
Step 1. First of all, transfer the converted music files to your phone with a USB cable.
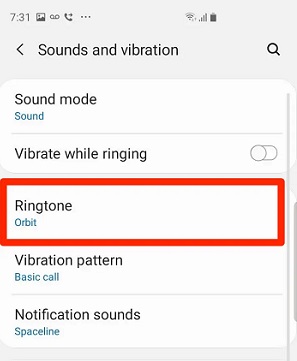
Step 2. Head to Settings, then tap Sounds and Vibration > Ringtone.
Step 3. Tap SIM 1 or SIM 2 and you can see all the ringtones on your phone.
Step 4. Tap the + icon to add MP3 Apple Music files.
Step 5. Select the Apple Music song you like from the list. If the music files don’t show up, just tap Folders to add the file.
Step 6. Tap Done to finish the settings.
Part 5. Summary
To set Apple Music as ringtone is not so difficult. Apple Music is in an encrypted format, so all you need is to convert Apple Music to MP3 format for the settings. Tunelf Audio Converter is the key tool. It can download and convert Apple Music for adding it to your iPhone or Android device and setting it as a ringtone. To see more about Apple Music, you can click the following download link.
Get the product now:
Get the product now:


