How to retrieve my iTunes Library? Hi, I installed a separate Apple Music application because I wanted to see how it works. Unfortunately, this application has no connection with Last.fm, so I don’t want to use it for now. I uninstalled AM but my entire itunes library is completely gone. How can I restore it?
— User from the Apple CommunityFor most Apple users, it is common that they lose music on iTunes or accidentally delete an iTunes playlist. However, you don’t need to worry that you cannot find your tunes saved or purchased on iTunes. In this guide, we will walk you through how to recover iTunes music and now follow the below methods to recover lost iTunes music on your computer.
Method 1. Re-add Your iTunes Music Files
Sometimes you can not find your tracks in the iTunes library, but the music files are still stored on the local folder of your computer. Under this circumstance, you can back up all the music files and add them to your iTunes library again.
1) If you are using a Mac computer, you need to go to the Finder app and click the Music folder to find your iTunes music files. For Windows users, the iTunes music files can be found on Users\user name\Music\iTunes.
2) Once you find the files, you can open the iTunes app now. Then, move the cursor over the top toolbar and click File > Add File to Library/ Add Folder to Library.
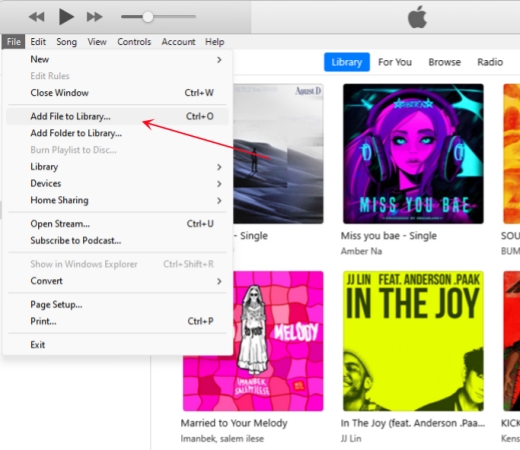
3) Choose the music files that you found before. So, you can add them to your iTunes library again.
Method 2. Recover iTunes Music from Backup
You can restore your iTunes music from your external drive to your computer if you have the foresight to back up your iTunes music in advance. Then you can recover lost iTunes music from your external hard drive with ease. Here’s how to do it:

1) Quit iTunes and go to This Computer, then click your external drive.
2) Select your iTunes folder, then right-click and choose Copy.
3) Go to the location on your computer where you want your iTunes library, then right-click and choose Paste.
4) Hold down the Shift key while opening iTunes.
5) When a message pops up that asks you to choose iTunes Library, click Choose Library.
6) Choose the location where you copied your iTunes folder and click Open then choose the iTunes Library.itl file in inside.
Method 3. Retrieve iTunes Music from iCloud
An external hard drive isn’t the only way to back up your iTunes library these days. One of the best features of iCloud is that it retains a record of every single thing you’ve ever bought or downloaded from the iTunes Store. So, you can try to retrieve iTunes music from iCloud.
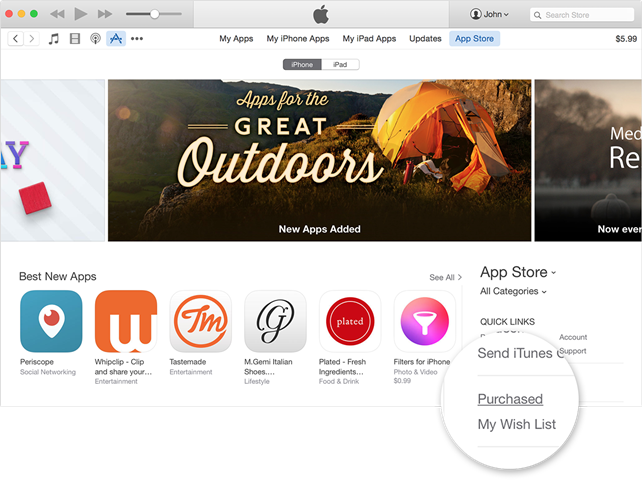
1) Open iTunes on your computer and sign in with your Apple ID and password.
2) Go to select Store at the top of the iTunes window and select Purchased below Quick Links.
3) Choose Music near the top right of the page that appears, then iTunes shows your purchases available for download.
4) To restore the iTunes music library, select the iCloud Download button.
Method 4. Get iTunes Music Back from iPhone
As a user of iPhone, iPad, or iPod, you can get your iTunes music back to your computer easily. When you sync your iTunes music to your iPhone, iPad, or iPod, you can transfer them to your computer even though you have lost on your computer.
1) Use a useful USB cable to connect your iPhone to your computer.
2) iTunes will immediately detect your iPhone once connected successfully.
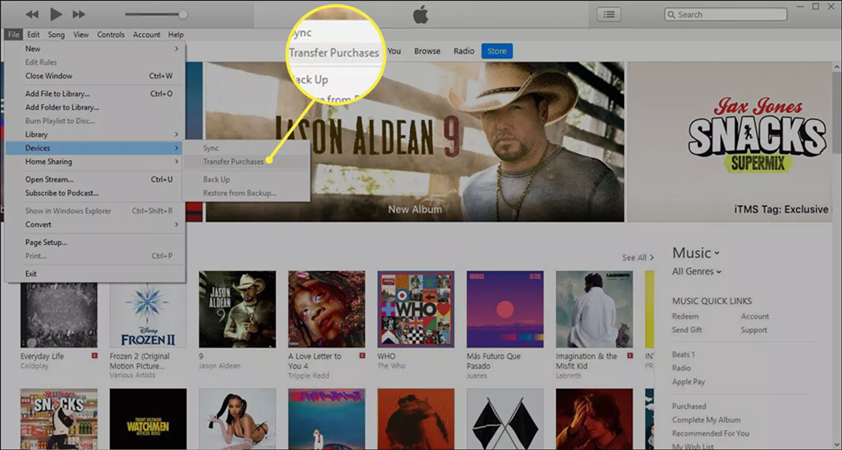
3) Go to File > Devices > Transfer Purchases from [device name] and prepare to transfer your iTunes music from your iPhone to your computer.
4) Now reauthorize your computer to be able to play your transferred iTunes music on iTunes.
Method 5. Restore iTunes Music from iTunes Match
iTunes Match is another option for you to solve your problem of restoring iTunes music. If you subscribe to iTunes Match, iTunes Match will create an exact copy of your purchases or downloads in iCloud. Now you can restore your iTunes library with the below steps.
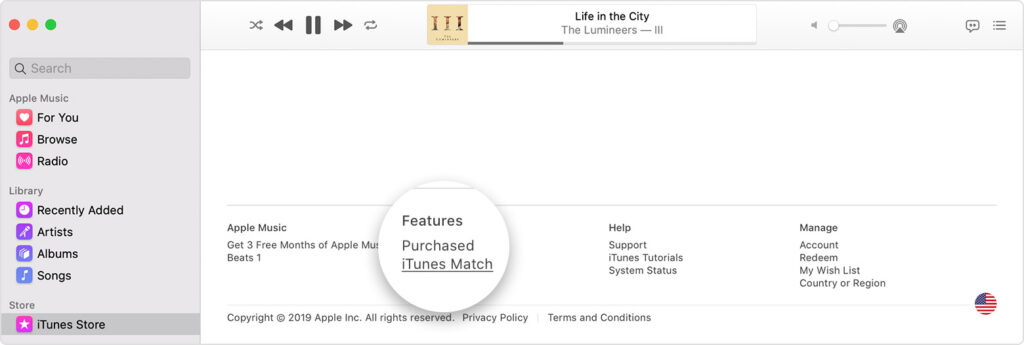
1) Launch iTunes on your computer and select Store at the top of the iTunes window.
2) Scroll to the bottom of the Store window and click iTunes Match under Features.
3) Sign in with your Apple ID and password then iTunes Match automatically scans your music library for matches.
4) Once your music library is uploaded, you’ll see Download next to songs that are available for download from iCloud.
5) Now you can click Download appears next to music and your iTunes music will be saved to your device.
Method 6. Recover iTunes Music Files via Time Machine [Mac]
Time Machine is a backup software for macOS. It will back up your entire system, files, applications, and system settings automatically. When you find you lose your iTunes library, this feature can help you restore your Mac to a previous state and get your iTunes library back.
1) Open Finder on your Mac computer. Then, search to find Time Machine.
2) After that, you can use the timeline which is located at the edge of the current screen to find your lost iTunes songs.
3) You can select and press the Space Bar to preview.
4) Once you found all the lost iTunes files, you can now click Restore to get them back.
Method 7. Convert iTunes Music to MP3 Locally for Backup
The above four solutions can help you recover your iTunes music after losing your iTunes music. But you could try to back up your iTunes music on more platforms, then you can recover them easier. In fact, all music tracks from iTunes, especially those older purchased songs, are encoded in a Protected AAC format. So, you’re not able to save them to other cloud platforms or use them on other players.
To convert iTunes songs to MP3 would be a great solution for you to back up your iTunes music. Then you can move your iTunes music to other devices or upload them to more free cloud platforms such as Google Drive for backup. Here we’ll introduce a powerful music converter specifically designed for iTunes audios – Tunelf iTunes Audio Converter. With it, you can remove DRM from iTunes music and convert iTunes songs to MP3 for use without limits.
Key Features of Tunelf Audio Converter
- Convert Apple Music to MP3, WAV, FLAC, AAC, and other audio formats
- Remove DRM from Apple Music, iTunes audios, and Audible audiobooks
- Preserve the converted audio with lossless audio quality and ID3 tags
- Support the conversion of audio format at a 30× faster speed in batch
Step 1 Import iTunes songs to the converter
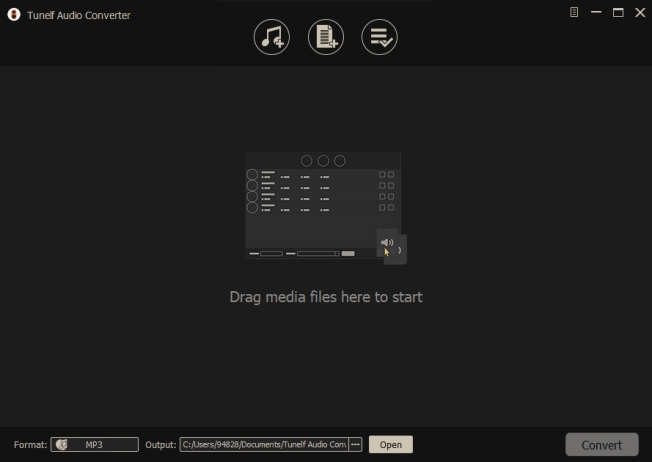
Launch Tunelf Audio Converter on your computer, and meantime, iTunes will automatically load. Then you can click the Add icon to import iTunes M4P files you want to transfer to your Android device. Or you can simply drag and drop your target audio files from iTunes or the folder to the Tunelf interface.
Step 2 Set the audio parameters for iTunes songs
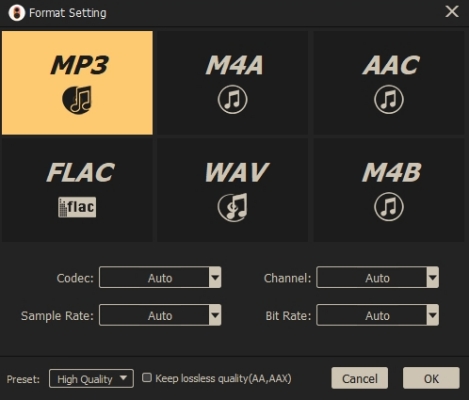
Once your iTunes M4P files are loaded into the Tunelf app, click the Format panel at the bottom left-hand corner. A window of format setting will appear where you can set the output audio parameter per your need. You can set the output format as MP3. To retain the original audio quality, you need to set the bit rate, sample rate, and channel.
Step 3 Start to convert iTunes songs to MP3
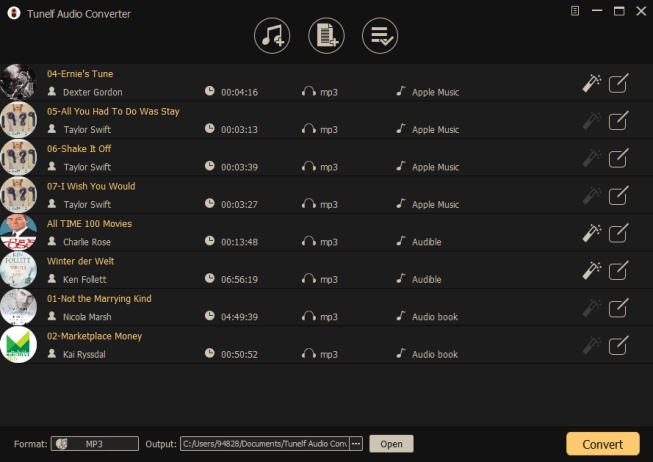
After all your settings are done, you can now click the Convert button and Tunelf Audio Converter will automatically convert iTunes M4P to MP3 or other audio formats you set. You can then locate all your converted iTunes M4P files by clicking the Converted button and begin to transfer them to your Android phone for listening anytime.
Conclusion
With the above four options, you can easily restore your iTunes music if you back up them in advance or subscribe to Apple services like iTunes Match or iCloud. However, Tunelf Audio Converter could make you prepare to back up your iTunes music on more storage platforms or devices if you don’t want to subscribe to iTunes Match or iCloud. What’s more, you can listen to iTunes music anywhere and anytime.
Get the product now:
Get the product now:


