The device is wildly popular for the unbeatable motivation it brings to home exercising. In fact, it is a rare indoor exercise bike with a built-in speaker, and a large touchscreen display, and even goes ahead to present a membership plan to deliver inspiration right into your home. If you want an instructor-led studio ride at home, Peloton brings the right energy with its classes that are available on the smart TV or live streaming from the Peloton app.
The only problem? It does not allow you to access Apple Music directly. Wonder how to play Apple Music on Peloton? Well, there are two possible ways you can reach it: sync Apple Music to Peloton using the Track Love feature or download Apple Music songs locally via Apple Music Converter, and then transfer them to Peloton for playing. Let’s dive deeper into the step-by-step guide on how to execute the two methods.
Part 1. How to Link Apple Music to Peloton
Peloton has a new Track Love feature that lets you save songs you hear during a workout, creating a curated playlist that can be accessed on your Apple Music as well. This Like button is represented by a heart icon and you can access it on the Peloton Bike, Bike+, Tread, Tread+, Row, and the Peloton app. This is a helpful and convenient way to help you integrate your favorite songs on Apple Music to Peloton. When you like a song during a workout, it will be synced automatically to the Peloton playlist on your Apple Music library. Follow the tutorial below to see how to do so.
How to Like Songs on Peloton
Step 1. Tap the Music icon on the top left of the Peloton screen to see which song is playing.
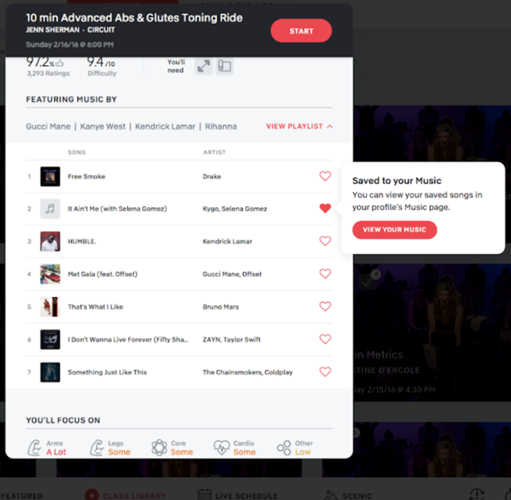
Step 2. Or, you can like a song before a class by clicking the class and selecting Workout Details. From there, go to the Featured Music section. Here you can see the class playlist.
Step 3. When you find the song you like, you need to tap the Heart icon to add it to your playlist.
Step 4. Once done, head over to your Peloton profile, find the Music section, and tap it.
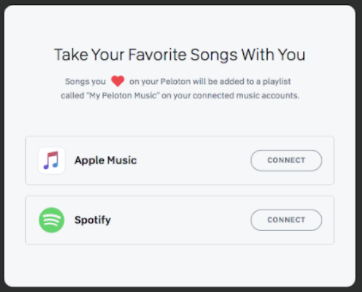
Step 5. Select the Connect button next to the Apple Music option. Next, enter your Apple ID and password to establish a connection.
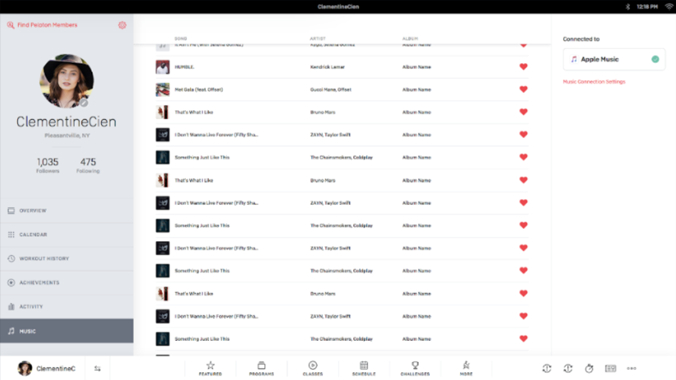
Step 6. When it is finished, you can find the music you liked on My Peloton Music playlist with your user’s name.
How to Access Peloton Playlist on Apple Music
Step 1. Go to the Apple Music app on your device and sign in to your account.
Step 2. Then, tap Library and scroll down to the Playlists section.
Step 3. Tap My Peloton Music By [your Peloton user name]. Here you can see all the songs you saved from your Peloton device.
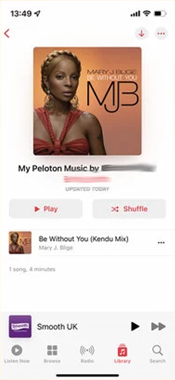
Step 4. Now you can choose any song you like and play it on Apple Music with ease.
Part 2. Best Way to Download and Play Apple Music Songs on Peloton
However, the Track Love feature can only save songs from Peloton Bike. With this feature, you cannot stream your playlists created in Apple Music during regular runs. It only saves songs from Peloton Bike. If you want to listen to your favorite playlists from Apple Music while working on your cardio on Peloton, you can try downloading Apple Music songs to Peloton Bike.
Using Tunelf Apple Music Converter allows you to play your entire Apple Music library on Peloton. It makes this possible by allowing you to download and convert songs from Apple Music to DRM-free audio and then transfer them to Peloton for playing. This is because even after subscribing to Apple Music, you cannot really keep those Apple Music downloads. But Tunelf makes everything possible. It can remove restrictions from Apple Music and convert Apple Music songs to a universal format, making them accessible on Peloton Bike.
Available for both Windows and Mac systems, Tunelf Apple Music Converter allows you to convert Apple Music songs, playlists, and albums to diverse popular audio formats, such as MP3, M4A, WAV, FLAC, AAC, and M4B. With the adoption of advanced encryption technology, it’s able to keep all the converted audio files with 100% lossless audio quality and the original ID3 tags and metadata information. After conversion, it’s a breeze for you to play the downloaded songs offline on various apps and devices.

Key Features of Tunelf Audio Converter
- Convert Apple Music to MP3, WAV, FLAC, AAC, and other audio formats
- Remove DRM from Apple Music, iTunes audios, and Audible audiobooks
- Preserve the converted audio with lossless audio quality and ID3 tags
- Support the conversion of audio format at a 30× faster speed in batch
Step 1 Launch Tunelf and Add Apple Music Tracks
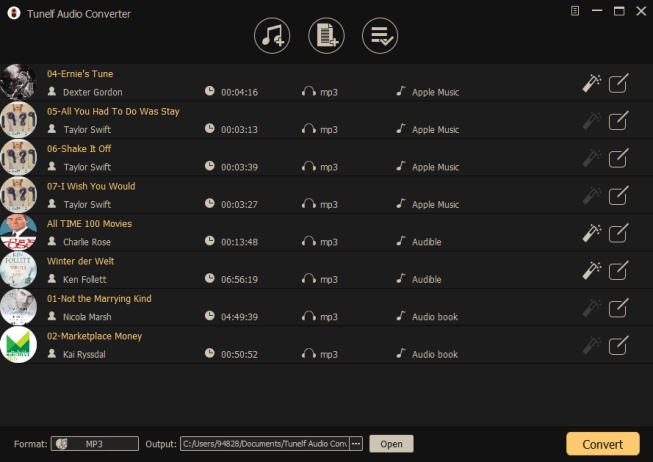
Head over to Tunelf’s official website and click the free download for either Windows or Mac. Launch Tunelf start the iTunes app. Select the Apple Music songs you desire using the Add function. At the same time, you can drag and drop your favorite songs from iTunes to the Tunelf interface. The app utilizes an algorithm that allows batch conversion. Therefore you can convert multiple files at a go without compromising speed.
Step 2 Choose the Format of the Audio Output
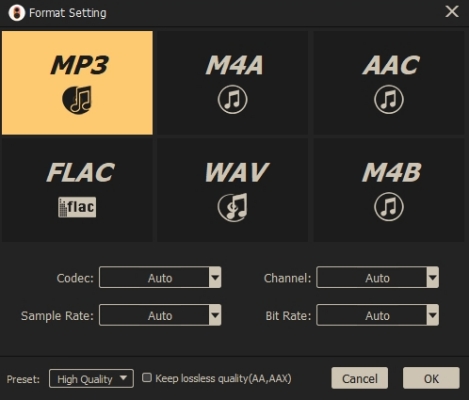
After selecting the song, you wish to convert, click the Format option at the bottom left of the Tunelf interface to open a new window that allows you to format the output audio. Select the audio format that’s compatible with Peloton.
Step 3 Initiate the Conversion of Apple Music
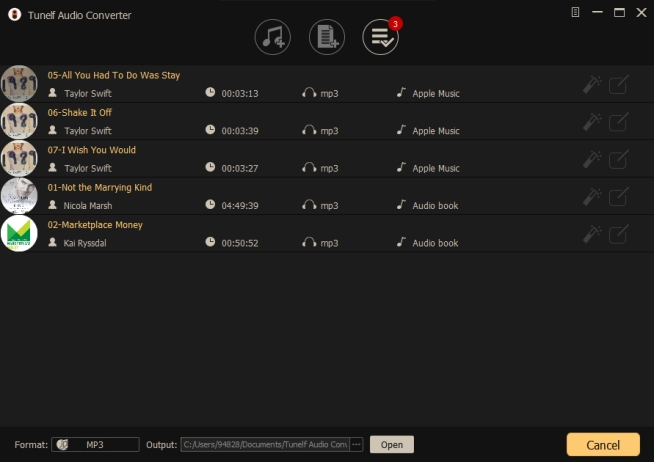
When you’re confident in your settings, click the Convert button to start the conversion. After conversion, click the Converted button in Tunelf to explore the songs you have converted. Now all that remains is to add your converted Apple Music to Peloton.
Step 4 Stream Apple Music Songs to Peloton
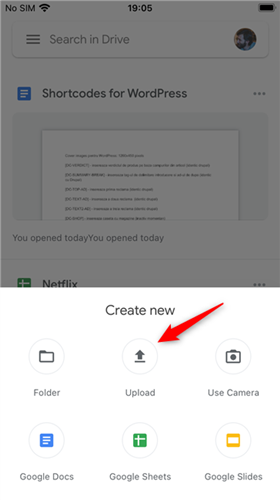
After removing DRM from Apple Music songs, then you can transfer those converted Apple Music songs to your Peloton Bike or Tread for playing. Start performing the below steps.
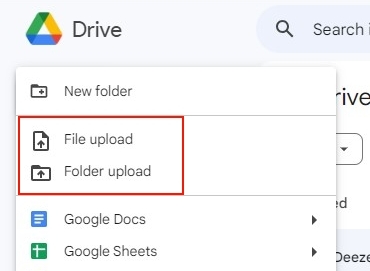
1. Go to the Google Drive website on your computer. Then, upload the converted Apple Music songs into Google Drive by selecting +New > File Upload/Folder Upload.
2. After that, fire up your Peloton device and tap the three dots icon in the right bottom of the home screen.
3. Select About, and then tap the lower-right corner of the pop-up box seven times.
4. Next, select WebView Browser Tester to open the hidden browser.
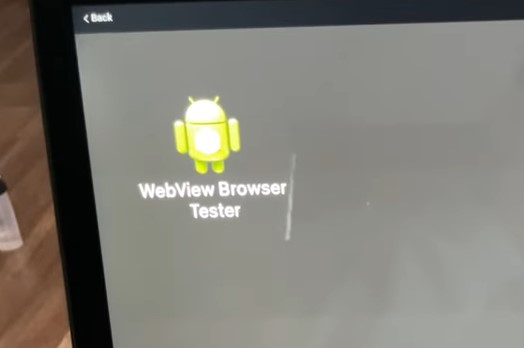
5. Once done, you can type the Google Drive address and play the Apple Music songs you uploaded with no limit.
Part 3. How to Fix Peloton Apple Music Not Syncing
Syncing Peloton with Apple Music. This used to work by I’ve just noticed the two no longer sync. My Peloton says An error occurred with Apple Music. When I try to login in I enter username, password and two factor authentication and an Apple web page opens on the bike saying invalid session ID. This appears to be an Apple issue as opposed to a Peloton one.
— User from the Apple CommunitySyncing music between Peloton and Apple Music is a convenient way to manage and enjoy your favorite music tracks. However, sometimes the synchronization may fail. Recently, many users have reported this issue. If your Peloton Apple Music integration isn’t syncing properly as well, here are some steps to troubleshoot and fix the issue easily.
1. Make sure that you log in to the same Apple Music account on both your Peloton device and the Apple Music app. Also, your account should have an active Apple Music subscription.
2. Check whether your Peloton is connected to a stable and solid network while syncing music.
3. Disconnect and reconnect your Apple Music account to your Peloton device so as to make a refreshment.
4. Restart both the Peloton device and your mobile device running Apple Music.
5. Go to Settings > your Profile section on Peloton and make sure that your profile is set to public.
6. On the mobile device running Apple Music, you need to ensure that iCloud Music Library is enabled. Just head to Settings > Music > Sync Library/iCloud Music Library.
7. Update both the Peloton operating system and the Apple Music app to the newest version.
8. If the issue still exists, consider performing a factory reset. But you should know that this step will clear all data on the device. You should consider carefully and proceed with caution. Here’s how to do so.
1) On the touch screen of your Peloton device, you need to tap the time on the top right corner. Then, select Settings from the drop-down menu.
2) Select Device Settings > System.
3) Then, tap Factory Data Reset > Reset Tablet.
4) Make a confirmation by hitting Erase Everything.
Part 4. More Tips: How to Use Peloton with Apple Devices
Currently, Peloton supports integrating with various Apple devices, including iPhone, iPad, Apple Watch, and Apple TV. You can install the Peloton app on your Apple device for syncing your health data and cast classics from your Peloton to Apple TV. Here are some useful tips about using Peloton with Apple devices.
How to Cast Classes from Peloton to Apple TV
Step 1. Tap on Settings in the top-right corner of your Peloton touchscreen.
Step 2. Find Cast Screen on Peloton and then tap on it.
Step 3. Select Apple TV to Miracast and then watch Peloton classes on your Apple TV.
How to Pair Apple Watch with Peloton Bike
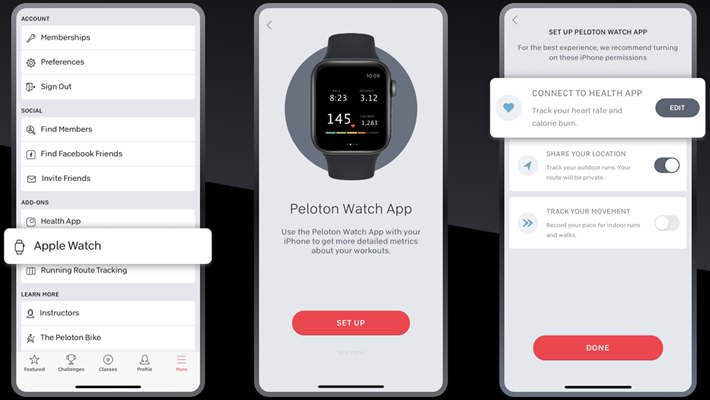
Step 1. Install the Peloton app on both your iPhone and Apple Watch.
Step 2. Launch the Peloton app on your iPhone and then tap on More.
Step 3. Go to Apple Watch > Set up and select Connect to Health App.
Step 4. In the Health app, tap Turn On All to enable the Peloton app to access your health data.
Step 5. Head back to the Peloton app and press Done to save the settings you change.
Step 6. Open the Peloton app on your Apple Watch and tap Allow to connect your Peloton.
How to Connect AppleAirPods to Peloton
Step 1. Open your Peloton and navigate to Settings > Audio.
Step 2. Then, turn on your AirPods as well. Open the lid of the charging case. After that, press and hold the button on the back of the case until you see the LED light start blinking, which means your AirPods are in pairing mode now.
Step 3. Now, go back to the touch screen of Peloton and choose Audio Output to locate your AirPods.
Step 4. You should ensure that your AirPods are within range. When you see your AirPods in the list, tap it to make a connection.
Step 5. Once connected, you should hear a tone in your AirPods.
How to Share Peloton Data with Apple Health
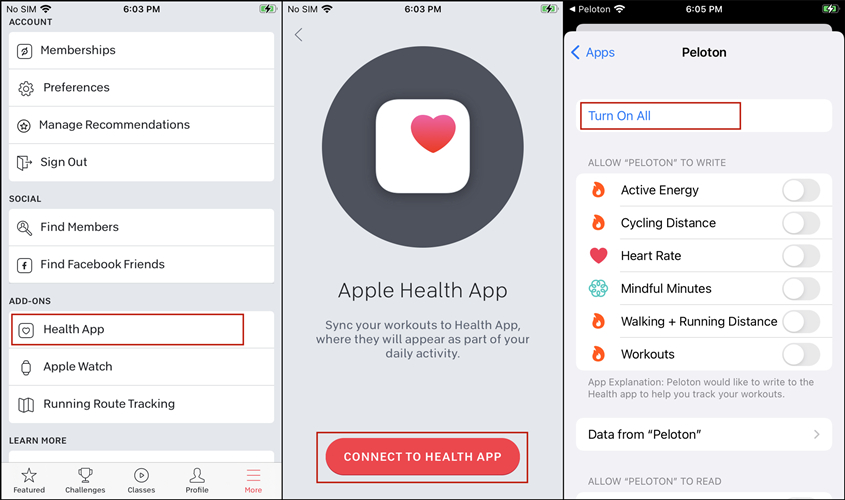
Step 1. Run the Peloton app on your iPhone and tap on the More button at the bottom right of the app.
Step 2. In the new window, find the Health App option under Add-ons and select it.
Step 3. Tap on the Connect to Health App button at the bottom of the screen.
Step 4. In the Health Access window, tap on Turn All and select Allow to save the settings.
Part 5. FAQs about Apple Music on Peloton
Q1: Can I play my own music on Peloton?
A: Yes, you can play your local music on the Peloton device. You can connect your mobile device to Peloton via Bluetooth. Or, you can upload your local music to third-party music platforms like Spotify or Apple Music. Then, you can access them on Peloton and play your music with ease.
Q2: Can you use any Bluetooth headphones with Peloton?
A: Sure, you can connect the Peloton device with your Bluetooth headphones for listening to music or other audio content. Just head to the touch screen of Peloton, and select Settings > Audio > Audio Output to choose your Bluetooth device.
Q3: What else streaming service can I get on Peloton?
A: Apart from Apple Music and Spotify, you can get the following streaming services on Peloton: Netflix, YouTube TV, DIRECTV, AMC+, Kindle, and more.
Bottomline
Suppose you were wondering about how to play Apple Music on Peloton; you should know by now. You can either use the Track Love feature to sync Apple Music on Peloton or use a music converter like Tunelf Apple Music Converter to convert all Apple Music songs to Peloton-compatible formats. With the first method, you won’t be able to access your favorite Apple Music but only create a playlist from what’s already on Peloton. On the flip side, the second method allows all the possibilities. Now you can make your choice!
Get the product now:
Get the product now:


