Apple Music is a great music streaming platform that enables you to enjoy over 100 million songs and 30,000 playlists on various devices like iPhone, iPad, and more. However, some guys may come across the problem of the Apple Music playlist disappeared. So, what to do if your Apple Music disappeared? Luckily, we’ve found some workable methods to help you fix the Apple Music playlist disappeared issue. Now you can read them below.
Part 1. Why Did My Playlists Disappeared on Apple Music?
My playlists have disappeared from Apple Music on my iPhone. My iCloud Music Library is on in Settings, so the general advice to make sure it’s turned on isn’t solving my problem. I’ve turned it on and off. I signed into iTunes on my PC and played some of playlists with no problem. I can see them in my played music history in Apple Music on my phone, but I still cannot directly access my playlists on my phone.”
— From Apple CommunityIn the Apple Community, some Apple Music users complained about the songs disappearing from the Apple Music playlist issue but didn’t know the reason causing this issue. There are multiple kinds of reasons that might lead to this. The most common reasons are as follows:
Reason 1. Apple Music Subscription Issue
You can listen to music and playlists from Apple Music online or offline without any problem if you are a subscriber to Apple Music. However, once your subscription expires, you cannot listen to the music and playlist you’ve added to Apple Music anymore, even though you’ve downloaded Apple Music songs to your device.
Reason 2. Apple Music or Software Update Bugs
This is the possible reason why your Apple Music library is gone after updating the Apple Music app or the device system. Many people have encountered the same situation as you. After this update, your customized settings may be changed so that they cannot work as before.
Reason 3. iCloud Music Library Issue
Sometimes, some glitches or errors in your iCloud music library can result in this issue. Then those songs and playlists you’ve added in your music library cannot be synced to your device.
Reason 4. The Show Playlist Option Is Toggled off
Apple Music allows you to customize the interface of your music library. If you accidentally turn off the show playlist option, you can not see your playlists on the library.
Reason 5. Different Apple ID on Different Devices
When you find your playlist disappeared on Apple Music, you should check the Apple ID you used to sign in. Please make sure that you signed in with the same Apple ID that you use with your Apple Music subscription on all of your devices.
Reason 6. Network Issue
Sometimes, the network issue may also influence your Apple Music use experience. For example, once the Internet has a lagging issue, you may not see your playlists on Apple Music.
Reason 7. Temporary Bugs on Your Device
Except for the bugs within the Apple Music app, some temporary bugs and errors in your device will also cause the Apple Music playlist to disappear. One possible reason of the bugs in your device is an old operating system.
Part 2. 9 Useful Solutions to Solve Apple Music Playlist Disappeared
The common possible factors are listed above. If you have encountered the Apple Music playlists gone on your iPhone or iPad, then you can follow the methods introduced in this part. Let’s see how to fix the Apple Music playlist disappeared issue on your devices one by one.
Fix 1. Check Apple Music Subscription
When your songs and playlists disappearing from Apple Music is caused by the subscription, then the first thing you need to do is to check whether your Apple Music subscription is available or not. Now follow the below instructions to check your Apple Music subscription.
On iPhone:

Step 1. Open the Settings app on your iPhone and tap your iCloud name.
Step 2. Then tap the Subscription button to check your subscription status.
Or you can follow the below steps to check your Apple Music subscription.
Step 1. In the Settings app, tap your profile name and select Media & Purchases.
Step 2. Tap View Account, then enter your Apple ID password to sign into your account.
Step 3. Under Account Settings, tap Subscriptions to check your Apple Music status.
On Windows:
Step 1. In iTunes on a Windows PC, click Account > View My Account, then click View Account.

Step 2. Locate Settings and click Manage at the rear of Subscriptions.
Step 3. Browse and check the subscription status of your Apple Music.
On Mac:
Step 1. In Settings on a Mac, click Media & Purchases, then click Manage.

Step 2. View your Apple Music subscription and confirm the subscription status.
Fix 2. Show Apple Music Playlists
In fact, you can freely customize the way you view and play your Music content. In the Library sidebar in Music or iTunes, you can various categories, including Recently Added, Songs, and more. When you can’t find your songs or playlists, simply add items to the Library sidebar.
Step 1. In the Music app, tap Library at the bottom of the screen.
On iPhone:

Step 2. Then tap Edit at the top right corner if you don’t find the Playlists categories.
Step 3. Select Playlists and tap Done, then go back to your library.
On Windows:

Step 1. Fire up iTunes on your Windows PC and select Music.
Step 2. Move the pointer over Library in the sidebar, then choose Edit.
Step 3. Select Songs, Albums, or other items you want to see in the sidebar.
Step 4. Click Done. Then go to find out whether this issue is fixed.
On Mac:

Step 1. Start the Music app on your Mac and click Edit in the Library sidebar.
Step 2. Select Songs, Albums, or other items you want to see.
Step 3. Click Done to save the settings and find your songs and playlists.
Fix 3. Turn on Sync Library [iPhone]
All your purchased music, content you add from Apple Music or import to iTunes, and changes you make to your library will sync across all your devices. But this feature is only available when enabling Sync Library on your device. If not, go to reset it to fix this issue.
Step 1. Head to Settings on your iPhone and scroll down to tap Music.
Step 2. Under the settings of Music, turn Sync Library on.

Fix 4. Enable and Update iCloud Music Library
Enabling iCloud Music Library on Apple Music is vital to sync and transfer your music among devices. You should turn it on. If you find your Apple Music playlists disappeared, you can update them to fix the issue.
On iPhone:
Step 1. Open your iPhone and go to the Settings section.
Step 2. Select Music, then you can see the iCloud Music Library option under the Library section. Tap it to turn it on.
After doing so, the music in iCloud will show in your library and you can get your Apple Music playlists back.
On Windows:
Step 1. In iTunes, click Edit and select Preferences from the sub-menu.
Step 2. In the General Preferences, find iCloud Music Library and select it.
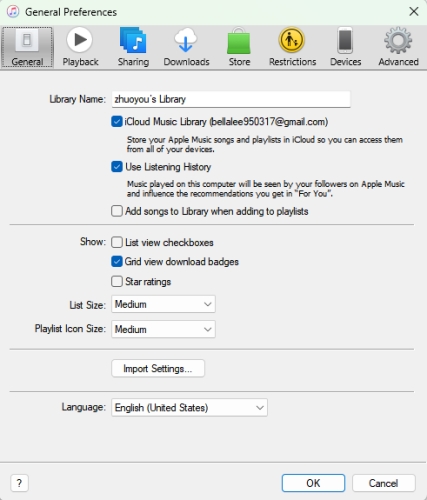
Step 3. Proceed to click OK to save the settings.
On Mac:
Step 1. In the Music app, click Music > Preferences, then there will pop up a window.
Step 2. Switch to the General tab and find Sync Library, then select it.
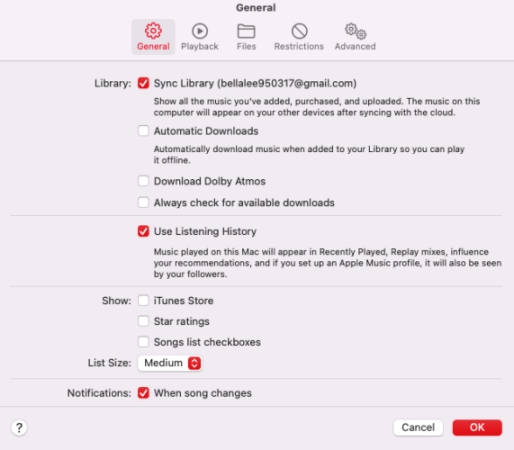
Step 3. Click the OK button to enable the settings.
If you already enabled the iCloud Music Library but can not see your Apple Music playlists, you can consider updating it:
Step 1. Open iTunes on your PC or Mac.
Step 2. Click File > Library > Update iCloud Music Library.

Fix 5. Sign Out and Sign In to Apple Music
Maybe your Apple ID isn’t working well on your device. This could result in the abnormality of Apple Music. In this case, you can try to sign out of your Apple ID and sign in again to fix this issue. If you don’t know how to, simply perform the following steps.
On iPhone:
Step 1. Start the Settings app on your iPhone, then tap your profile name.
Step 2. Scroll down to tap Sign Out and enter your password to confirm.
Step 3. After signing out of your Apple ID, try to sign in again.
On Windows:
Step 1. Open iTunes on a Windows PC and click Account > Sign Out.

Step 2. After signing out of your Apple ID, then enter your Apple ID and password to sign in again.
On Mac:
Step 1. Open the Music app on a Mac and head to Account > Sign Out.
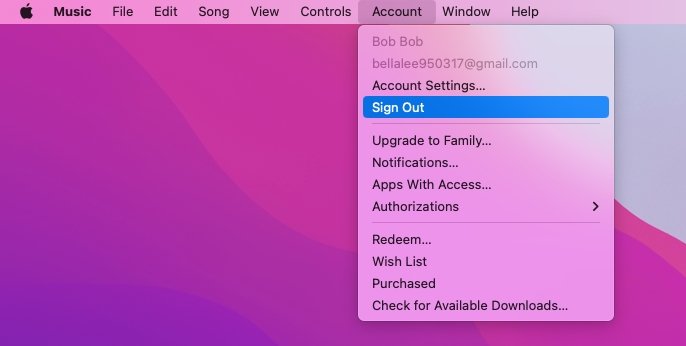
Step 2. Go back to click Account > Sign In, then sign in again with your Apple ID and password.
Fix 6. Delete and Reinstall Apple Music [iPhone]
Sometimes, the glitches appear just because of the listening cache in your Apple Music. These unnecessary caches and files can be deleted to fix the issue. You can go to free up storage used by the Music app or delete and reinstall the app, then see if your playlists come back.

Step 1. Find and tap General in the Settings app, then select iPhone Storage.
Step 2. Tap Music, then select Offload App. Or tap Delete App and choose to install it again.
Fix 7. Restart Apple Music and Your Device
The easiest way to fix this issue is to restart your device or Apple Music. Sometimes, due to some unknown errors, there would happen some problems with your device or the app installed on your device. Try rebooting your device or completely close the Apple Music app. Then you can use your Apple Music app and see whether the issue still exists.
Fix 8. Re-download Purchased Music in iTunes [Windows & Mac]
When you cannot find your purchased music on iTunes, you might consider downloading that purchased music to your library again. Then you would find those songs and playlists disappeared from Apple Music. You can do it with the following steps.
On Windows:
Step 1. From the menu bar at the top of iTunes, click Account > Purchased.
Step 2. Select Music from the menu in the upper-left corner.
Step 3. Browse your purchased music or album, then click the download button.
On Mac:
Step 1. Open the Music app and click Account > Purchased from the menu bar.
Step 2. Find your purchased music and click the download button to download them.
Fix 9. Unhide Music [Windows & Mac]
When you choose to hide music, it will not appear in your library in any devices that you sign in with your Apple ID. Even if you use Family Sharing, the family members can not see the item you hide, unless you downloaded the item on one device. To show your hidden music and playlists, you can try the following steps.
On Windows & Mac:
Step 1. Launch the Apple Music or iTunes app on your PC or Mac computer.
Step 2. You should click Account > Account Settings at the top menu bar. Then, log in with your Apple ID.
Step 3. In the new pop-up window, scroll down to the Downloads and Purchases section.
Step 4. Next, click Manage next to Hidden Purchases.
Part 3. Ultimate Fix: Download Apple Music Playlist Locally
If your songs and playlists disappearing from Apple Music aren’t caused by canceling Apple Music, then you can successfully solve your issue on your device. But here we’d like to introduce a great way to help you keep Apple Music forever. This way can avoid the Apple Music playlist disappearing after canceling the subscription. That is to download Apple Music locally by using an Apple Music Converter.
As we all know, all the downloaded songs and playlists in Apple Music are playable during the subscription. However, once your subscription is out of date, you may find that all Apple Music songs and playlists disappeared or greyed out. In this circumstance, you cannot miss this great method to keep your Apple Music library forever. All you need is to use the Tunelf Audio Converter.
Tunelf Audio Converter is a professional music converter for dealing with a variety of music files, including Apple Music, iTunes music, Audible books, and many common file formats. With this one-click solution, you can convert Apple Music to MP3 or other popular audio formats without any problem. Therefore, you can keep and play Apple Music songs on multiple devices after conversion. Even if your Apple Music subscription ends and your Apple Music playlists disappeared, you can still enjoy your Apple Music playlists and songs.
Key Features of Tunelf Audio Converter
- Convert Apple Music to MP3, WAV, FLAC, AAC, and other audio formats
- Remove DRM from Apple Music, iTunes audios, and Audible audiobooks
- Preserve the converted audio with lossless audio quality and ID3 tags
- Support the conversion of audio format at a 30× faster speed in batch
Step 1 Import Apple Music Playlist to Tunelf
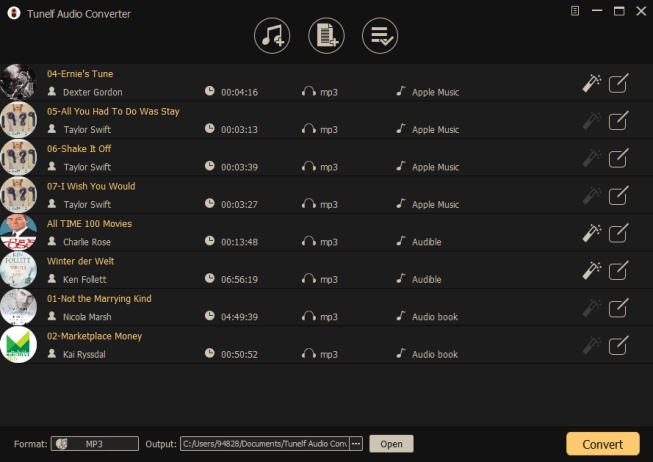
For a better user experience, you may need to make a purchase and sign up for Tunelf to unlock full features. As Tunelf works with the iTunes or Apple Music app, make sure that you have installed it on your computer in advance. After launching Tunelf software, you can see three buttons at the top of the screen. You can click any button to add your Apple Music songs to the converter for conversion. The other way is to drag and drop your music file into the converter.
Step 2 Select the Output Formats and Parameters
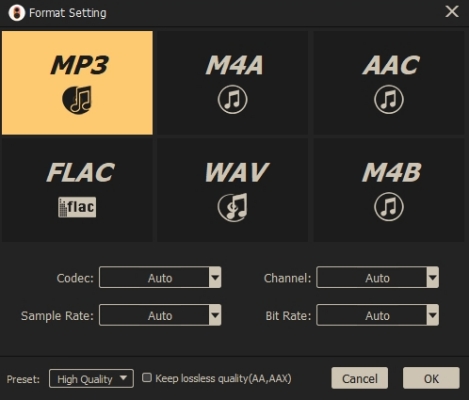
Once loaded, you can see the music tracks on the main screen. Then you can click the Format button at the bottom to set the output formats, and we’ve set MP3 as the default output format. Well, you can also change it according to your needs. To better manage your music library, you can set the output storage folder and archive in the menu setting on the top right of the interface. Then click Preferences > Convert under the menu setting. And when you hover over the loaded files, you can see an Edit icon, you can edit the tags here.
Step 3 Start to Convert Apple Music to MP3
Now all of the settings are done, you can click the Convert button to start the conversion. The conversion speed is 30× faster, so you can convert a batch of music tracks in a very short time. When finished, you can locate the converted files in the storage you’ve set before by clicking the Converted icon.
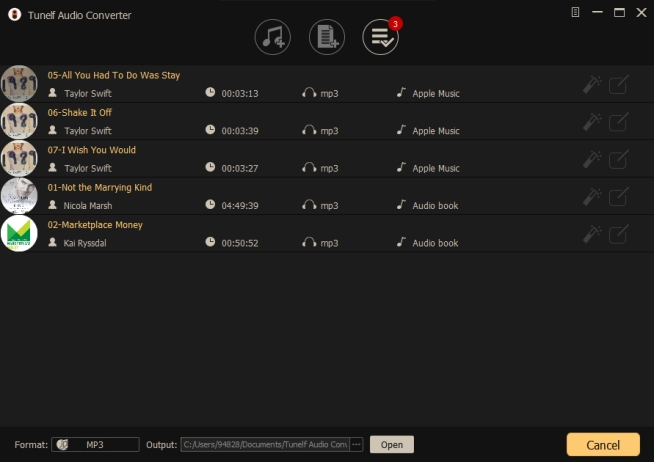
Now all songs and playlists from your music library have been saved as MP3 music files. You can directly use Windows Media Player, iTunes, or other media players to play them on your computer. Or you can transfer them to your mobile phone for listening. You don’t need to worry that your songs and playlists will disappear from Apple Music after cancellation.
Part 4. Final Thought
There are many reasons that may result in the Apple Music playlist disappeared issue. So, you need to check the reasons above and try the right methods to solve it. If the above methods cannot work, perhaps you can consider using a third-party tool – Tunelf Audio Converter. With a clear interface and efficient functions, Tunelf software can help you enjoy Apple Music without any limitations. If you have more tips, you can share them in the comment area below.
Get the product now:
Get the product now:


