As one of the leaders in the music streaming industry, Apple Music owns over 100 million songs and 30,000 playlists. This allows you to get unlimited access to the world’s largest classical music catalog, with the highest audio quality. If you subscribe to Apple Music, you can download songs in your library to listen to offline. However, there is no Download All option for users to download all Apple Music at once. They have to select songs, playlists, and albums manually.
Is there a way to download the entire library without having to download playlists or albums one by one? Yes! You’ve found the right passage. Here in this post, we’ll teach you how to download all Apple Music at once. And as a bonus tip, we’ll introduce to you a wonderful tool to download all Apple Music to MP3.
Part 1. Can You Download All Songs on Apple Music at Once?
When you are planning to use a new phone, you may want to download all your Apple Music songs again to listen to them offline. Or when you are going to have a long trip, downloading all your loved Apple Music songs allows you to listen to music without an internet connection. But can we download all Apple Music at once? To do this, first, you have to own an Apple Music subscription. Unfortunately, there’s no Download All option to get it done. You have to manually select the tracks you want to download one by one. But don’t worry. Here we listed three practical methods for you to download all songs in your library at once.
Part 2. Download All Apple Music Songs at Once via Smart Playlist
In this part, we’ll teach you a way to download all Apple Music songs by creating a smart playlist, both on Mac and Windows. Let’s get started.
Step 1. Open Apple Music on a Mac or iTunes on a Windows PC.
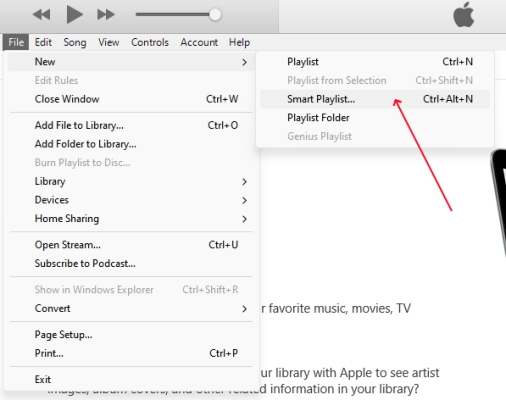
Step 2. Click File on the top left corner, then choose New > Smart Playlist.
Step 3. In the popup window, tick the box next to Match and select Music.

Step 4. Select Time, is greater than, and 00:00 under Match Music for the following rules.
Step 5. Then select Live updating and click the OK button to save the settings.
Step 6. Find the Smart Playlist in Music Playlists, create a name for it, and then right-click the playlist to select Download. Now all Apple Music songs in your library will be downloaded at once.
Part 3. Download All Apple Music Songs at Once via Shortcut
There is another method to download all Apple Music at once, no matter if you are using an iPhone, Mac, or Windows PC. That is using a Shortcut. It helps you to put your songs from the Apple Music library into one single playlist. What’s more, you can choose the number of songs you want to add to the playlist. Back to the app, you can download the songs in your newly-created playlist at once.
Download All Apple Music on iPhone via Shortcut
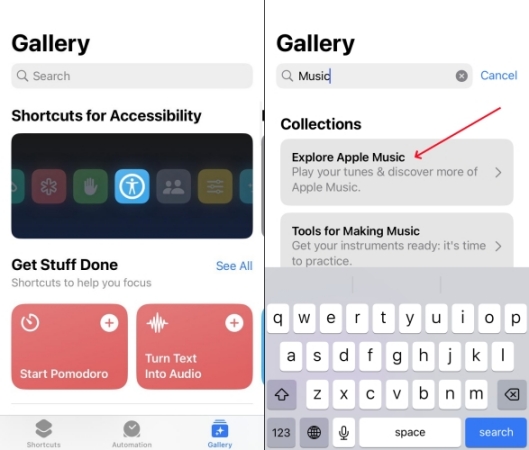
Step 1. Open the Shortcut app on your iPhone, then tap on Gallery at the bottom of the screen.
Step 2. Search Music and choose Explore Apple Music from the results.
Step 3. Scroll down to select Make Top 25 Playlist to add.
Step 4. Go back to the section of Shortcuts and tap on the three-dot icon of the Make Top 25 Playlist part.
Step 5. Set the filter parameters and add the number of songs you want to download.
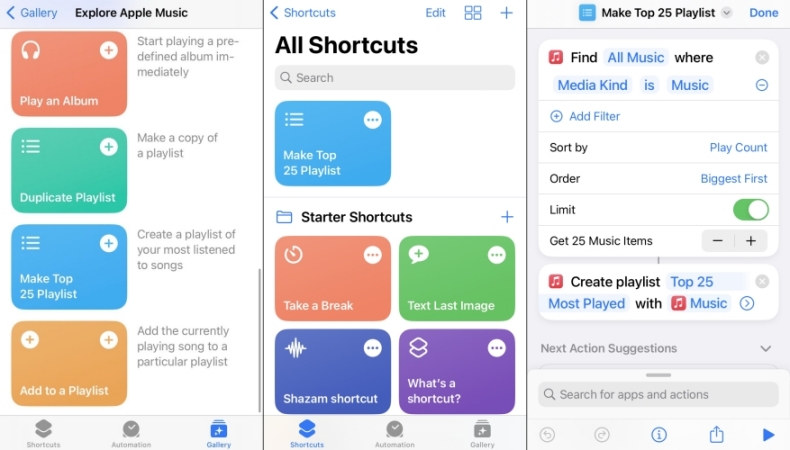
Step 6. Press the Start button on the right bottom of the screen.
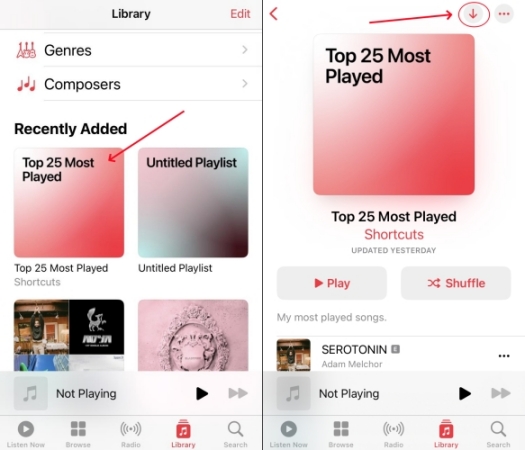
Step 7. Go to the Apple Music app, then tap Library > Make Top 25 Playlist. You’ll see the new playlist just created.
Step 8. Tap the Download button to download all your songs.
Download All Apple Music on Mac/Windows via Shortcut
On Mac or Windows, you can also select the entire playlist or album to download all songs from Apple Music at once. Here’s how to do this.
Step 1. Open Apple Music on a Mac or iTunes on a Windows PC.
Step 2. Choose Albums on the left panel.
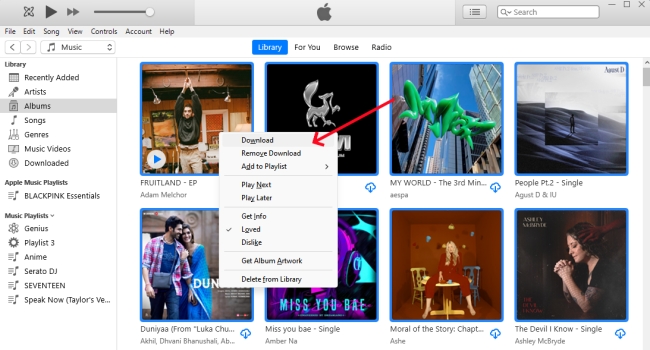
Step 3. Press Ctrl + A or Command + A to select all the songs in your library.
Step 4. Right-click on any cover and click Download to download all songs.
Part 4. Download All Apple Music Songs at Once via Automatic Downloads
When you are using Apple Music on an iPhone or Mac computer, there is still an alternative way to download all Apple Music at once. If you enable the Automatic Downloads feature in Apple Music, every song you add to the library can be downloaded automatically. Let’s see how to enable this feature.
Download All Apple Music on Mac via Automatic Downloads
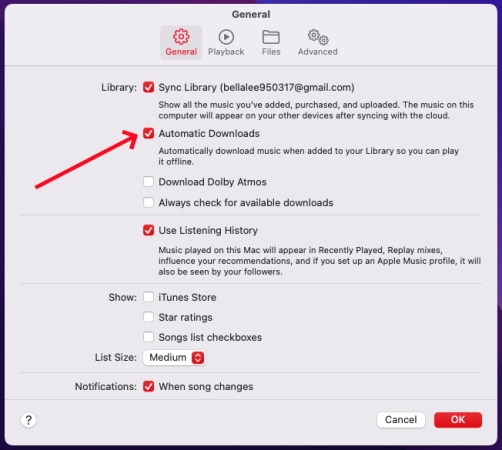
Step 1. Open Apple Music on your Mac, and click Music > Preferences.
Step 2. In the General section, tick Automatic Downloads.
Step 3. Then click OK to save the settings.
Step 4. Next time, the song you added to your iTunes library will be downloaded automatically.
Download All Apple Music on iPhone via Automatic Downloads
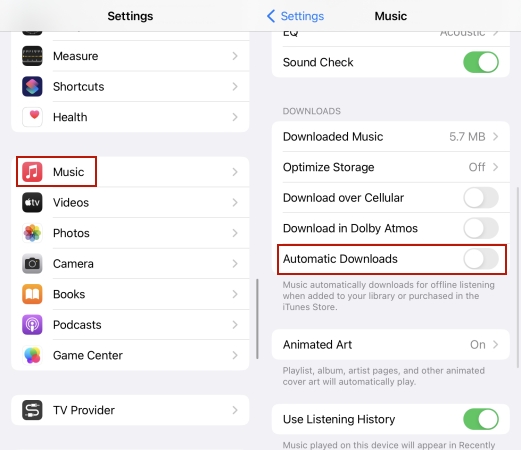
Step 1. Open the Settings on your iPhone, and scroll down to find Music.
Step 2. Tap on Music and toggle on the Automatic Downloads button.
Step 3. Back to Apple Music, and add songs to your library. The added songs will be downloaded automatically.
Part 5. Bonus Tips: Download and Convert All Apple Music Songs to MP3
In this passage, we offer you three methods to download all Apple Music songs at once. Hope these methods can help you to download all Apple Music successfully. Since the tracks in Apple Music are encrypted in a special audio format, you can’t play it on another platform even though you download it. Is there any method to convert Apple Music to MP3 format? Sure! You can use a third-party tool – Tunelf Audio Converter to help you.
Tunelf Audio Converter is an Apple Music converter. You can use it to convert Apple Music, iTunes audios, and Audible books to MP3, FLAC, WAV, AAC, M4B, or M4A format rapidly and easily. And then, you can upload the converted songs to many portable devices for offline listening. With this tool, no matter whether you are traveling by plane, wanting to save up battery, or don’t have access to the network – you can still listen to your favorite Apple Music songs. Now, let’s see how to take advantage of this tool.
Key Features of Tunelf Audio Converter
- Convert Apple Music to MP3, WAV, FLAC, AAC, and other audio formats
- Remove DRM from Apple Music, iTunes audios, and Audible audiobooks
- Preserve the converted audio with lossless audio quality and ID3 tags
- Support the conversion of audio format at a 30× faster speed in batch
Step 1 Import Your Target Apple Music Songs
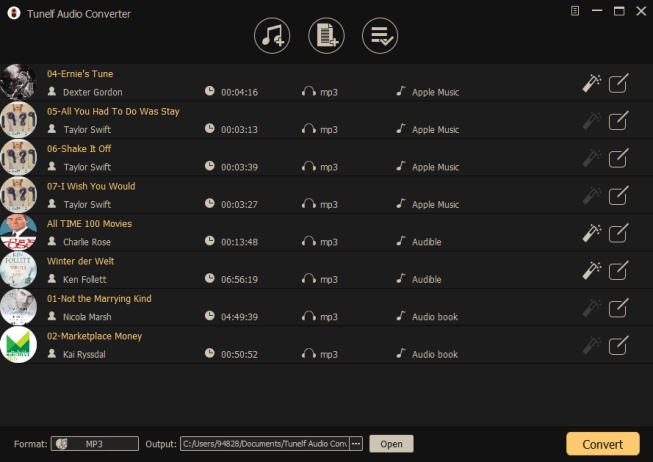
Open Tunelf Audio Converter, and click the first icon “Load iTunes Library” from the left in the upper position of the panel. Then the downloaded tracks in Apple Music will display. Choose the songs you want to convert and tap the Add icon in the bottom right corner to add it to the conversion list. Or you can simply drag and drop your downloaded Apple Music Songs to Tunelf. You can add several songs at a time and convert them at once.
Step 2 Set Output Format and Parameters
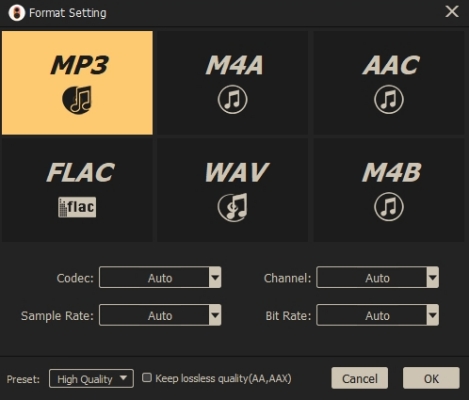
Once your songs are added to Tunelf, you can click the Edit icon to edit the songs’ information of title, album, genre, etc. Click the Format icon in the bottom left of the screen, you can choose the output format into MP3, FLAC, WAV, AAC, M4B, and M4A. What’s more, you can also choose the output audio parameters from codec, channel, sample rate, and bit rate. Then click OK to save all the parameter settings.
Step 3 Start Converting Apple Music Songs to MP3
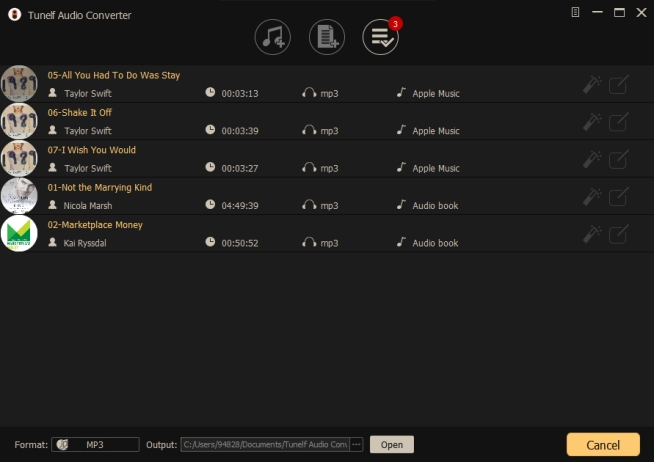
After all the settings are done, you can click the Convert button on the right bottom of the panel. Then your added songs will be converted to MP3 or other formats you like. After a few seconds, the process will be completed. You can view all converted songs by clicking the Converted button. Now, you can listen to your Apple Music offline as you like.
Part 6. Conclusion
In this passage, we’ve listed 3 practical methods to download all your Apple Music at once. Try one of the methods the next time you open up the Apple Music app. From now on, you don’t need to download Apple Music playlist one by one. If you are looking for a tool to convert your Apple Music to MP3, Tunelf Audio Converter is the best choice. Don’t miss it!
Get the product now:
Get the product now:


