When you have a large number of songs on Apple Music, or if you’re a music lover who listens to music almost day and night, so be sure to not neglect the cache cleaning issue. According to the data tested before, the majority of Apple Music users share one common opinion – the longer the Apple Music app is used, the slower the response speed will be. Most importantly, some unexpected errors or mistakes seem to be easier to happen in the process. One of the main cause is the overwhelming and corrupted cache data on your device. Therefore, it’s necessary to clear Apple Music cache regularly. If you don’t know the exact steps to do so on your devices, you can not miss this post. Just take a few minutes and read the below guidance so that you are enabled to know almost everything you need.

Part 1. Does Apple Music Cache Songs?
Yes, Apple Music does cache songs. When you listen to a song on Apple Music, the app temporarily stores a portion of that song on your device’s storage. This cache allows for smoother playback and reduces the need to re-download the entire song each time you play it, which helps save data and improve the app’s performance.
Why You Need to Clear Apple Music Cache?
When you use Apple Music for an extended period, all the songs you’ve streamed are temporarily stored as cache files on your device. Over time, this buildup can slow down the app’s performance and consume valuable storage space. Regularly clearing the cache helps improve the app’s speed, free up storage on your device, and resolve any glitches or bugs you might encounter in the app.
How Often Should I Clear the Apple Music Cache?
It’s a good practice to clear the cache every few months to keep the app running smoothly.
Does Clearing Apple Music Cache Delete Playlists?
No, clearing the cache will only remove the temporary data stored on your device. Your playlists or any other content in your library will not be deleted.
Is There a Downside to Clearing the Apple Music Cache?
Yes, although clearing the Apple Music cache can improve the app’s performance, there are a few downsides.
1. After clearing the cache, the next time when you reopen the app or play previous cached songs, it may take a longer time to load.
2. If you have downloaded songs for offline listening, the step to clear the cache may remove some of them. You may need to re-download them when it was partially stored in the cache.
3. Some of your preferences or settings tied to the cached data may be also deleted after clearing the Apple Music cache. These include recent searches or recommended songs based on your listening habits.
Part 2. How to Clear Apple Music Cache [iPhone]
Unlike other streaming music services, there is no feature for deleting cache in the Apple Music for iOS app. But you still have other options to limit and remove the Apple Music cache on your iPhone. Here you can follow the below steps to limit and delete cache on your iPhone or iPad.
Method 1. Limit Apple Music Cache
When your iPhone doesn’t have enough storage space, you can enable Optimize Storage in Apple Music. Once you turn on the feature, the music you haven’t played in a while will be automatically removed from your iPhone. As the downloaded Apple Music songs are cache files, you can do this to reduce the Apple Music cache on your device.

Step 1. In Settings on your iPhone, tap Music.
Step 2. Scroll down to Downloads and tap Optimize Storage.
Step 3. Under Optimize Storage, turn Optimize Storage on.
In addition to removing Apple Music downloads, you can prevent Apple Music from automatically downloading music you’ve added to your library. When the Automatic Downloads feature is on, all the music in your library will automatically download for offline listening. Here you can turn it off to reduce the Apple Music cache on your iPhone.
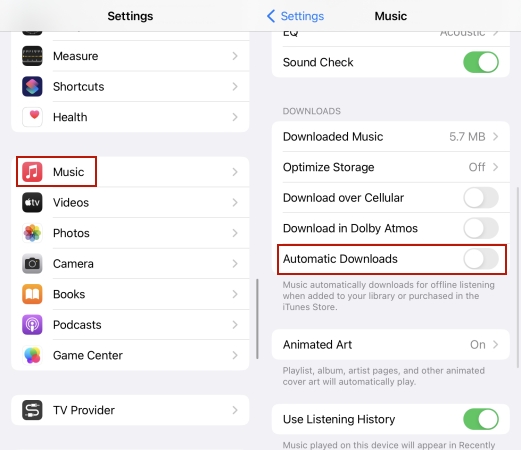
Step 1. Open the Settings app on your iPhone, then tap Music.
Step 2. Locate Downloads and switch Automatic Downloads off.
Method 2. Delete Apple Music Cache
The last option to clear the Apple Music cache is to delete the Apple Music app. But note that this will remove all the music caches and downloads from your iPhone. If you have purchased songs in Apple Music, be sure to back them up before doing so. Here’s how to delete the Apple Music cache by removing the app.
Step 1. Head to the Settings app on your iPhone or iPad.
Step 2. Scroll down to select General > iPhone Storage.
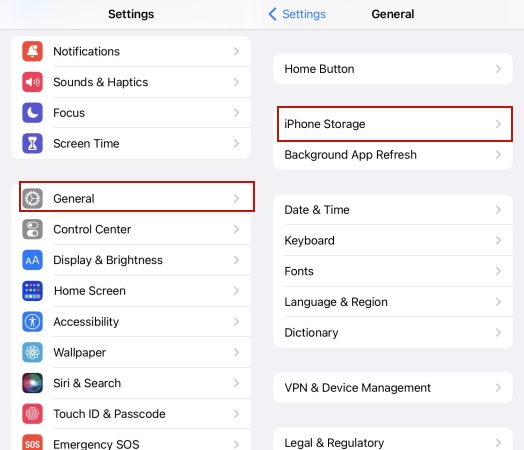
Step 3. Then, you need to select Apple Music from the app list.
Step 4. Tap Offload App to clear its cache data.
Method 3. Remove Downloaded Songs
If the previous two methods don’t free up enough space on your device, a practical alternative is to delete any downloaded songs. This can quickly reclaim significant storage, especially if you have a large music library saved for offline listening. You can always re-download these songs later if needed.
1. Open the Apple Music app on your mobile devices.
2. Choose Songs or Albums in the sidebar. Then, find the songs you need to delete.
3. Select the three-dot icon next to the song or album, and then tap Remove Download.
4. Once done, the downloaded music will be deleted. You can still find it in your library but you need to be connected to valid Internet to listen to it.
Part 3. How to Clear Cache on Apple Music [Android]
If Apple Music is crashing on your Android devices or there are some other mistakes and glitches, you can go to delete the caches of Apple Music on your Android device. If your Android device is low on storage, you can choose to clear the Apple Music cache.
Option 1. Reduce the Apple Music Cache Limit
Differing from the Apple Music for iOS app, the version for Android allows users to set a limit for Apple Music to store cache. In the Apple Music for Android app, you can use the lowest limitation, which can limit Apple Music cache on Android. Here’s how to limit the playback cache of Apple Music on an Android device.

Step 1. In Apple Music, tap the gear icon at the top right corner.
Step 2. Tap Settings and head to tap Playback Cache.
Step 3. Select an appropriate value to limit the playback cache.
Option 2. Clear Apple Music Cache
Another way to delete the Apple Music cache on an Android device is to clear it in the Settings app. The Apple Music app on Android has an additional feature that isn’t available on the Apple Music for iOS app, which is to clear data and cache directly. Follow the below steps to clear the Apple Music cache on Android devices.
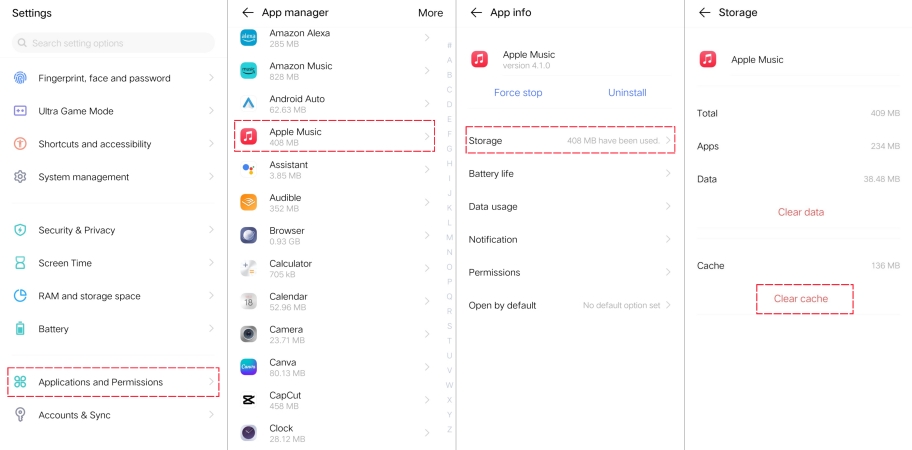
Step 1. Head to Settings on your Android phone and tap Applications & Permissions.
Step 2. Under Applications & Permissions, tap App Manager and select Apple Music.
Step 3. In the App Info screen, tap Storage, then tap Clear Cache.
Part 4. How to Clear Apple Music Cache on Desktop
In most cases, Apple Music caches are useless and unnecessary files. Both Windows and Mac computers automatically manage cache files, but if you’re in urgent need of clearing the Apple Music cache to free up space on your computer, finding and removing them can help. The steps to clear the Apple Music cache on a Windows PC or a Mac are a little bit complex. Let’s get started.
How to Clear Apple Music Cache on Mac
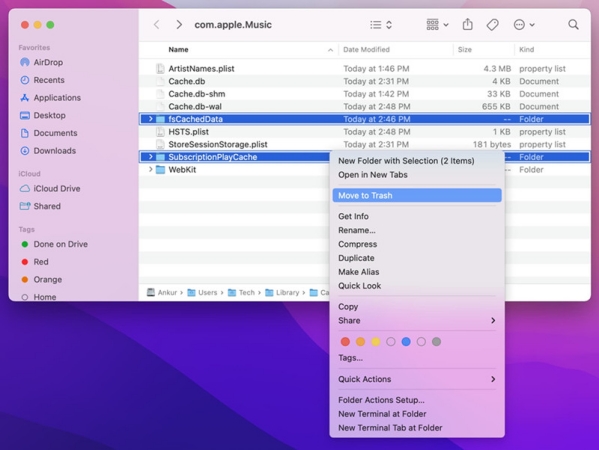
Step 1. Open the Finder, then press Command + Shift + G, or from the top menu bar, click Go > Go to Folder.
Step 2. Copy and paste the following address into the search box, then press the enter key.
On macOS Catalina and later: ‘Users > username > Library > Caches > com.apple.Music’
On macOS Mojave and earlier: ‘Users > username > Library > Caches > com.apple.iTunes’
Step 3. Select all the cache files, right-click them, and click Move to Trash to delete them.
How to Clear Apple Music Cache on PC
Step 1. Launch iTunes and click Edit > Preferences to open the Preferences window.
Step 2. Go to the Advanced tab and find the iTunes Media folder location.
Step 3. Open the Windows Explorer and enter the location you find in iTunes. Or you can enter the location: ‘C:\Users\USERNAME\AppData\Local\Apple Computer\iTunes\’.
Step 4. Right-click all the cache files, then click Delete to clear the cache.
Part 5. Best Way to Free up Space While Preserving Apple Music Songs
Clearing the Apple Music cache helps free up storage space on your device and can potentially improve the app’s performance and responsiveness. But the disappointing truth is that all songs from Apple Music are strictly restricted by DRM agreements. And the songs you’ve downloaded from Apple Music are only temporary caches. Once you clear the Apple Music cache, these songs will be deleted. If your device is low on space, you can choose to store your Apple Music downloads on an SD card or a USB drive, instead of clearing the cache.
Thus, to enable Apple Music downloads to be playable forever, the best way is to remove DRM from Apple Music and download Apple Music songs as local files. Then it will be easy to stream Apple Music at any time you want. To achieve that, you need a tool called Tunelf Apple Music Converter. It is an almighty audio solution to convert Apple Music to unprotected audio files like MP3 and M4A. It can retain the original metadata information of the file and preserve them with lossless high quality. Follow the below steps to download Apple Music songs to an SD card or a USB drive.

Key Features of Tunelf Audio Converter
- Convert Apple Music to MP3, WAV, FLAC, AAC, and other audio formats
- Remove DRM from Apple Music, iTunes audios, and Audible audiobooks
- Preserve the converted audio with lossless audio quality and ID3 tags
- Support the conversion of audio format at a 30× faster speed in batch
Step 1 Import Apple Music to Tunelf Software
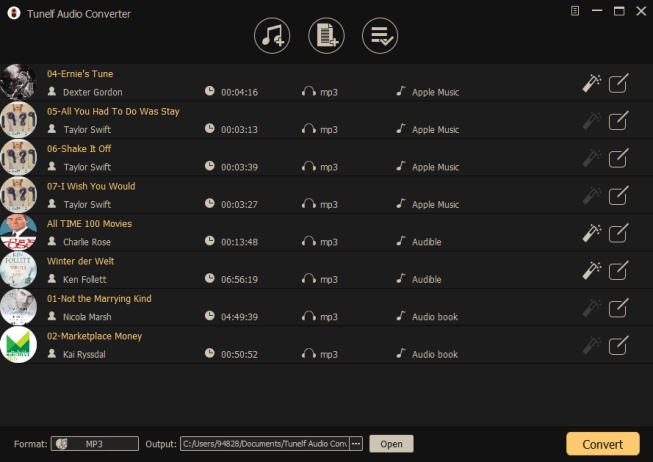
Launch the Tunelf Apple Music Converter on your computer, and then it will load the Apple Music app or iTunes automatically. To add Apple Music songs you want to convert, there are two methods for you to choose from. You can directly drag and drop your downloaded songs from Apple Music to the converter. Or you can click the Load iTunes Library button to browse your songs in Apple Music, then add them to the conversion list.
Step 2 Configure the Output Audio Parameters

To set the output audio parameters, click the Format panel. Then you can select MP3 from the list of audio formats. Here you can also set the bit rate, sample rate, codec, and channel to get better audio quality. After deciding, click the OK button and go back to the interface.
Step 3 Convert Apple Music to Unprotected Files
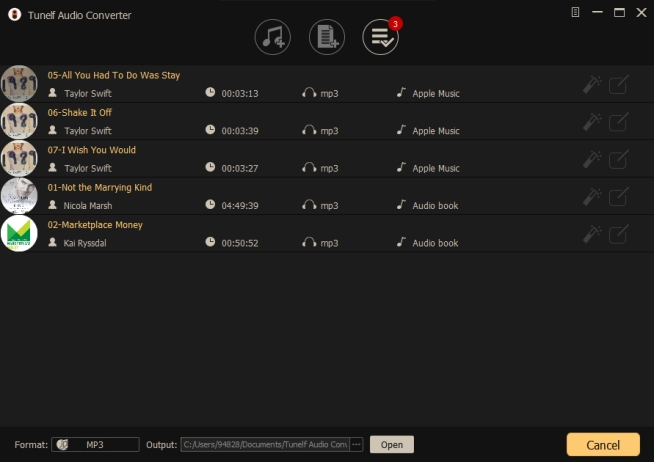
Once you’ve set the output format and parameters, you can click the Convert button to proceed. Wait for a while till the conversion is done. You can convert a whole batch within a few minutes with lossless high quality. After completing the conversion, click the Converted button to check the location of your converted files.
Part 6. Conclusion
Clearing the Apple Music cache is a simple and effective way to ensure your app runs smoothly and efficiently. In terms of how to clear the Apple Music cache on multiple devices, you can follow the above steps to do it. But when you clear the cache in Apple Music, you won’t stream Apple Music songs in Offline Mode. Besides, all of your downloads are only available during the subscription. Luckily, you can throw these troubles away by using Tunelf Apple Music Converter.
Get the product now:
Get the product now:


