As one of the highest-profile streaming music services on the planet, Apple Music continues the growth of its content. And Apple Music has become increasingly important to both Apple users and other users over the years — especially since it replaced iTunes in 2019. So, if you’re subscribing to this service, you access music from around the world.
Although it is convenient to enjoy your favorite tracks on your mobile device, burning music to an audio CD is still a useful method for storing your favorite tunes when you want to listen to music from a sound system, CD player, or computer. Here we’ll show you how to burn Apple Music so that you can play Apple Music anywhere you like.
Part 1. Can You Burn Apple Songs to CD?
With Apple’s music subscription, you’re able to stream songs from around the world, rock out to Beats 1, and enjoy a lot of great features. However, all songs offered by Apple Music come with Digital Rights Management protection. These DRM-protected songs have usage restrictions and feature high-quality audio encoding.
In this case, you’re only allowed to listen to those songs downloaded from Apple Music during the subscription of Apple Music and play them within the Apple Music app, let alone burn Apple Music to CD. For breaking this limitation, the best solution is to remove DRM protection from Apple Music and convert Apple Music songs to DRM-free audio formats.
What You’ll Need to Burn Apple Music to CD
- Your Mac or Windows computer must have a disc drive that can burn discs.
- A blank disc is needed to store your saved Apple Music songs.
- A CD burner is required. If there is no built-in CD burner on your computer, you have to buy an external CD burner to burn Apple Music to CD.
- Most importantly, you’ll need an Apple Music Converter to help.
Part 2. Best Solution of Burning Apple Songs to CD
To complete this special task, you may need an audio converter. There are hundreds of free or paid audio converters in the market claiming that they can convert almost all audio formats. Unfortunately, 99% of them fail to convert Apple Music or iTunes music to MP3. That’s because all Apple music tracks are encrypted with Apple’s Fairplay DRM.
Here we do recommend Tunelf Apple Music Converter to you. is the 1% software that can help you convert Apple Music to MP3 easily. Except for converting Apple Music to MP3, you can also use it to convert Audible, iTunes songs, and common audios to widely-used formats. Here are the main features of this software:
Key Features of Tunelf Audio Converter
- Convert Apple Music to MP3, WAV, FLAC, AAC, and other audio formats
- Remove DRM from Apple Music, iTunes audios, and Audible audiobooks
- Preserve the converted audio with lossless audio quality and ID3 tags
- Support the conversion of audio format at a 30× faster speed in batch
Step 1 Add songs from Apple Music to Tunelf interface
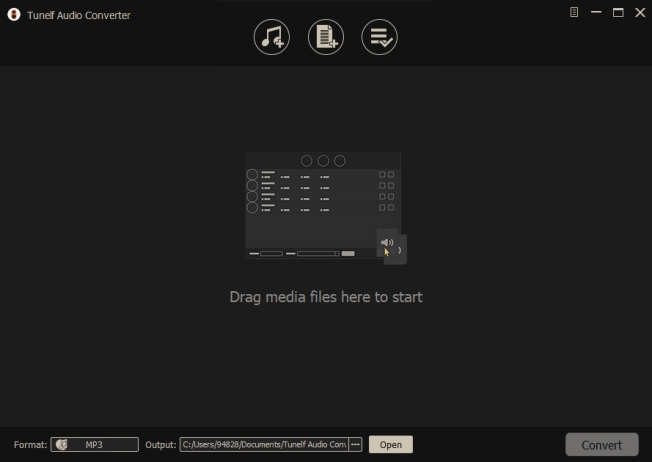
Start by launching Tunelf Audio Converter then it will automatically load Music on your Mac or iTunes on your Windows. To convert Apple Music songs, you first need to add your music files to the conversion list. You can add them to the tool by drag-and-drop. Or you can click the first icon marked as Load iTunes Library and then you can browse your library and select songs you want to burn to a disc.
Step 2 Customize the output parameters for Apple Music
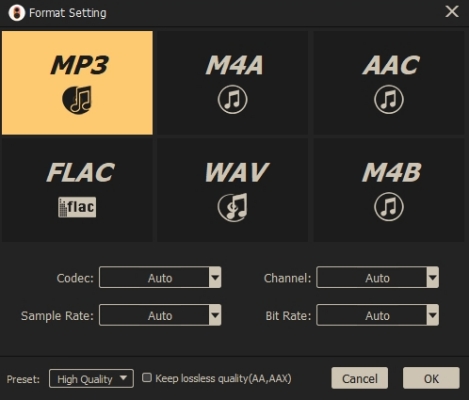
When your required music files are added to the conversion list, you can go to set the output audio parameters by clicking the Format panel at the bottom left corner. In this window, you can select the MP3 option from the list of audio formats. From there, you can also set the bit rate, sample rate, codec, and channel for getting better audio quality. Once you’re satisfied with your settings, click the OK button.
Step 3 Start to convert Apple Music playlist to MP3
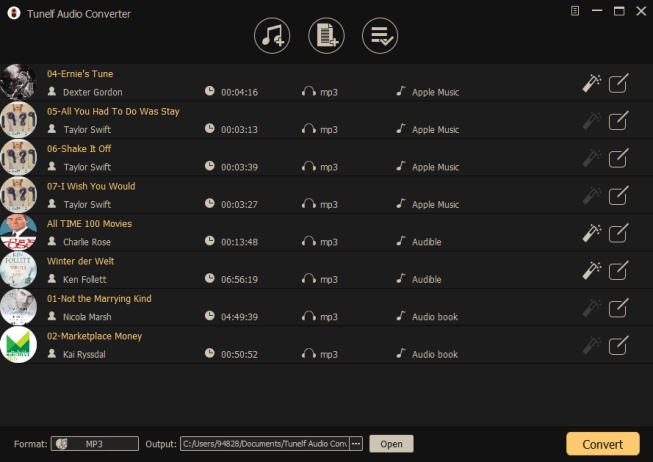
The final step is to initiate the conversion of Apple Music songs by clicking the Convert button on the bottom right corner. After conversion, you can click on the Converted icon to browse your converted songs in the history list. As your files have been saved to your default downloads folder, you can locate the folder by clicking the Search icon at the rear of each track. Now you can go on reading the next part to know how to burn music to CDs.
Part 3. Guide on How to Burn a CD from Apple Music
To burn Apple Music to CD, the most important part is to remove DRM and convert Apple Music songs to a playable format. Now you’ve got it done and what you need to do now is to burn the converted Apple Music songs to a CD. There are several ways to help you burn music to CD, and you could follow the below four methods to copy from Apple Music to CD.
3.1 Burn Apple Songs to CD with Music
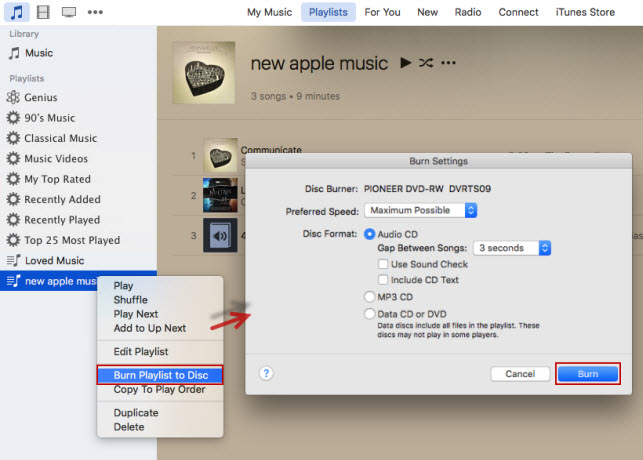
Step 1. Fire up the Music app on your Mac and create a playlist that contains Apple Music songs you want to burn to a CD.
Step 2. Choose View > as Songs and make sure the items you want to include have a checkmark beside them and then insert a blank disc.
Step 3. Select the playlist, then choose File > Burn Playlist to Disc to prepare for the burning of Apple Music to CD.
Step 4. Select a disc format and adjust the burning settings like recording speed and volume. After that, click the Burn button to start burning Apple Music to a disc.
3.2 Burn Apple Songs to CD with iTunes
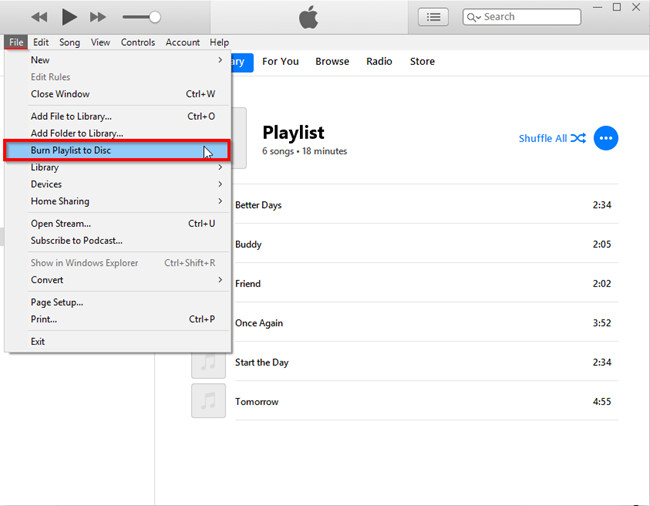
Step 1. Open iTunes on your Windows computer and now you need to create a new playlist for saving the converted Apple Music songs by clicking the File menu > New > Playlist.
Step 2. After you add the converted Apple Music songs to this playlist, insert a blank CD into the disc drive and then click the File menu to select the Burn Playlist to Disc option.
Step 3. Once you get the previous step done, you can go to adjust the burning settings like disc format and burning speed.
Step 4. Finally, click the Burn button on the bottom right corner of the interface to initiate the burning of Apple Music to CD.
3.3 Burn Apple Songs to CD with VLC Media Player
Step 1. Open the VLC player on your computer and create a new playlist. Then drag and drop Apple Music songs you want to burn to CD onto the playlist dock.
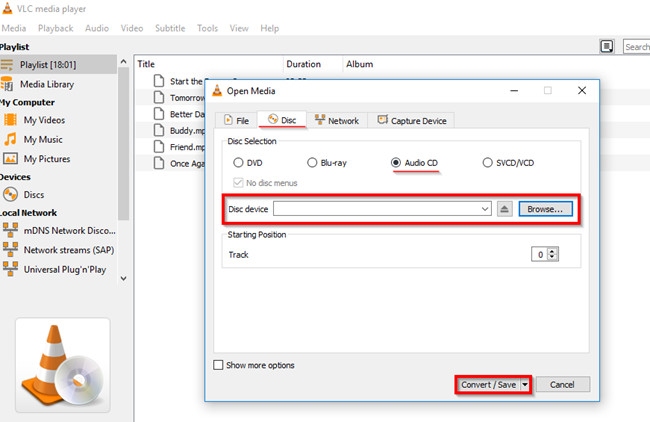
Step 2. Once your required Apple Music songs are added to the playlist, click the Media menu, choose the Convert/Save button, and click the Disc button.
Step 3. Now insert a blank CD into the disc drive and click Audio CD and Browse to choose the Convert/Save option.
Step 4. When you see the Convert screen, click the Browse button to add the created playlist and then click the Convert/Save button to start burning Apple Music into a CD.
3.4 Burn Apple Songs to CD with Windows Media Player
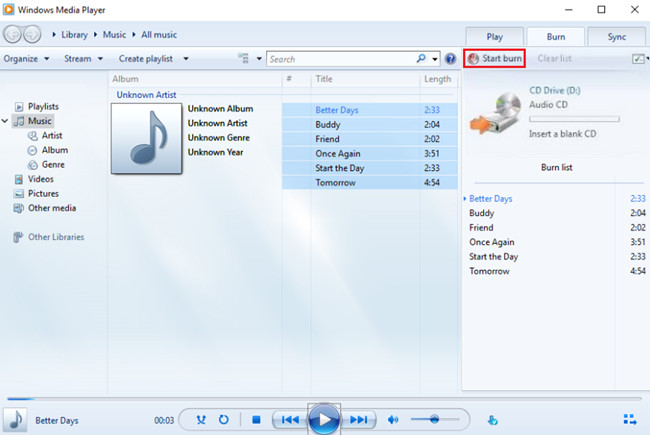
Step 1. The first step is to import the converted Apple Music songs to Windows Media Player. Just click the Playlist panel on Windows Media Player to create a new playlist.
Step 2. After creating a new playlist, drag and drop Apple Music songs onto the created playlist and insert a blank CD into the disc drive.
Step 3. Next, click the Burn button in the top right corner of the interface and drag and drop your created playlist onto the Burn List dock at the right side of the interface.
Step 4. The last step is to select the Audio CD option from the menu and click the Start Burn button to start to burn Apple Music songs to a CD.
Final Words
The above are all the solutions that can help you burn songs to CDs from Apple Music. But before the burning, the most thing you need to do is to convert Apple Music to DRM-free audio formats like MP3 by using an Apple Music Converter. Here Tunelf Apple Music Converter could be a good option and you’ll find it out.
Get the product now:
Get the product now:


