Apple Music – songs greyed out on my playlist. Recently, some songs are greyed out on my playlist. If I clicked the song, region lock notification will pop out. But if I search those songs on Apple Music, they can be played. I don’t think it’s a region lock issue. Does anyone how to solve this?
— User from the Apple CommunityAs one of the major music streaming service providers, Apple Music is outperforming its competitors with its vast collection of music and other original audio content. It also keeps producing new features and surprises for its users, making it a top choice for music lovers. The working team behind its app is worth praise. Though Apple Music is a well-established app and has been tested by professional teams, technical issues still exist. One of the most common complaints users have is that Apple Music songs greyed out on their devices.
This problem also appears to be happening on iTunes. For users who also encountered this problem and have endeavored to find the solutions, this article can offer some valuable insights. Keep reading this post and you can learn how to fix the issue with diverse useful solutions. The detailed tutorial is prepared below, and you just need to follow it step by step.
Part 1. Why Are Some Songs Greyed Out on Apple Music/iTunes?
Apple Music songs greyed out is the signing that they can not be played currently. In most cases, this issue happens because they are no longer available in Apple Music’s library due to copyright licenses. Beyond that, there are many other affecting factors. Here we will show you some of them and you can take the below content as a reference.
1. The song may no longer be available in your region or country.
2. The songs in your library have a syncing problem.
3. Some of your songs may have been encoded in formats that are no longer supported or have DRM restrictions.
4. Your Apple Music subscription expires.
5. Your iCloud Music Library is not matched correctly with the Apple Music catalog.
6. The music files are corrupted.
7. There are temporary bugs and errors in the Apple Music/iTunes app.
Part 2. Things to Check When Apple Music Greyed out Songs
Check the Internet Connection
A stable network is essential for using Apple Music smoothly, as the app relies on it to load songs from your library. If there’s an issue with your internet connection, such as high latency, songs may appear greyed out. To resolve this, check both your internet connection and settings. If the network speed is slow, try resetting the network settings on your device or rebooting your router to improve performance. Additionally, ensure that Apple Music is allowed to stream over the cellular data of your device. To do this, go to Settings > Music > Wireless Data, and select WLAN & Cellular Data.

Don’t Use a VPN Service
Many songs and albums are region-specific on Apple Music due to licensing agreements. Thus, make sure you are not using a VPN service. Otherwise, Apple Music might detect a mismatch between your account region and IP address, causing your songs to be greyed out. Additionally, using a VPN might cause syncing problems between devices as well. If you regularly use servers in different locations, you may lose tracks from your iCloud Music Library.
Use the Latest Version of Apple Music and iOS
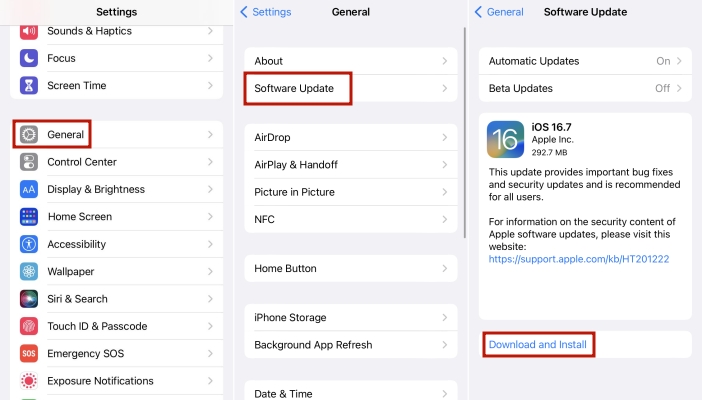
It’s always a good idea to make sure that you are running the latest software. Thus, you can have the most recent performance fixes added. Also, you will need the latest iOS system to make sure that there is no incompatibility issue between your device and the new Apple Music app. Just go to the App Store and you can check for updates. For updating iOS, you will need to select Settings > General > Software Update. When there is a new version, tap Download and Install to get it.
Check Your Apple Music Subscription
Another important step is to check the status of your Apple Music subscription. If your subscription has expired, you will no longer have access to the Apple Music catalog, which could explain why your songs are greyed out. To play them again, you’ll need to renew your subscription. You can check the status of your subscription by going to Settings > Your Name > Subscriptions on your device. From there, you’ll be able to see if your Apple Music subscription is active or needs to be renewed.

Log in with the Same Apple ID
Ensure that you’re logged in with the same Apple ID that has an active subscription on all your devices. This will allow your library to sync properly across all platforms.
Check the Availability of the Greyed-out Songs
If you notice songs in your library are greyed out, try searching for them in the Apple Music catalog to see if they’re still playable. If they can be played from the search results, the issue lies with your library, and you can try re-adding the songs. However, if the songs no longer appear or can’t be played, they may have been removed due to licensing issues and are no longer available on Apple Music.
Check the Cloud Status of the Greyed-out Songs
Checking the cloud status of greyed-out Apple Music songs on your Mac or PC can be very helpful in identifying the issue and restoring these problematic tracks. Here are the precise steps.
1. Fire up your Windows or Mac computer, and open the iTunes or Apple Music app. Sign in to your account.
2. Head to Library, and then select Songs from the sidebar.
3. After that, click View > Show View Options in the menu bar.

4. In the new pop-up window, you need to select the checkbox before iCloud Status and iCloud Download.

5. Once done, you can see the statuses next to your songs to learn what happens.
The Waiting icon means this song is waiting to be uploaded.
The removed icon means this song was deleted from your other device that has enabled the Sync Library option.
The exclamation point means that you must locate the original file of the song to play it or sync it across your devices.
Part 3. How to Fix Apple Music/iTunes Songs Greyed Out
Based on the information above, you should now have a clearer understanding of what’s causing your greyed-out songs. It’s time to resolve this frustrating issue and restore your favorite tracks. You can choose one of the solutions below and follow the specific steps provided. To prevent this issue from occurring again, we recommend the ultimate fix: backing up your songs as local files. For more detailed information, please refer to Part 4.
Solution 1. Enable iCloud Music Library
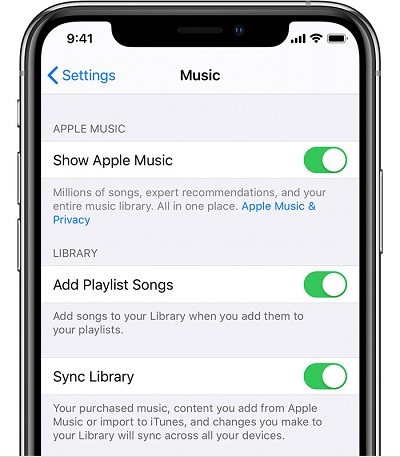
The syncing problem is one of the dependent factors that may lead to greyed-out issues. On iPhone, you may need to check the sync settings on Apple Music and enable it. When there are streaming or other issues, try to re-enable it. Here are the steps to do so on different devices.
On iPhone/iPad:
1. Go to Settings on your iOS device.
2. Find and tap Music.
3. Toggle on Sync Music.
On Mac/Windows:
1. Launch iTunes on your desktop and sign in to your account.
2. In the menu bar, click Edit > Preferences.
3. Then, switch to the General tab and turn on the iCloud Music Library option.

Solution 2. Log out and Log Back In
Logging out and logging back in can help refresh your session and let Apple Music sync your account information again, resolving sync or accessing issues within the app and getting your songs playable again. It is a simple troubleshooting step that can resolve problems and enhance your experience.
1. Open the Settings app on your iPhone, Mac, or iPad.
2. Click iTunes & App Store and then tap your ID.
3. Next, tap the Sign Out button.
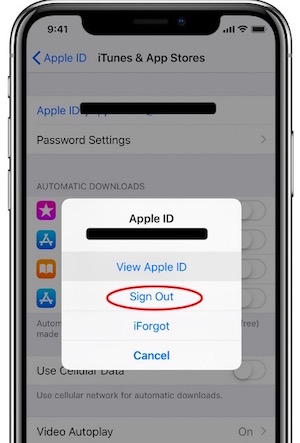
4. Wait for a few seconds, and log back into your Apple ID.
Solution 3. Re-add or Re-download the Greyed out Songs
When you encounter greyed-out issues on your iPhone or iPad, it’s a simple fix to delete the greyed-out songs and re-add them to your music library. To do so, check the methods here:
On Apple Music:
1. Open Apple Music on your device and go to the Library.
2. Tap Downloaded to check the downloaded songs. Find the greyed-out song, and then touch and hold it.
3. After that, select Remove > Delete.
4. Next, go to the Apple Music catalog and search for the song again.
5. Once you find it, tap and hold it. In the pop-up window, select Add to Library.
On iTunes:
1. Open iTunes on your device and then navigate to iTunes Store which is at the top as shown in the figure.
2. After that, tap on your account and then, look for the purchased option. Here, all the songs will be listed for you.
3. Next, select a song that greyed out and simply download it again from iTunes.
Solution 4. Re-authorize Your Computer
If your iTunes still won’t show up and play songs, as usual, this step might be another helpful resort. You can try to de-authorize your computer and then re-authorize it. Here I’ll show you what you can do:
1. Open your iTunes library and click Store from the menu bar.
2. Select Deauthorize This Computer option from the drop-down menu and sign out of your iTunes account.
3. After that, restart your device and re-open the iTunes library, then go to Store and enable Authorize This Computer option.

Solution 5. Check Selection on iTunes
There is a setting in iTunes that may cause the iTunes songs greyed out issue. If the specific setting is turned on, you may need to disable it to solve the problem. Just follow the simple steps below:
1. Open your iTunes library and navigate to the greyed-out songs.
2. Right-click on the selected songs and find an option that says Check Selection.
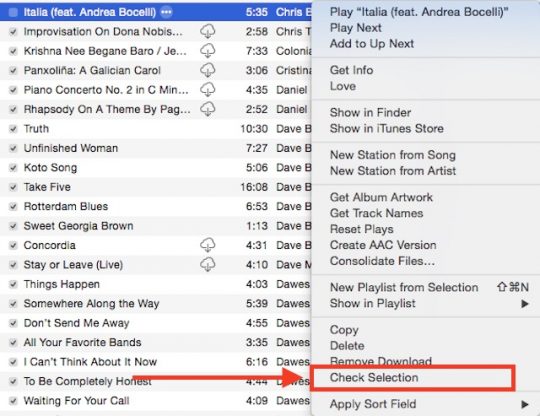
3. Now turn it off to see if the songs will show up.
Solution 6. Remove Restriction on Your Device
One possible situation is that you have a restriction turned on for your device, which causes your Apple Music songs to greyed out. For example, the screen time restriction. In such a case, you can turn off it to play your Apple Music songs again.
1. Head to the Settings app on your iPhone or iPad.
2. Scroll down to select Screen Time.
3. Select Content & Privacy Restrictions and toggle it off.
4. Next, restart Apple Music and try to play your songs again.
Part 4. Ultimate Fix: Back up Apple Music Songs Locally
If your Apple Music songs are greyed out and are unable to play, you may need to check the audio formats of the songs. Probably they’re DRM-protected and it is this format that restricts us from playing Apple songs. To check it, open your iTunes music library and right-click on your greyed-out songs. In the drop-down menu, select Get Info > File > Kind to check. If it shows “Protected” next to kind, this means the song is protected by the DRM copyright format or not supported. If this is the case, the best way to fix Apple Music/iTunes songs greyed out is to remove the protection limits from the tracks so that they can be playable.
To remove the restrictions on Apple Music songs, you’ll need this tool: Tunelf Apple Music Converter. As an all-in-one converter, Tunelf Apple Music Converter aims to bring people convenience and happiness for streaming audio files without limits. It can deal with three main audio files from Apple Music, iTunes, and Audible. Thanks to the advanced and innovative technology, Tunelf can download DRM-free audio files from them and convert these audio files to multiple common audio formats like MP3, FLAC, etc. Most importantly, the original music quality and ID3 tags will be preserved without any loss. And the 30x conversion speed allows you to convert in batches. Here are the steps about how to convert Apple Music to your target common formats.

Key Features of Tunelf Audio Converter
- Convert Apple Music to MP3, WAV, FLAC, AAC, and other audio formats
- Remove DRM from Apple Music, iTunes audios, and Audible audiobooks
- Preserve the converted audio with lossless audio quality and ID3 tags
- Support the conversion of audio format at a 30× faster speed in batch
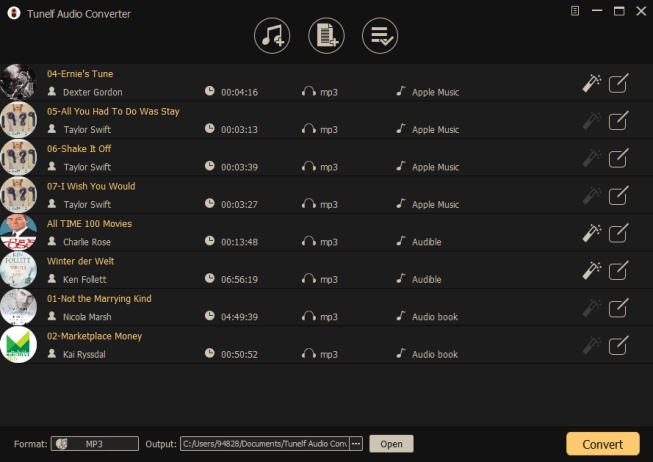
Step 1 Add iTunes/Apple Songs to the Tunelf program
Before conversion, you’re supposed to sign up for Tunelf Audio Converter first. Then don’t forget to download and install the iTunes app on your device. When you launch Tunelf, the iTunes app will run simultaneously. You can browse your music library and choose a song to import to the program by clicking the Add Files icon.
Step 2 Configure the output audio parameters
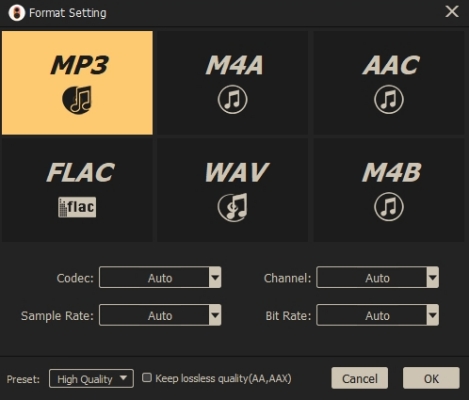
Now you can select MP3 from the list of audio formats by clicking the Format button at the bottom. You can also set the bit rate, sample rate, codec, and channel for getting better audio quality here. After deciding, click the “OK” button to go back to the interface.
Step 3 Download iTunes/Apple Music as local files
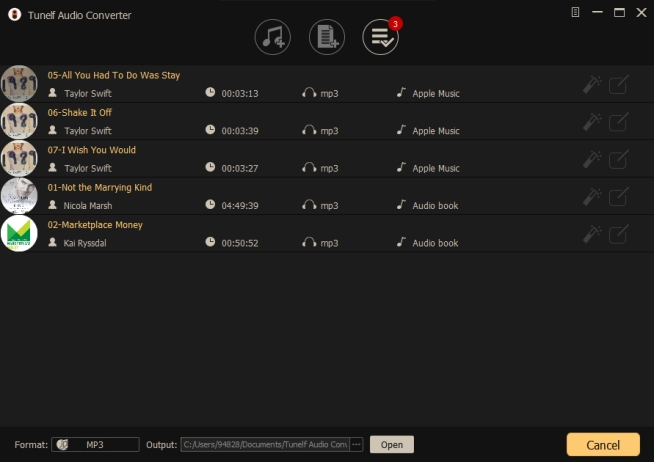
Now it is time to download and save Apple songs to your PC computer. Click on the Convert button, and Tunelf Audio Converter will save Apple Music/iTunes songs as your required formats to your computer. The conversion speed is 30x faster, it’ll cost a concise time to complete the conversion. Once it’s done, you can locate the converted audio files in the storage folder you set before and then share them to any device or platform for playback.
Part 5. Conclusion
Regarding the iTunes/Apple Music songs greyed out issue, we’ve illustrated the best fixes above for you to check. Remember to back up your playlists before applying the methods, in case of unnecessary losses. And to save your efforts and reach a better user experience, you’re advised to download Tunelf Apple Music Converter to back up your favorite Apple Music tracks locally.
Get the product now:
Get the product now:


