When we listen to music, what do you think is the most important? You may say the audio quality. You’re true. But what I’m going to say today is another vital factor, that is the listening experience. Every time when a song ends, it’ll always need a few seconds to play the next song. How to remove the silence period? I guess you need the crossfade function. When you turn on the crossfade, you can stream Apple Music without pause. Now please read this post carefully to figure out how to turn on Apple Music crossfade.

Part 1. What Is Apple Music Crossfade
The crossfade means the songs will be played one by one without pause. When we stream music, we may experience a short period of silence before switching to the next song. With crossfade, you can enjoy the music playing smoothly and it will never stop. The crossfade is the transition effect while playing one song to another. When a song is finished, the end of the current song will fade into the beginning of the next song. You’ll get a more pleasant listening experience if the Apple Music crossfade is on.
Part 2. How to Crossfade Apple Music on Your Devices
Apple Music released the crossfading feature in the early times. You can set crossfade on iPhone, iPad, Android, Mac, and Windows. Unluckily, it is not available on iOS systems that are lower than iOS 17. If you use an old iOS system, you cannot set this feature on your phone. But you can use an alternative method to reach it and more details are shown in part 3. Now let me show you how to set crossfade Apple Music on multiple devices.
2.1 On iPhone/iPad
Note: You need to update your iPhone or iPad to the latest version of iOS or iPadOS so as to enable the crossfade feature. To check out the update, you can head to Settings– General – Software Update.
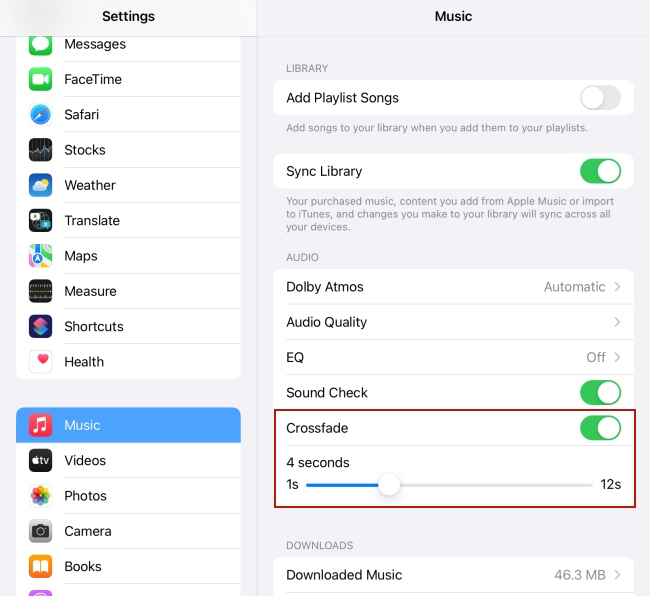
1. Go to Settings on your iPhone or iPad.
2. Scroll down to tap Music.
3. Switch the Crossfade button on under the AUDIO section. Then, you can set the crossfade duration as you wish.
2.2 On Android
1. Launch Apple Music on your Android device.
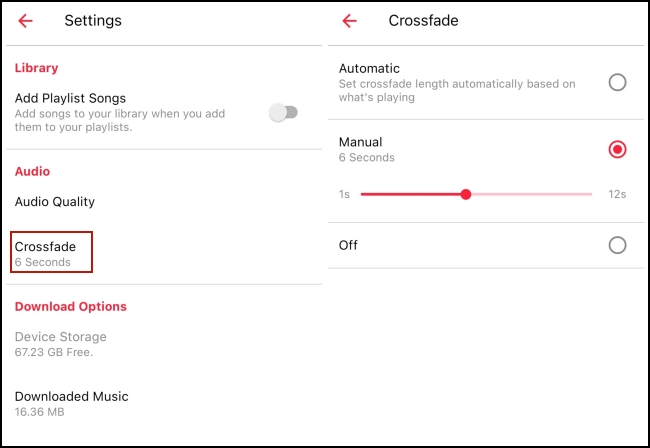
2. Tap the three-dot icon on the upper-right of the interface and select Settings.
3. Tap Crossfade and then you can choose the Automatic option or the Manual option to enable the crossfade.
2.3 On Mac
1. Open Apple Music on Mac.
2. Go to the Music > Settings.
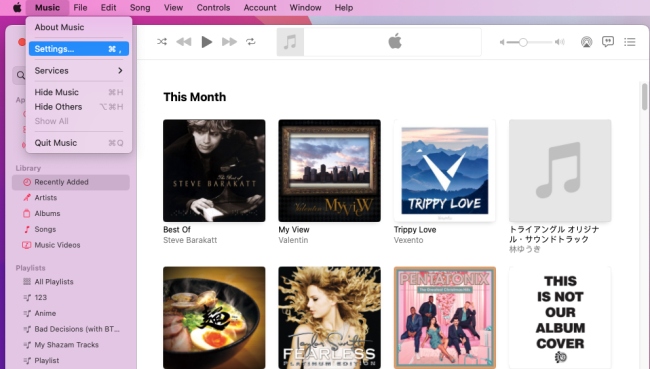
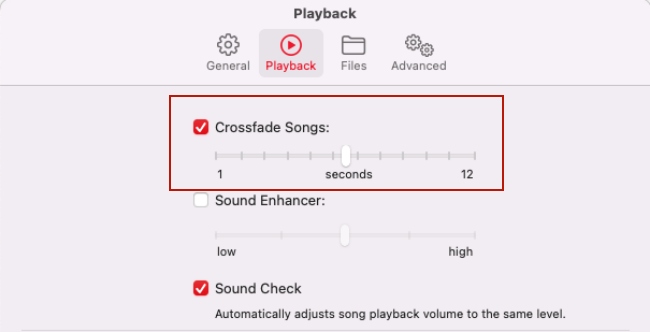
3. Select the Crossfade Songs option under Playback. Here you can drag the slider to adjust the transition time.
2.4 On Windows
1. Open the iTunes app on your computer.
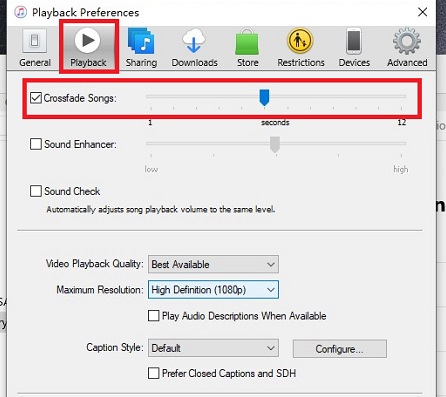
2. Go to Edit > Preferences > Playback.
3. Select the Crossfade Songs option and drag the slider to adjust the transition time.
Part 3. Get Apple Music Crossfade without Limitation
You may ask what if I use an older iPhone? Can I get this feature? Don’t worry. For users using systems lower than iOS 17, though you cannot use this feature on Apple Music, you can download Apple Music and transfer it to Spotify to enjoy the crossfade service. While due to the DRM from Apple Music, we can’t own the downloaded music completely. In order to download Apple Music and transfer it to Spotify for streaming, you need a professional Apple Music converter.
Tunelf Audio Converter is designed to remove DRM from Apple Music and convert Apple Music songs to MP3 or other compatible audio formats. After conversion, you can download Apple Music on your computer and keep the converted music files playable on multiple devices you like. It can also convert audio files including Apple Music, iTunes Music, and audiobooks to popular audio formats. Meanwhile, you can even edit the audio files according to your preferences and can split the audio with different modes such as segment, and chapter. Can’t wait to know how it works?
You can read the steps below.

Key Features of Tunelf Audio Converter
- Convert Apple Music to MP3, WAV, FLAC, AAC, and other audio formats
- Remove DRM from Apple Music, iTunes audios, and Audible audiobooks
- Preserve the converted audio with lossless audio quality and ID3 tags
- Support the conversion of audio format at a 30× faster speed in batch
Step 1 Add Apple Music to Tunelf software
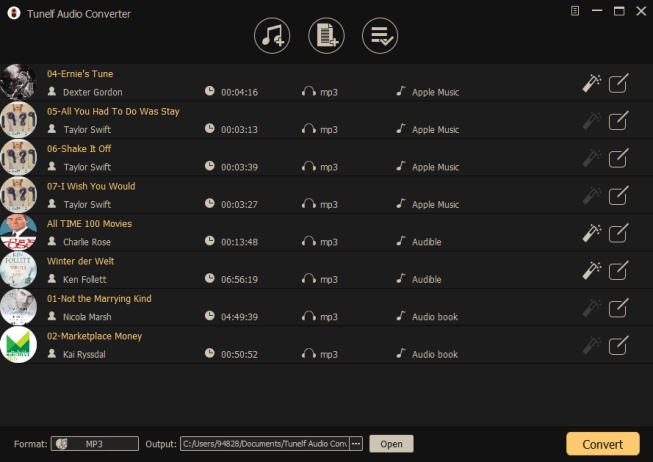
To begin with, you’d better purchase and get registered for Tunelf Audio Converter. And as Tunelf needs to access the data of your music, you have to download and install the iTunes app on your computer. When you open Tunelf, the iTunes app will run simultaneously. You can see three icons displayed on the top of the main screen. To add songs you want to convert, you can directly drag and drop your songs to the interface. Or you can click the Load iTunes Library button to browse your songs or locate the folder where you save songs by clicking the Add Files button.
Step 2 Set the output formats for Apple Music
Now you can select MP3 from the list of audio formats by clicking the Format button at the bottom. You can also set the bit rate, sample rate, codec, and channel for getting better audio quality here. After deciding, click the “OK” button to go back to the interface, then click “Convert” to start conversion.

Step 3 Download Apple Music to MP3
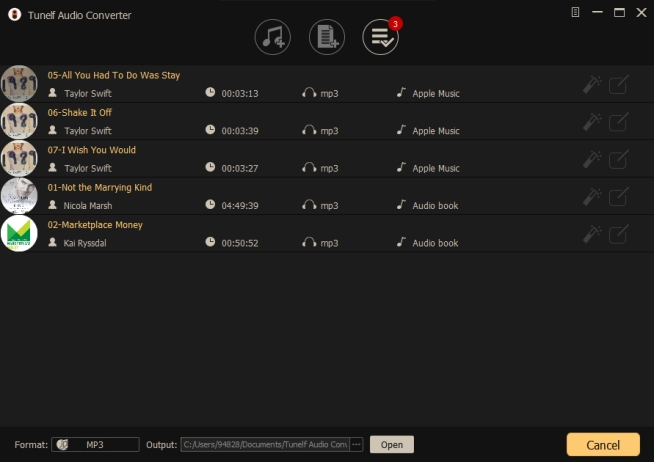
When you click the Convert button, Tunelf will convert Apple Music to MP3 automatically. The conversion speed is 30x faster, it’ll take a very short time to complete the conversion. Once it’s done, you can locate the converted audio files in the storage folder you set before and then share them with any device or platform for playback.
Step 4 Crossfade Apple Music on other players
Now the converted Apple Music files are saved on your computer. You can play them on other players that have the crossfade feature.
Method 1. Spotify
1. Upload or transfer Apple Music to Spotify.
2. After transferring, you can tap the Home button and go to Settings > Playback > Crossfade on your mobile phone. Then adjust the slider to select the crossfade length.
3. If you’re using Spotify from a desktop, you can click the down arrow in the top-right and select Settings.
4. Then go to SHOW ADVANCED SETTINGS and toggle the Crossfade songs on. Finally, you can move the slider to select the crossfade length.
Method 2. Windows Media Player
1. Add the downloaded Apple Music to Windows Media Player.
2. Play one song and enter the Now Playing window.
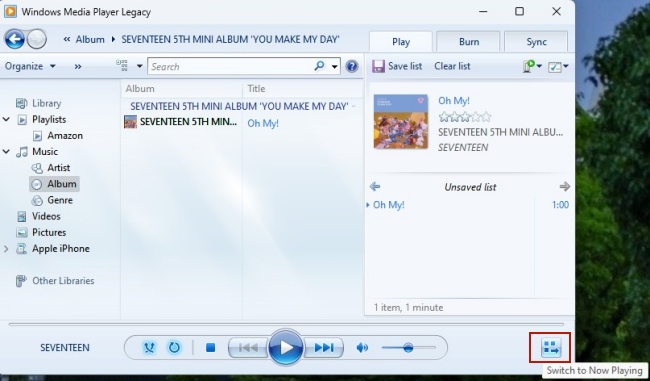
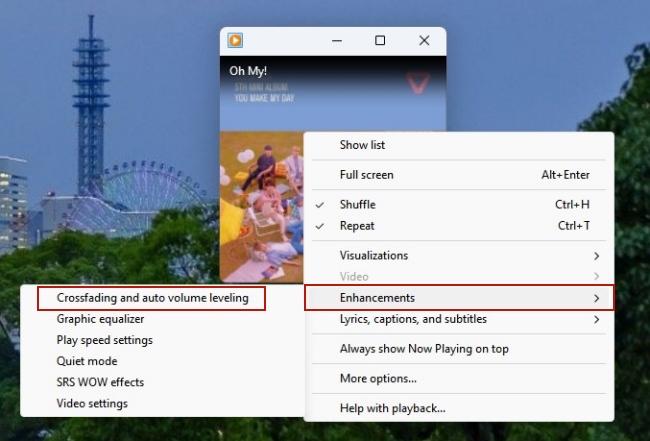
3. Right-click the Now Playing window and click Enhancements – Crossfading and auto volume leveling.
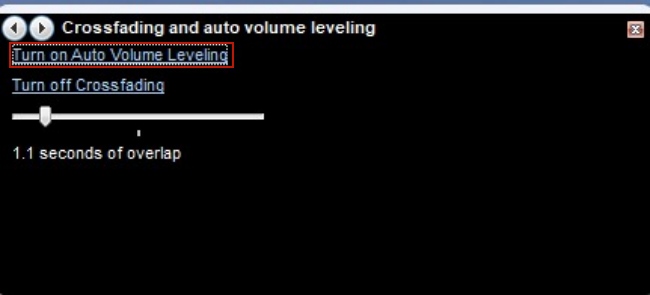
4. Click Turn on Crossfading to enable it. You can use the slider below to adjust the duration between songs.
Part 4. FAQs about Apple Music Crossfade
Q1: Is it possible to crossfade Apple Music on iOS 16?
A: Well, the Apple Music crossfade feature is not available on iOS 16 now. If you have an iPhone with iOS 16, you can only download tracks from Apple Music via Tunelf Audio Converter, and then transfer them to other players that have crossfade function.
Q2: How long does Apple Music crossfade last?
A: You can set the duration of crossfade from 1 to 12 seconds on Apple Music. Adjust the slider on the crossfade bar and you can change it.
Q3: Why doesn’t my Apple Music crossfade work?
A: When you encounter the problem of crossfade not working, you can try the below steps to solve it.
1. Make sure that you have already enabled the crossfade option on Apple Music. You can check this on Settings – Music – Crossfade.
2. Check the crossfade duration. If it is set as 0, it won’t work.
3. Update your iOS or iPadOS system. The crossfade feature now is only accessible on iOS 17 instead of other iOS systems.
4. Close the Apple Music app and make sure it not running in the background. Then restart your device and open Apple Music again.
Part 5. Conclusion
Music lovers can enjoy a better listening experience once set Apple Music crossfade. This feature is available on multiple devices, including iPhone, iPad, Android, Mac, and Windows. The complete guidance is listed above and we also offer you an alternative way to enjoy the crossfade feature. All you need is Tunelf Audio Converter to download Apple Music and transfer it to other music players that have crossfade for listening, such as Spotify and Windows Media Player. Now, click the link below to start your conversions.
Get the product now:
Get the product now:


