Your Kindle can do more than just being an e-reader. It can also play your music files, which is one of its great functions. With a kindle fire by your side, you can listen to your favorite music while reading. While many of you are here seeking ways to play Amazon Music on Kindle Fire. Here in this guide, we’ll show you two possible ways of streaming Amazon Music on Kindle Fire.

Part 1. Download Amazon Music on Kindle Fire via Amazon Music App
If you have got an Amazon Prime membership, you can access over 2 million songs and thousands of playlists and stations at no extra charge. Or if you’ve subscribed to Amazon Music Unlimited, you can choose from more than 70 million songs. Both Amazon Music Unlimited and Prime Music songs can be downloaded for offline playback.
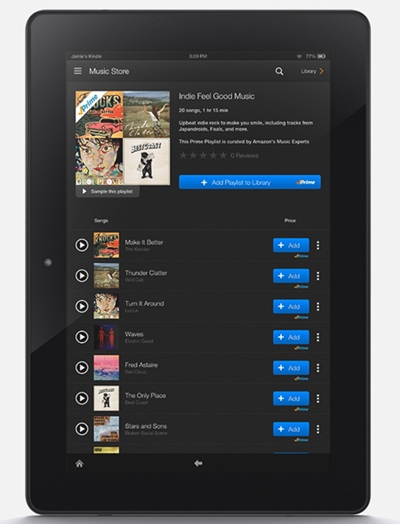
Step 1. Launch the Amazon Music app on Kindle Fire.
Step 2. Select the music (song, album, playlist, etc.) you want to download.
Step 3. Tap the More Options menu, and tap Download.
You’re all set! Now you can stream Amazon Prime Music from your Kindle Fire at ease.
Part 2. Stream Amazon Music to Kindle Fire via Amazon Music Downloader
Pay attention that you can just download Prime music or Music unlimited tracks for offline listening. All you’ve downloaded are some cache files that only accessible within the Amazon Music app. It is not possible to export them for use on other apps and devices. Sounds a little frustrated, right? Don’t worry. Things will be smoothly solved with a smart Amazon Music downloader. Continue reading and find more about it.
2.1 Best Amazon Music Converter You’ll Need
As a powerful converting tool for Amazon Music, Tunelf Amatune Music Converter is specialized in converting your preferred Amazon Music songs to several widely-used formats such as MP3, AAC, FLAC, and more while retaining a lossless audio quality.
What’s more, this smart converter allows you to download your favorite Amazon songs in lossless quality at a fast speed. After conversion, you can keep the converted Amazon Music in your local folders forever and stream them on multiple devices with ease. In some ways, if you don’t want to subscribe to Amazon Music, Tunelf is the best option to shoot for you.

Key Features of Tunelf Amazon Music Converter
- Download songs from Amazon Music Prime, Music Unlimited, and HD Music
- Convert Amazon Music songs to MP3, AAC, FLAC, WAV, M4A, and M4B
- Handle the audio conversion of Amazon Music at a faster speed of 5×
- Ensure the output audio quality while retaining ID3 tags and metadata
2.2 Steps to Convert Amazon Music Tracks to MP3
Before converting your favorite Amazon Music tracks, you should download Tunelf Amatune Music Converter first from the Tunelf official website. You can then follow the steps below to convert Amazon Music to MP3.
Step 1 Select playlists or albums to convert
Once launch the program on your computer, it’ll run the Amazon Music app simultaneously. Now sign in to your Amazon Music account first and then select your favorite songs as you need. Just open the playlist or album, tap the three-dot icon to open more options, then you can copy and paste to load in playlists to the Tunelf conversion list.
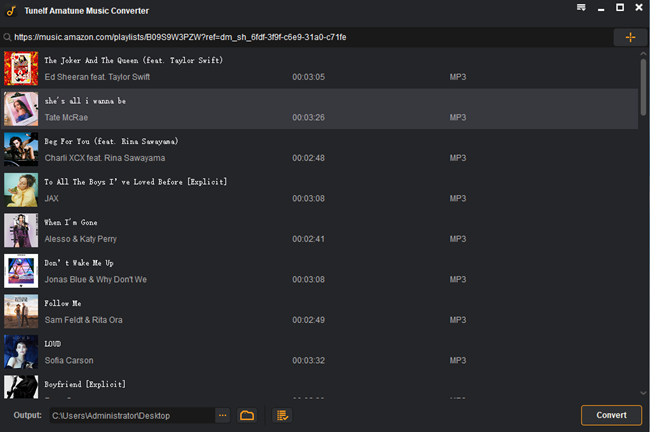
Step 2 Adjust your output preferences of Amazon Music
Once imported, you should click the top Menu button, select Preferences, and then switch to the Convert window. Here, you can choose the audio format from MP3, AAC, M4A, M4B, FLAC, and WAV. Besides, you’re able to set the channel, bit rate, sample rate, and more importantly, specify the output path.
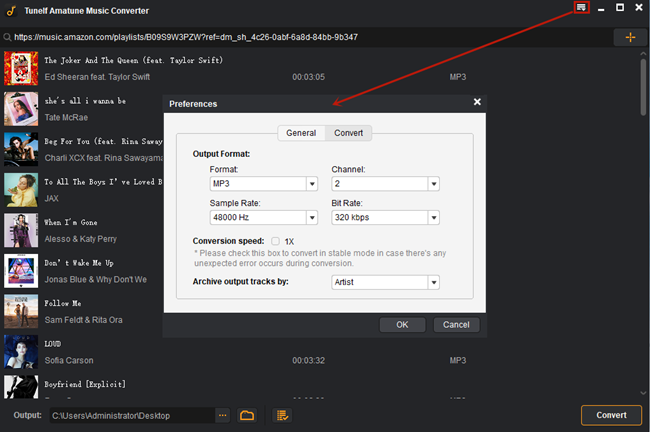
Step 3 Start to convert music tracks you selected
Now check the conversion list and select the music tracks you need. Then you just need to hit the Convert button below to start the conversion. Here you should pay attention that you can still go back to select other playlists and enjoy other music tracks when the program is tackling the conversion process.
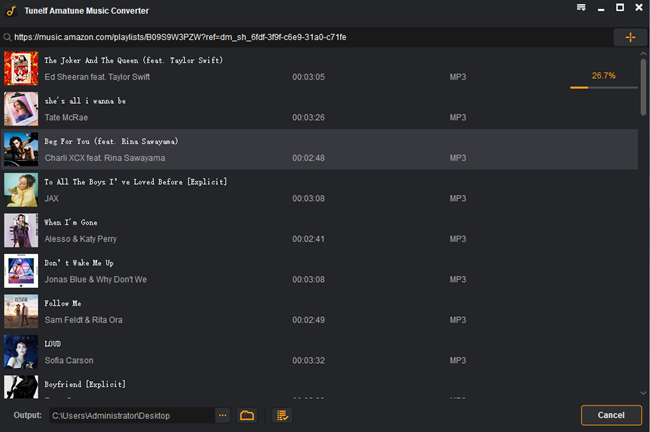
Once completed, you can view all the converted music tracks on the Converted page. Now you can easily find the converted Amazon Music tracks on your computer.
2.3 Transfer Amazon Music to Kindle Fire
Sometimes you don’t have access to the Internet, which means all those songs in the cloud won’t be accessible. For times like this, you can upload the converted Amazon Music to your Kindle Fire directly. Be aware that any music added to your Kindle Fire via this method will take up space on the device. Just upload them using the steps below.
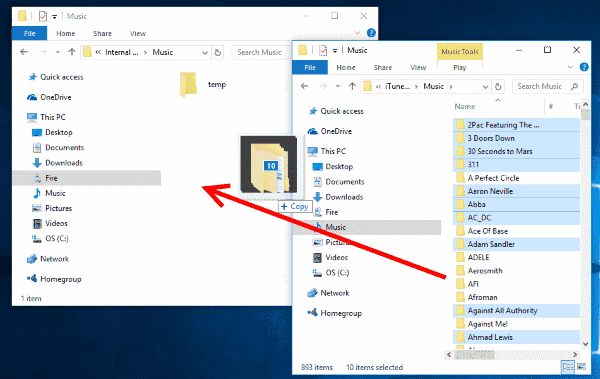
Step 1. Connect your Kindle Fire to the computer via a USB cable.
Step 2. Once successfully connected, unlock the screen of your Kindle. Now the Kindle Fire will show up as a media device on your computer.
Step 3. Windows users can look under This PC/Computer. Mac users can download and install Android File Transfer and look for Fire or KINDLE on the desktop.
Step 4. Open the Fire or KINDLE. You will see a folder named Music. You can drag and drop the converted Amazon Music files into this folder.
The item will then be uploaded to the cloud and available on your Kindle Fire in the Music app. Now you can stream Amazon Music on Kindle Fire offline at ease.
Part 3. Solutions to Amazon Music Not Working on Fire Tablet
If you come across issues that Amazon Prime Music not working on Kindle Fire like freezing, crashing, or refusing to open, you can try the following steps. If all those cannot take effect, just try Tunelf Amatune Music Converter to upload your Amazon Music playlists. Then you can solve Amazon Music not working on Kindle Fire once and away.
1. Restart Your Fire Tablet
1) Press and hold the power button for up to three seconds until you see a shutdown request message.
2) Select OK and your device turns off.
3) Press the power button for two to three seconds to turn it back on.
2. Force Close Amazon Music on Your Fire Tablet
1) Select Apps & Games or Apps & Notifications from the Settings menu.
2) Select Manage All Applications then select Amazon Music.
3) Select Force Stop.
3. Clear Amazon Music Cache and Data on Your Fire Tablet
1) Open the Settings menu and select Apps & Notifications.
2) Select Manage All Applications or See all … apps and choose Amazon Music.
3) Select Storage, tap to Clear Data or Clear Storage, then Clear Cache.
4. Uninstall & Install Amazon Music from Your Fire Tablet
1) On the Games & Apps tab, select Library.
2) Locate Amazon Music you’d like to uninstall and select […].
3) Select Manage All Applications and select Amazon Music.
4) Select Delete from Device.
5) Select Amazon Music from your Library to download it or search fo Amazon Music in the Store.
Conclusion
This passage mainly posted two ways of playing Amazon Music on Kindle Fire. With Tunelf Amatune Music Converter, you can keep those Amazon Music tracks permanently and enjoy them on any device you want. Just get it and keep your preferred Amazon Music tracks forever.
Get the product now:
Get the product now:


