Launched in 2011 as a successor to MobileMe, iCloud is Apple’s current cloud-based file storage and services platform. The service permits users to share and store data across multiple devices, from photos, documents, and music to device backups and app data synchronization information. Apple is offering 5GB of iCloud storage for free to all users, with paying options starting at $0.99 per month for 50GB.
Since iCloud is an essential part of the Apple ecosystem, there is no doubt that backing up Apple Music to iCloud is pretty easy. However, there are still many people wondering if they can save other streaming music services to iCloud, such as Spotify and Amazon Music. In this article, we’ll have a detailed tutorial to show you how to back up Amazon Music to iCloud Drive.

Part 1. Can I Download Amazon Music to iCloud?
At present, all the popular streaming music services are only accessible in the music players themselves, and Amazon Music is no exception. Protected by digital rights management, content from Amazon Music can not be transferred to other apps. Therefore, if you want to save Amazon Music to iCloud, you’ll need to remove the DRM protection from Amazon songs and convert them to iCloud-supported file formats. How can you achieve that?
No worries. Here Tunelf Amatune Music Converter comes to help you download and convert your favorite Amazon songs. This powerful Amazon Music converting tool is equipped with high conversion technology that can easily convert the encrypted Amazon Music to commonly used formats like MP3, FLAC, WAV, and more. All the converted Amazon songs will remain a lossless audio quality, as well as full ID3 Tags.

Key Features of Tunelf Amazon Music Converter
- Download songs from Amazon Music Prime, Music Unlimited, and HD Music
- Convert Amazon Music songs to MP3, AAC, FLAC, WAV, M4A, and M4B
- Handle the audio conversion of Amazon Music at a faster speed of 5×
- Ensure the output audio quality while retaining ID3 tags and metadata
Part 2. How to Convert Amazon Music for iCloud
Now just download the program on your computer and follow the three steps below to get your preferred Amazon songs. Take care to select the right version for your computer.
Step 1 Add Amazon Music songs to Tunelf software
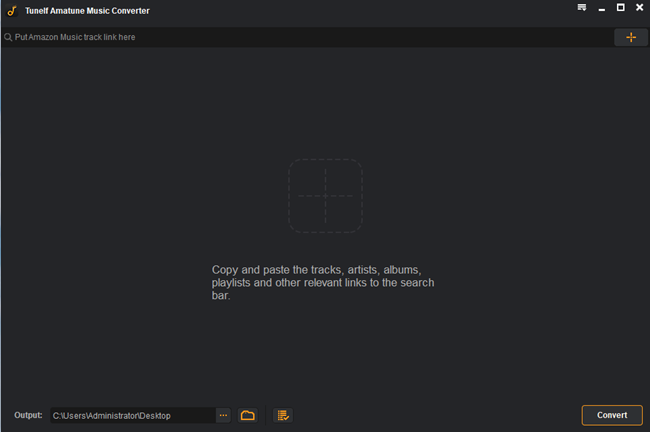
Once you downloaded the Tunelf software, you can click and launch it on your desktop. You will find the Amazon Music app opens itself at the same time. Then, you can log in and choose the track you want to download and save on iCloud. Just copy its link and paste the link into the search bar on Tunelf’s interface. After that, click the add icon next to it and the track will be loaded to the converter.

Step 2 Preset the output settings for iCloud
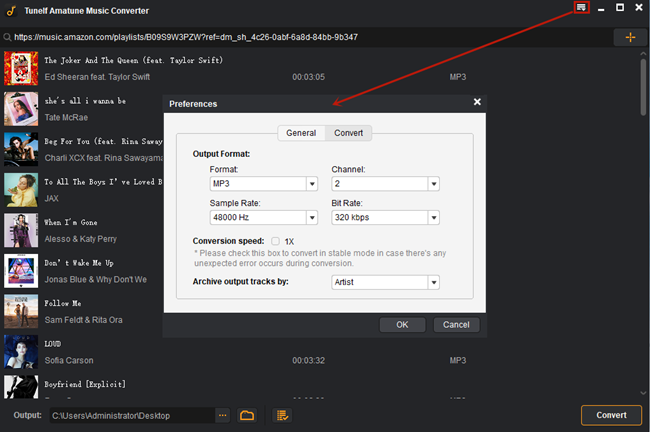
When you add all the Amazon Music tracks you want to save on iCloud, you should set the output settings so that the music files can be uploaded successfully. Enter the menu section by hitting the icon at the top right corner. Then, choose Preferences > Convert. Here you can choose the output format that is compatible with iCloud. Also, other parameters like channel, bit rate, and sample rate can all be changed according to your demands.

Step 3 Start to download Amazon songs for iCloud
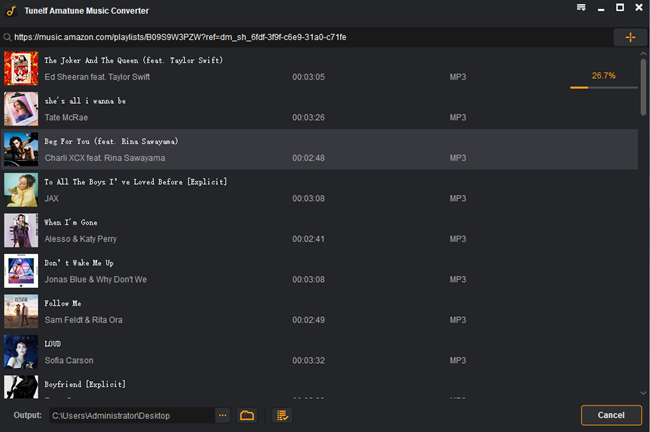
The last step is to start the conversion process. All you need to do is click the Convert button at the bottom of the converter’s interface. After that, the Tunelf software will start to download and convert all the songs you add. When it is finished, you can click the Converted icon to see the converting history and locate the downloads on your computer.

Part 3. How to Upload Amazon Music to iCloud
iCloud is compatible with Mac, Windows, iPhone, iPad, and iPod Touch devices. Therefore, it’s pretty easy for you to back up all the downloaded Amazon songs to your iCloud service. Your Apple account includes 5GB of cloud storage, and you can purchase more for a small fee. Now continue reading and learn how to back up Amazon Music to iCloud with the following method.
Step 1. Open one browser on your desktop and go to iCloud.com.
Step 2. Click Sing In and enter your Apple ID.

Step 3. Once you log in to your Apple ID, you can click the Drive panel. Here you will see all the files that are stored on your iCloud Drive.

Step 4. Click the New Folder icon at the top center of this screen to create a new folder to which you can upload your converted Amazon Music files.

Step 5. Next, hit the Upload icon and find the Amazon Music file you want to save on iCloud. Once selected, just click Open and it will be added successfully.

Part 4. Troubleshoot: Can’t Find Amazon Music after Syncing
After uploading Amazon Music files and turning on the iCloud sync feature, you can enjoy the downloaded Amazon Music songs on your devices via iCloud. But sometimes you may fail to find the converted music files due to some errors. Don’t worry. You can check this part to fix it.
1. Check the Internet and Apple ID. First, please make sure that your device is connected to a stable network. Also, you should check about the Apple ID you signed in. Only with the same Apple ID you can access the converted Amazon Music on your iCloud.
2. Check the converted music files and re-add them. Make sure that the converted music files are not damaged and can be played normally. Then, delete it from your iTunes library. Wait for a while, then you can add them back and try to sync them to iCloud again.
3. Update the iCloud library. Sometimes you can’t find the song because it is waiting to sync on iTunes. To fix it, you should go to the iTunes app on your computer, then choose File > Library > Update iCloud Music Library.
Conclusion
From the above, we’ve clearly shown you the possible ways to back up Amazon Music to iCloud. Once you’ve successfully loaded them to your iCloud service, you won’t have to worry about losing data even when your Apple product is lost or damaged. Besides, you can also transfer the downloaded Amazon songs to your other mobile devices that offer no support for the Amazon Music player. Note that you can just get 1/3 of each Amazon song with the free trial version, to unlock all the features, you’ll need to purchase the full official version.


