Due to its large catalog, personalized recommendations, and other attractive features, Spotify has become one of the best music streaming services. So, it’s not hard to see why Spotify is the default streaming service for most people. In addition to accessing music online, Spotify is still a top music player as you’re allowed to add local files to Spotify to play on your device.
However, most people ignore this feature. This unique feature enables you to play any of the audio files legally stored on your device. If you have set Spotify as the default music player, you cannot miss this feature. In this article, we’ll show you how to add local files to Spotify on your different devices. Also, you can find some useful tips for playing local music on Spotify in the following content. Beyond that, we have prepared detailed instructions for users who want to save Spotify tracks as local files. Please take a few minutes and read this post quickly so that you are enabled to know almost everything you need.

Part 1. How to Add Local Files to Spotify on Desktop
Except for the vast selection of tracks on Spotify library, you can also upload any of the audio files that are stored on your devices. To do so, you will need to install the Spotify app and authorize its access on your device settings. No matter what Spotify plan you have, you are able to use this feature and enjoy your local music. If your music files are stored on your computer, the steps in this part can give you a hand in adding them to Spotify easily and effectively.
Before uploading, you need to notice that the local files should come from legal sources. Otherwise, they can not be added to Spotify. You should also check the file format as well. Currently, Spotify supports audio files in MP3, MP4 (not contain video), and M4P.
It should be noted that those songs from iTunes (M4A format) and Apple Music (ALAC format) are not supported by Spotify. In this case, you can try to convert iTunes audio or Apple Music to Spotify supported formats before adding them to your music library. All right, and you can follow the below steps to add local songs to Spotify on your computer.
Method 1. Upload Music Files from Computer Directly
For the music files that are stored in your computer’s folder, you can add them to the Spotify app directly. To make the whole process smooth, you’d better install the latest version of Spotify and sign in to your account in advance.
Step 1. Start by launching Spotify on your computer, then log in with your Spotify account.
Step 2. Click your profile image at the top right corner and select Settings from the drop-down menu.
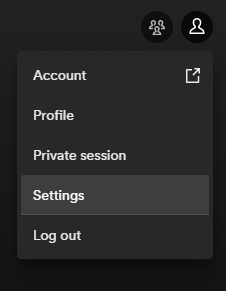
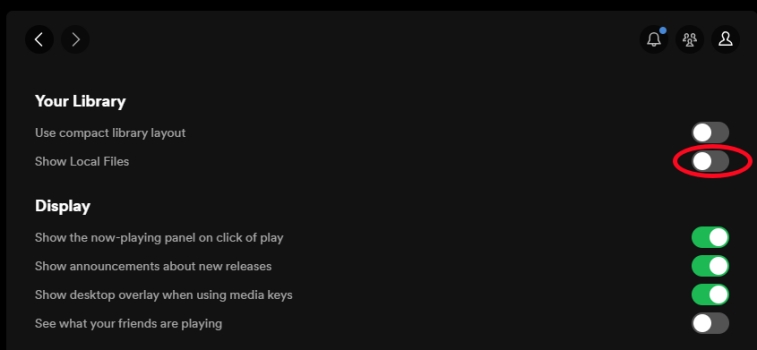
Step 3. Scroll to find Library and turn Show Local Files on, then there appear several options.
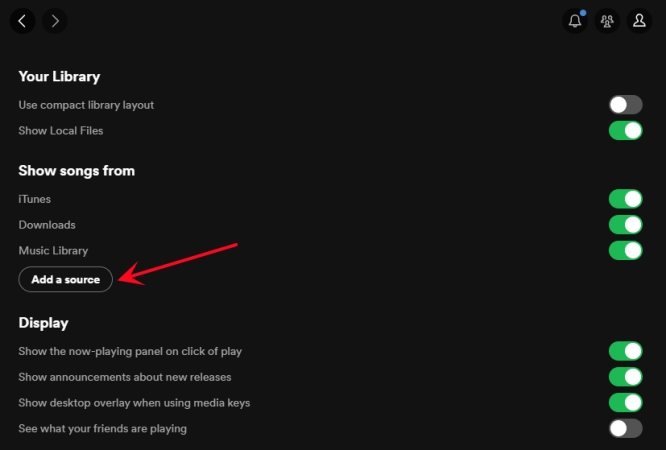
Step 4. Click Add a source to open the Windows Explorer and head to the folder containing your local files.
Step 5. After selecting the folder, click the Open button to upload your local files.
Now you can find your local files in Local Files at the left column of Spotify. And you can start playing your local songs through the Spotify app on your computer. It is also possible if you want to add your local music tracks to your other playlists. You just need to find the song, and then right-click it to choose the Add to playlist option.
Method 2. Upload Local Music Files from iTunes
Recently, Spotify added a new feature that you can sync local files in your iTunes music library to Spotify. This means that you can upload your local songs to iTunes first, then you can make local files sync to Spotify. Here’s how to.
Step 1. Open iTunes on your PC, then click File > Add File to Library or Add Folder to Library.
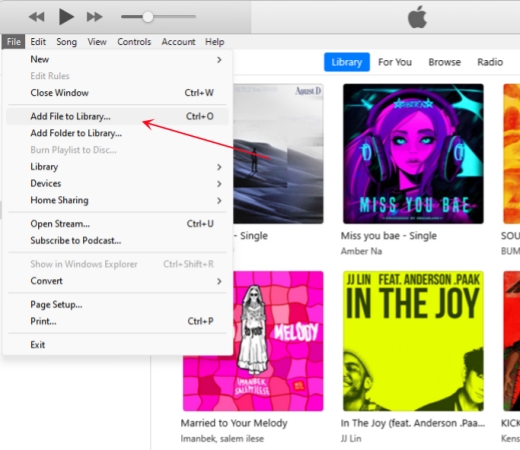
Step 2. Locate a folder or find a file, and click the Open button to upload your local files.
Step 3. In iTunes, go over to Preferences under the Edit tab, then select Advanced in the pop-up window.
Step 4. Check the box next to Share iTunes Library XML with other applications and click OK.
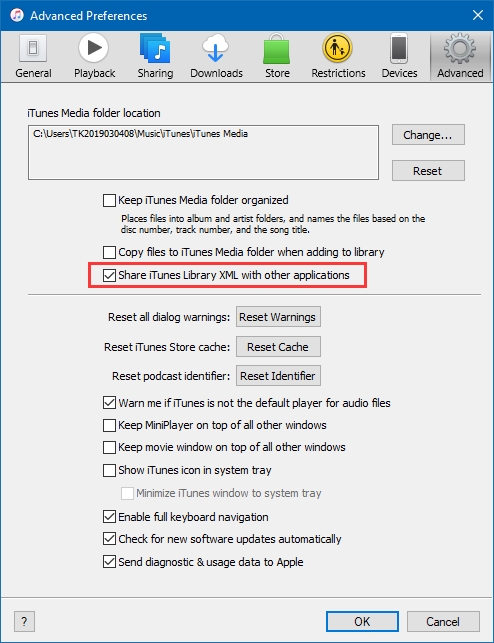
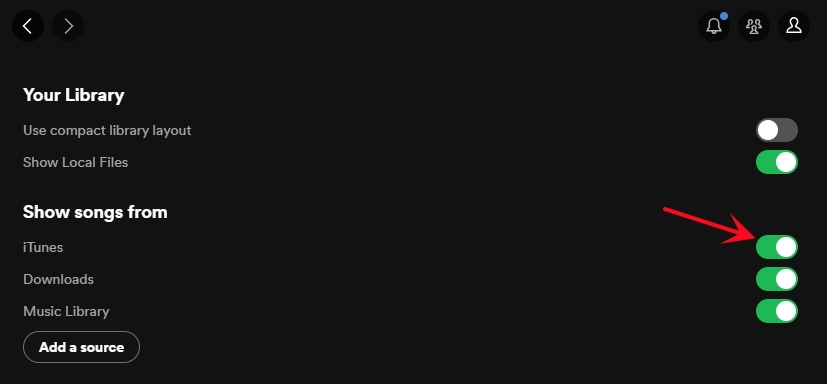
Step 5. Click your profile image in Spotify and select Settings, then head to Library.

Step 6. Switch Show Local Files on and select iTunes to have access to your local files in your music library of iTunes.
Part 2. How to Upload Local Files to Spotify on Mobile Phone
In addition to the desktop app, the Spotify mobile app also allows you to upload local music files. If your local songs are stored on your mobile device, you can follow these steps.
Option 1. Upload local files stored on your mobile phone
For Android users:
Step 1. Run the Spotify app on your Android device, then tap your profile icon at the top right corner.
Step 2. Then, select Settings and privacy.
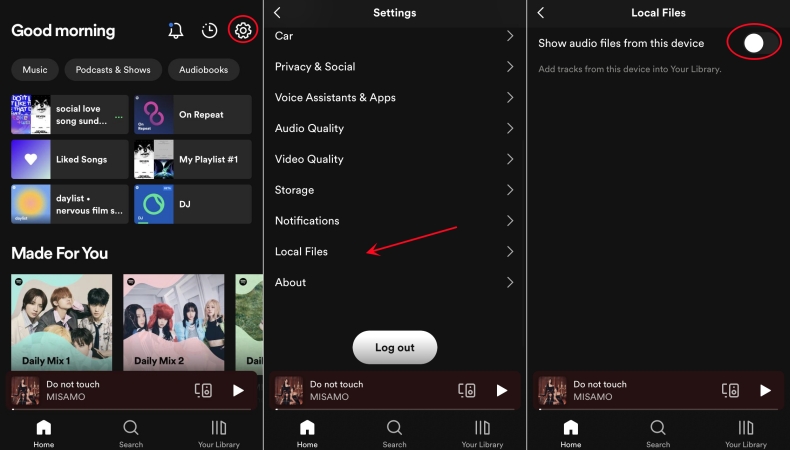
Step 3. Scroll down to select Local files > Show local files from this device. After that, you can go back to Your Library. All the detected local music files will be stored in the Local Files section.
For iPhone users:
If you are using an iPhone, you need to know that Spotify will automatically look for local files from On My iPhone after you turn on the Show audio files from this device option. In other words, the songs stored in the iCloud Drive folder can not be detected. Thus, you have to move your local files to a folder from On My iPhone first. Here’s how to.
Step 1. Open the File app and tap any blank place to select New Folder.
Step 2. After creating a folder for storing your local files, head to iCloud Drive or other folders of the browser app.
Step 3. Go to select the files and choose Copy or Move, then tap Browse > On My iPhone.
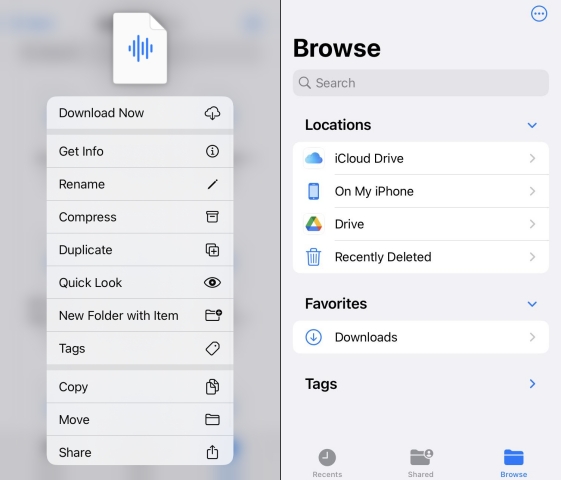
Step 4. Press the folder for Spotify and select Paste or Move Item here. Now your stored local files will appear in Local Files.
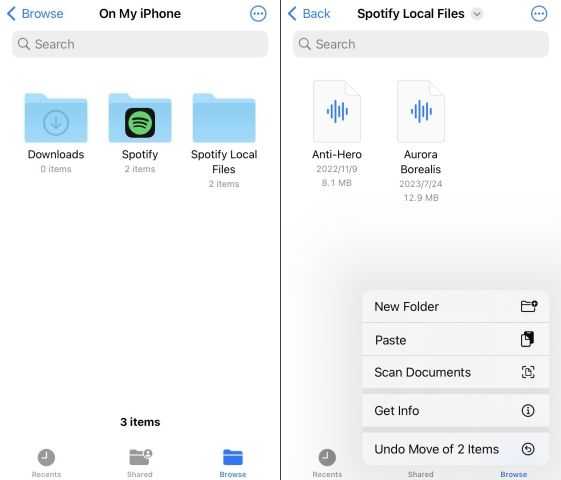
Step 5. Once finished, you can go to the Spotify app and add the local files. Just head to the Settings section on the Spotify app.
Step 6. Then, select Local Files > Show audio files from this device.
Option 2. Get local files from your computer
If you want to get local files from your computer to Spotify on your phone, you have to move your local files from your computer to your phone. Android users can directly use a USB cable to connect between their devices, and then transfer the local files by copying and pasting. Those iPhone users can not only move local files from a computer through a USB cable but also sync local files to the iPhone via iCloud. After transferring the local files to your mobile phone successfully, you can do the same steps on Option 1 to add them to Spotify.
Part 3. How to Sync Local Files on Spotify Across Devices
If you have a Spotify Premium subscription, there is a great method that can help you access your local files on almost all devices that you sign in to your account. That is to sync your local music files after adding them from your computer to the Spotify app. Once finished, you can not only listen to the local songs on the computer where you stored them but also on other devices that have the Spotify app.
1. Upload your local music files to the Spotify app on your computer.
2. Then, go to Your Library and create a new playlist by clicking the add icon in the left column.
3. Select Create a new playlist. You can rename this playlist as you want.
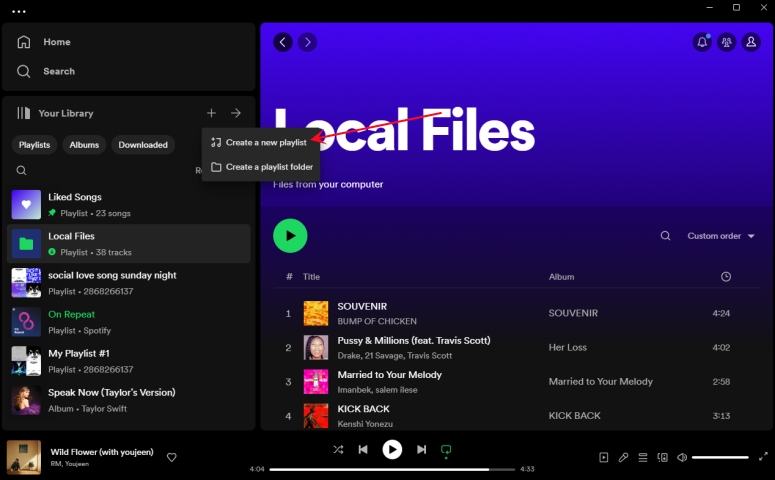
4. After that, head to the Local Files section. Find the tracks you want to sync, and then right-click it.
5. Next, select Add to playlist to add it to the new playlist you just created. Repeat this step until you add all the songs you need.
6. Make sure that your computer and mobile phone are connected to the same WiFi network. Then, open the Spotify app on your mobile phone and refresh it.
7. As long as you are signed to the same Spotify account, the new playlist will be synced automatically.
8. Go to Your Library and you can see the new playlist that contains all your local music files. Tap the download icon at the top and you can listen to the local files on your mobile phone without the Internet.
Part 4. Bonus: How to Download Spotify Tracks as Local Files
With the above steps, you can easily import local files to Spotify for playing. So, is it possible to download Spotify music as local files? Of course, but you cannot directly save Spotify music as local files even though you have a Premium account. Here we offer you a great way to download local files from Spotify for playing anywhere.
In fact, all premium users can only download Spotify music as cache files instead of physical files. Therefore, once your premium subscription expires, those Spotify downloads are not playable in the offline mode. Besides, as encoded with digital rights management, Spotify songs are only playable within itself app. Thus, you cannot transfer your downloaded Spotify songs to other devices or platforms for playing.
To break this limitation, you need a Spotify downloader. Tunelf Spotify Music Converter is a one-click solution you can try. It is a professional and trustworthy software for all Spotify users. With this tool, you can download and save Spotify music into several unprotected audio format files like MP3. Then you can access and play your Spotify music whenever and wherever you want. Below is a simple tutorial on how to use Tunelf Spotify Music Converter.

Key Features of Tunelf Spotify Music Converter
- Download Spotify playlists, songs, and albums with free accounts easily
- Convert Spotify music to MP3, WAV, FLAC, and other audio formats
- Keep Spotify music tracks with lossless audio quality and ID3 tags
- Remove ads and DRM protection from Spotify music at a 5× faster speed
Step 1 Select Spotify Music to Download
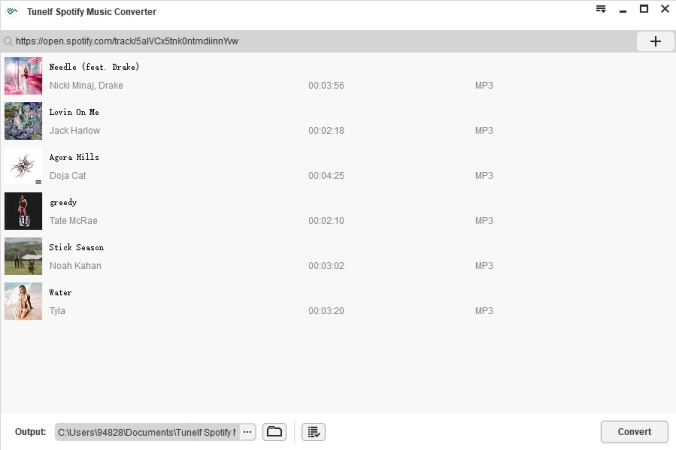
To get started, you’re supposed to install Tunelf Spotify Music Converter on your computer first. As Tunelf software needs to access your Spotify music data for exportation, make sure that you have installed the Spotify app on your device in advance. When you launch Tunelf software, it will run the Spotify app at the same time. Now you can add Spotify songs to the converter by drag-and-drop. Or you can copy the music link and paste it into the search bar on the converter.
Step 2 Adjust the Output Audio Parameters
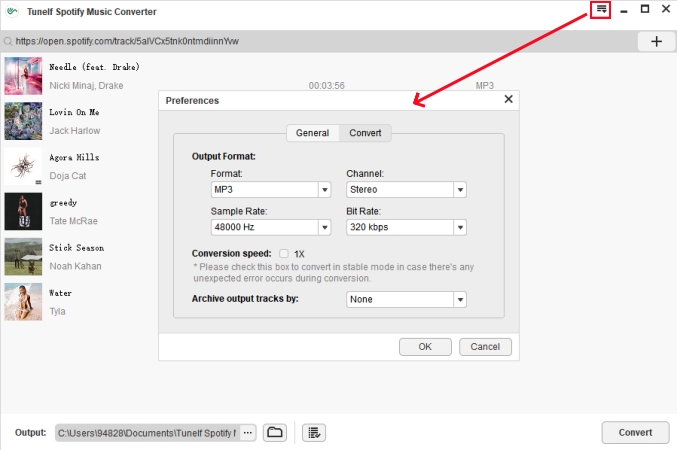
Here comes the most important part of the process – setting the output audio format. To set the output audio format, you can click the menu bar and select the Preferences option. Then, in the pop-up window, switch to the Convert tab. Here you’re allowed to choose an audio format from MP3, AAC, FLAC, WAV, M4A, and M4B. Besides, Tunelf software allows you to change other audio parameters like the sample rate, bit rate, and channel.
Step 3 Download Spotify Music as Local Files
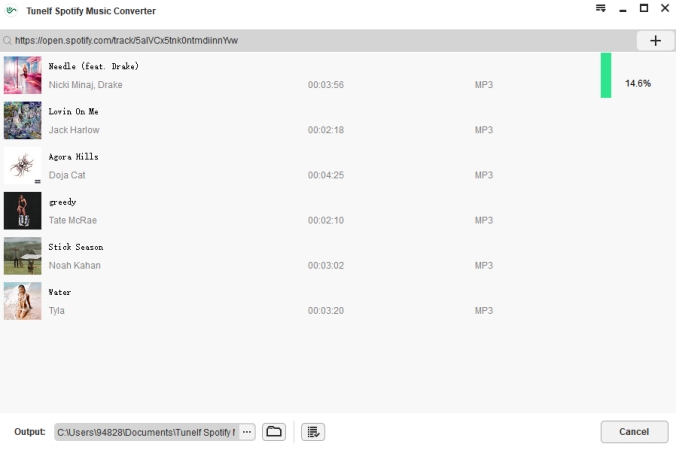
After setting the format, you can click the Convert button located at the right bottom of the converter. Then Tunelf software will start the conversion automatically. When the conversion is complete, you can get unprotected Spotify music files. You can find them by clicking the Converted icon. In the history list, you can click the Search feature to open the folder where you choose to store your downloaded Spotify music files.
Part 5. FAQs about Local Files on Spotify
Q1: What format do local files need to be for Spotify?
A: If you want to import local music files to Spotify, you should ensure that the file is in one of the following formats: MP3, M4P, MP4, FLAC, and WAV. Also, the M4P file can not contain video.
Q2: Why won’t my local files show up on Spotify?
A: Sometimes, you may find that your local files not showing up on Spotify after adding them. The reasons can vary depending on the situation. For example, you do not enable the local file feature correctly, or the file format is not supported. If you encounter this issue, you can fix it by trying the following solutions.
1. Make sure that your local music files’ format is supported by Spotify.
2. Ensure that the music files are not protected by DRM.
3. Update or reinstall the Spotify app on your device.
4. Update your device system to make sure there is no compatibility issue.
5. Make sure your local music files are stored in the location that Spotify can access. Normally, Spotify only checks for files saved in the Downloads and Music folders of your computer.
6. Disable the Offline Mode of Spotify.
7. Make sure that you give Spotify enough permissions to access your local files.
Q3: Do you need Spotify Premium for local files?
A: No, you don’t have to need a Premium account for uploading local files on Spotify.
Q4: Where to find local files on Spotify?
A: To find local files on Spotify, go to your Library and tap the folder Local Files. Then you can find all the local files you’ve uploaded to Spotify.
Summary
So, there you have it. After reading the whole post, you’ll know how to add local files to Spotify on your devices. Also, you follow those tips we’ve shared in the post to better enjoy your local files on your devices anywhere and anytime. And if you want to save songs from Spotify as local files for playing without hassle, don’t miss the Tunelf Spotify Music Converter.
Get this product now:
Get this product now:


2 replies on “How to Add Local Files to Spotify on Mobile Devices/Desktop [Complete Guide]”
spotyfy can’t play this right now, if you have the file on your computer you can import it.
what is solution for this……………..?
You can find the solution in our another post at Spotify Can’t Play Local Files? Fixed!