Many people have grown accustomed to hearing the soundtrack on every digital show or TV program they watch. Having background music is important for different occasions, such as video games, social gatherings, retail venues, and video blogs, and the most important thing is to include music in your PowerPoint slides. To bring your illustration to life during a presentation from a slide show, you could add music to PowerPoint from Apple Music to complete your content for the audience.
If you have a cute tune on your PowerPoint slides, be sure to make your presentation more engaging and impressive. While you may not know how to add Apple Music to PowerPoint, adding your favorite tunes or themes to accompany your presentation is pretty straightforward. Not knowing how to add music to a PowerPoint from Apple Music, read on and find out how to in this article.
Part 1. Can You Add Apple Music to PowerPoint?
PowerPoint is a daily-used product in our studies and work. This powerful presentation program offers brilliant, rich features that make slide-making easy and beautiful. When you’re making a PowerPoint presentation, background music can be a fun part of the composition of your slide show. However, when you come across a song you prefer on Apple Music and try to add it to your PowerPoint as background music, you’ll find that you cannot insert it directly into your slide.
So, why you can’t add Apple Music to PowerPoint directly? Many people wonder about the reason. Apple Music is a streaming service, meaning you can listen to millions of songs online, but you don’t own the files. PowerPoint, on the other hand, works with downloadable audio files like MP3, WAV, or WMA. This difference makes it impossible to add Apple Music directly to PowerPoint. Fortunately, there are still workarounds to help you add Apple Music to PowerPoint.
To get Apple Music local files for adding to PowerPoint, Tunelf Apple Music Converter is a great helper.
Part 2. How to Link Music to PowerPoint from Apple Music [Online Way]
If you’ve ever tried to insert a song from Apple Music into PowerPoint, you’ve likely discovered that PowerPoint doesn’t recognize the format. This is because Apple Music is protected by Digital Rights Management, which restricts the use of songs outside of Apple’s ecosystem. In this case, you can choose to link Apple Music to a slide in your PowerPoint. Here’s how to do it.
Requirements:
An Apple Music account
A computer with PowerPoint and Apple Music
A stable internet connection
Step 1 Copy the Apple Music Song Link
Launch Apple Music on your Mac or the Apple Music web player on your Windows PC. Then find the music you want to play in the background while the slide appears. Right-click your selected song and click Share Song > Copy Link.

Step 2 Add a Button Shape to a Slide
Go back to open your PowerPoint presentation to add the music. Choose a slide and click the Insert tab from the menu bar. Then click the Shapes button and select a rectangle from the drop-down menu to add.

Step 3 Set the Action Settings of the Button
After placing the button into the slide, click the Hyperlink button, and then there appears the Action Settings dialog box. In the dialog box, tick the Hyperlink to box, select URL, and click the OK button to save the settings.

Step 4 Link Apple Music to PowerPoint
In the Hyperlink to URL dialog box, you can paste the copied song link from Apple Music. Then click the OK button to create the hyperlink. Now you can click the Play button to check whether you have successfully added the music.

Part 3. How to Add Music to PowerPoint from Apple Music [Offline Way]
As Apple Music uses DRM to prevent unauthorized sharing or downloading of its music files, you can’t simply drag and drop Apple Music songs into PowerPoint. You can try to link a song from Apple Music to your PowerPoint for playing in the background, but this often fails due to various reasons. If you don’t want to go through the hassle of linking Apple Music tracks, you can explore other options. The better way to use Apple Music in PowerPoint is to convert the music into a compatible format.
Best Tool to Make Apple Music Playable in PowerPoint
Unlike MP3 or WAV files, Apple Music files are encoded in a protected format, making them unplayable in third-party apps like PowerPoint. To make Apple Music tracks playable, you need special software to do this because DRM prevents format conversion tools from accessing the files. There are various DRM removal tools available online that can help you convert Apple Music to MP3 or WAV, but Tunelf Apple Music Converter is highly recommended to you.
Tunelf Apple Music Converter is a multi-functional converting tool that can convert any music track, playlist, album, and artist from Apple Music to MP3, AAC, FLAC, WAV, M4A, and M4B. By adopting advanced decoding technology, this tool can keep the original audio quality and metadata information after conversion. What’s more, it supports converting music at 30× faster speed and customizing the output audio parameters like the bit rate and sample rate.

Key Features of Tunelf Audio Converter
- Convert Apple Music to MP3, WAV, FLAC, AAC, and other audio formats
- Remove DRM from Apple Music, iTunes audios, and Audible audiobooks
- Preserve the converted audio with lossless audio quality and ID3 tags
- Support the conversion of audio format at a 30× faster speed in batch
Download and Convert Apple Music for Use in PowerPoint
The context guide below will tell you how to convert Apple Music for use in your PowerPoint with Tunelf Apple Music Converter. Before starting, make sure that you have Tunelf Apple Music Converter installed on your computer. Go on, let’s have a look at how to do it.
Step 1 Audio File Formats Supported in PowerPoint
It’s important to figure out which audio formats are supported in PowerPoint. The supported output audio formats of PowerPoint are as follows.
| PowerPoint for Devices | Supported Audio File Formats |
| Windows | AIFF, AU, MIDI, MP3, |
| macOS | AIFF, AU, MP3, MP4, WAV, AA, AAX, M4A, AAC, AC3, EC3 |
| Web | MP3, WAV, M4A, AAC, OGA |
Step 2 Import Apple Music Songs to Tunelf Software
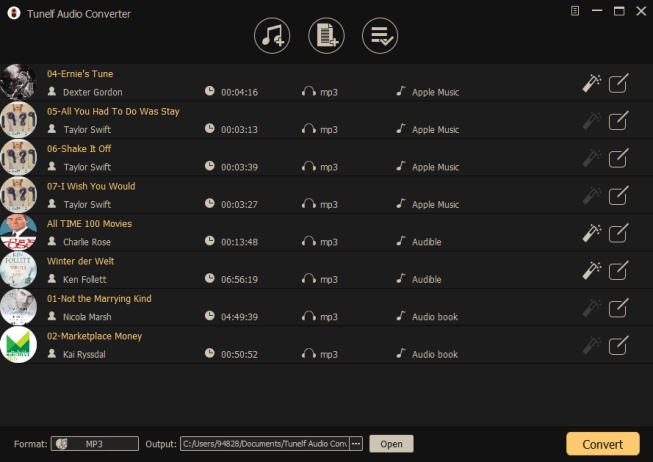
Launch Tunelf Apple Music Converter on your computer and click the Load iTunes Library tab located at the top of the main interface. Browse through your favorite songs and add them to the software for conversion. You can also add your Apple Music songs directly from your local folder by dragging and dropping them into the Tunelf app.
Step 3 Adjust the Output Parameters for Apple Music
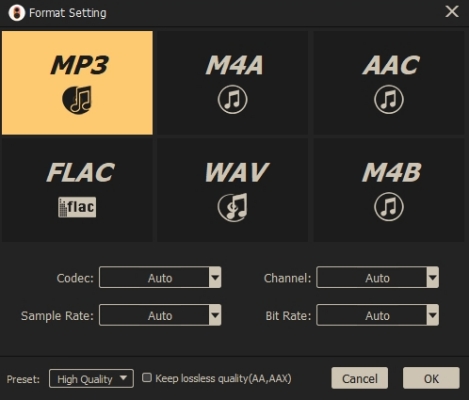
Click the Format panel, and in the Format Setting dialog box, you can set the output settings you want for your Apple Music. While Tunelf software offers many audio formats, select MP3 as it is supported by PowerPoint. Some settings you tweak are the sample rate, bit rate, channel, and codec. Remember to click the OK button to save the settings you set.
Step 4 Start to Convert Apple Music Tracks to MP3
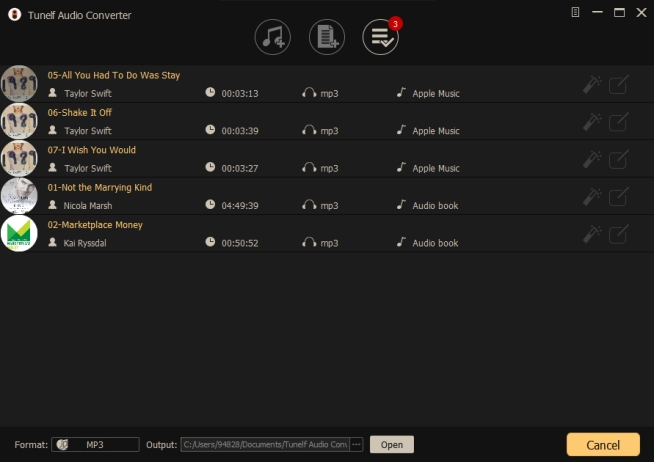
In conclusion to your conversion process, you need to click the Convert button at the lower right of the software after setting all your preferences. After clicking it, the conversion process from Apple Music to MP3 will initiate. When the conversion process is complete, proceed to click the Converted button. You can browse and find your converted Apple Music songs.
Add Apple Music to PowerPoint on Mac & Windows PC
With the help of Tunelf Apple Music Converter, you are one step away from adding your likable Apple Music tracks to your slide in PowerPoint and making your audience focus more on your demonstration. Now that you’ve successfully converted your Apple Music tracks to MP3, it’s time to add them to your PowerPoint presentation. Look at how to add Apple Music to a PowerPoint.
On Mac:
Step 1. In your PowerPoint presentation, select the slide you want to add Apple Music and click Insert > Audio.

Step 2. Click Audio from File to insert an Apple Music song from your computer.
Step 3. Select an Apple Music song you’ve converted in the file explorer.
Step 4. Click the Insert button, then your Apple Music song will be inserted into the slide.
On Windows PC:
Step 1. In your PowerPoint presentation, locate the slide to add the background music and click Insert > Audio.
Step 2. Select Audio on My PC, then you’ll find the Insert Audio dialog box.
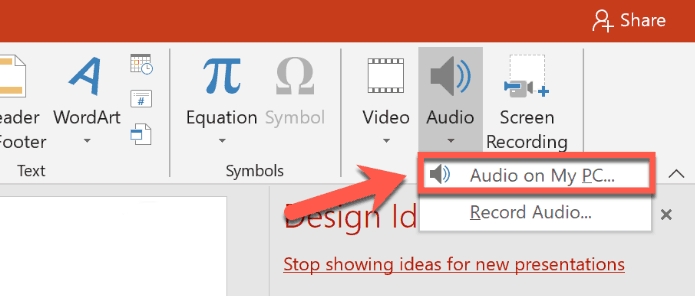
Step 3. In the Insert Audio dialog box, select the converted Apple Music track you want to add.
Step 4. Click the Insert button to add your selected file to the slide in your PowerPoint presentation.

Part 4. How to Play Apple Music on PowerPoint Automatically
Adding Apple Music to PowerPoint requires a few extra steps, but the results can be worth it. By converting your Apple Music tracks to a compatible format and embedding them into your presentation, you can create a more engaging and memorable experience for your audience. Furthermore, you can control the playback better with the following steps.
How to Play Apple Music on PowerPoint Automatically
Step 1. In your PowerPoint presentation, click the audio icon on the slide where you add the music.
Step 2. Go to the Playback tab and select Automatically in the Start list of the Audio Options group.

How to Play Apple Music across Multiple Slides in PowerPoint
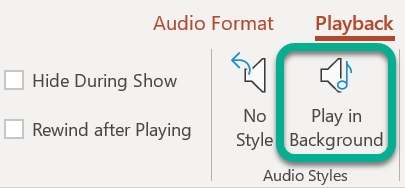
Step 1. In your PowerPoint presentation, locate the slide where you add the music.
Step 2. Click the Playback tab and select Play in Background.
Part 5. Conclusion
Now that you can convert your Apple Music files to MP3, adding Apple Music to PowerPoint is much simpler. Tunelf Apple Music Converter can convert Apple Music in simple steps. After conversion, you can freely use your Apple Music tracks in PowerPoint and even on other devices like PS5, Xbox One, and MP3 players for off-the-grid listening. Have your favorite music on the go.
Get the product now:
Get the product now:


