Apple Music is one of the most popular music streaming services. For audiophiles, Apple Music must be a good choice with the perfect combination of its music catalog and personalized recommendations. But sometimes, you may find the Apple Music songs should be definitely in the same album, split into 2 or 3 separate albums. You are not the only one who has encountered such an issue, similar issues can be easily found in the Apple community.
Why does Apple Music split albums? How to fix split albums in iTunes? In this article, we’ll discuss the possible reasons and find out practical solutions to fix the problem of Apple Music splitting albums. Read this article to find your answer.

Part 1. Why Does iTunes/Apple Music Splitting Albums?
First, let’s figure out why iTunes splits an album into two or more. We find that metadata conflict and device issues are the most likely causes of the Apple Music split album issue. The main reasons are listed as follows:
Different Editions of the Same Album
It’s common for the same albums to have different editions. If you search for an album name in iTunes or the Apple Music app, usually you will find different albums with the same artwork and similar album names. If you tap an album to check all the songs in it, you can also easily find the Other versions option under the song list. Releasing different versions of some albums is a good way to meet the fans with different requirements.
Album Artist Information Mismatch
Apple Music splitting albums is usually caused by the different metatags. Except for the Other Versions issue, there is another possible cause – album artist mismatching. Based on the Apple Music album sorting rule, it will also sort the music contents according to the artist’s name. While an album may include multiple artists, especially in a compilation album. So if the album is a compilation, the the app will tend to split the album.
Outdated App or Device
Except for the reasons above, sometimes, the issue may also caused by an outdated app or device. If there is a bug on your app or device, Apple Music won’t work as well as you expected. In this case, you need to update your app and device regularly.
Part 2. How to Fix iTunes/Apple Music Splitting Albums on Mac/PC
For iTunes on Mac or Apple Music on Windows, we have concluded 4 practical solutions according to the causes of Apple Music splitting albums. Check the solutions below to fix your problem:
Solution 1. Confirm the Album Metadata
Check if the Album Artist tag is the same between the split albums. If the artist name is different, you can delete and re-enter the artist name to make both albums use the same artist tags. Follow the steps below to ensure the Album Artist is identical:
Step 1 Launch iTunes on Windows or Apple Music on Mac, and find the separated albums in the Albums section.
Step 2 Right-click the album and select the Album Info option.
Step 3 Under Details, rename the Album Artists field for the individual album and click OK to save your setting.

Solution 2. Uncheck the Compilation Option
Except rename the Album Artist field, there is one more setting for fixing split albums in iTunes. If the iTunes splitting albums issue remains after renaming the album artist of the separated albums, make sure to check the Compilation box. Here’s how to:
Step 1 Launch iTunes on Windows or Apple Music on Mac, and find the separated albums in the Albums section.
Step 2 Right-click the album and select the Album Info option.
Step 3 Under Details, scroll down to uncheck the Compilation box.
Step 4 Click OK to save your change.

Solution 3. Remove and Re-add Albums
Another simple method that might work is to remove the separated albums and re-add them manually. Follow the steps below to remove the album from your iTunes library.
Step 1 Launch iTunes on Windows or Apple Music on Mac, head to the Albums section under Music.
Step 2 Find the separated albums and right-click.
Step 3 Select Delete from Library.

Solution 4. Turn off iCloud Music Library
iCloud Music Library is a feature included with Apple Music subscription. It allows users to store the entire Apple Music library on iCloud. But sometimes, this sync process can lead to incorrect or missing song metadata and incorrect song matching. In this case, we need to turn off this feature to avoid Apple Music splits albums.
Step 1 Launch iTunes on Windows or Apple Music on Mac, and sign in with your Apple ID.
Step 2 Click Music > Settings > General > uncheck the Sync Library box on Mac. Or click Edit > Preferences > uncheck the iCloud Music Library box on Windows.
Step 3 Click OK to save your changes.

Part 3. How to Fix iTunes/Apple Music Splitting Albums on iPhone
After knowing how to fix Apple Music splitting albums on desktop, let’s learn more about the methods to fix iTunes split albums on iPhone. Here are the solutions.
Solution 1. Turn off Sync Library in Apple Music
To avoid incorrect or missing song metadata in Apple Music, you can also turn off the Sync Library feature on your iPhone. This behavior is similar to turning off iCloud Music Library on your computer.
Step 1. Open the Settings app on your iPhone, and scroll down to choose Music.
Step 2. Toggle off the Sync Library button under Library.
Step 3. Select Turn Off again to confirm.

Solution 2. Manually Sync Music to iPhone
After you turn off the iCloud Music Library on your computer and Sync Library on your iPhone, you can sync the albums to your iPhone via a USB cable.
Step 1 Connect your device to your computer via a USB cable.
Step 2 Open iTunes on Windows or Apple Music on Mac, and click the Device icon near the top left of the panel.
Step 3 Choose Music in the sidebar and select the Sync Music tickbox.
Step 4 Choose Selected playlists, artists, albums, and genres.
Step 5 Select the albums you want to sync and click Done to start syncing.

Solution 3. Sign out and into Apple Music
You have tried all the methods above, but still not working? Then try signing out and into Apple Music. This operation will help your Apple Music reconnect to the server, which will resolve Apple Music temporarily out of order. Then sign into your Apple Music account again to check if the issue is solved.
Step 1. Open the Settings app on your iPhone.
Step 2. Tap on your name and press the Media & Purchases button, and then choose to Sign out.
Step 3. Go back to the Media & Purchases to sign in again.

Solution 4. Update iOS and Apple Music
According to the Apple community, many users feedback that albums in Apple Music randomly split on iPhone. We all know using the latest version of the Apple Music app can ensure you a better experience and avoid many unpredictable issues. So make sure the Apple Music app you installed is already the latest version. If not, go to the app store to upgrade it. Same as the app, an outdated software system may cause issues with the Apple Music app not working as expected. Thus, you need to update your device system to get rid of Apple Music split albums.
Part 4. Best Way to Avoid Albums Splitting in Apple Music/iTunes
Using the methods above surely can reduce the probability of Apple Music splitting albums, but are you tired of Apple Music’s sorting algorithm? Maybe you can upload your purchased Apple Music albums and listen to them on other music players. To do this, you need to remove the DRM protection of Apple Music and convert the albums to MP3 format first. Then upload your albums to other music players for listening.
You’ll need a Tunelf Audio Converter, an Apple Music Converter. It allows you to convert your Apple Music songs, albums, and playlists to MP3, AAC, FLAC, WAV, M4A, and M4B formats. All your converted Apple Music tracks will be saved on your computer as local audio files. You can upload them to any music player or device for playing. It supports 30X faster converting speed and keeps lossless output audio quality. With Tunelf Audio Converter, you can also adjust the parameters of the output audio, like sample rate, bit rate, and channel. Just simply 3 steps, you can convert your favorite songs into the format you want.

Key Features of Tunelf Audio Converter
- Convert Apple Music to MP3, WAV, FLAC, AAC, and other audio formats
- Remove DRM from Apple Music, iTunes audios, and Audible audiobooks
- Preserve the converted audio with lossless audio quality and ID3 tags
- Support the conversion of audio format at a 30× faster speed in batch
Step 1 Import Apple Music Albums to Tunelf
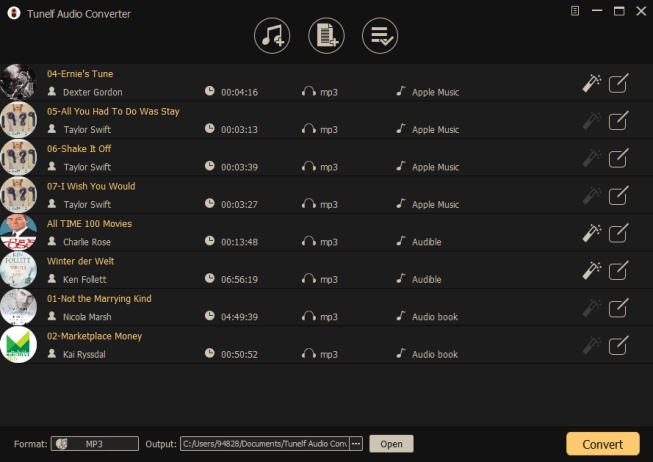
Launch the Tunelf on your computer, and click the Load iTunes Library icon on the screen. Then, all your downloaded Apple Music songs will be displayed in Tunelf. Choose the songs you want, and tap the Add icon to add them to the conversion list. Or you can simply drag the songs from Apple Music and drop them to Tunelf.

Step 2 Set Output Format for Apple Music Albums
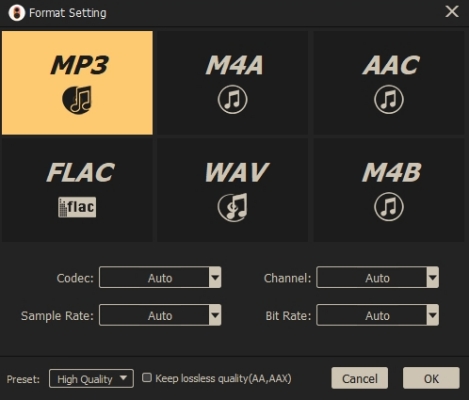
Once your wanted songs are added to Tunelf, click the Edit button to edit the ID3 tags of the songs, like title, album, genre, etc. Then click Format on the left corner, and choose the output format as MP3. Other parameters such as sample rate, channel, and bit rate can also be adjusted. Finally, click OK to preserve all your changes.

Step 3 Start Downloading and Converting Apple Music Albums
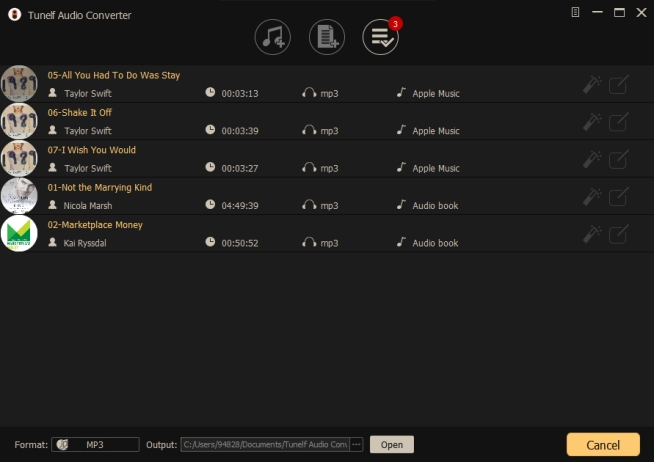
Now, click the Convert button at the bottom of the panel. After a few while, all added songs will be converted to MP3 audio format and saved in your computer as local files. You can browse all converted songs by clicking the Converted button. Now, you can upload your converted Apple Music songs on any music player or device.

Step 4 Upload Apple Music Albums to Other Music Players.
Since you have converted your favorite Apple Music albums to MP3 on your computer, you can upload them to any music player you want now. The ID3 tags of the songs are well preserved, you can get rid of the Apple Music splitting albums issue by using other music players. You can locate your converted music files in the folder of your computer. If you can’t find them, check the Output location in Tunelf.
Part 5. Conclusion
If you have read this passage, you must know the answer to why Apple Music splits albums. Additionally, we have listed some useful solutions for you to fix Apple Music splitting albums issue. And if you are tired of Apple Music’s music sorting algorithm, you can even play your Apple Music albums on other music players by using the Tunelf Audio Converter.
Get the product now:
Get the product now:


