Apple Music lets you see the top 25 most recently played songs. That means you can trace the history of your recently played songs. If you want to find the title of your most recently played songs or if you want to clear the recently played history, then this post will help you find a convenient way to do so on your mobile phone and desktop. For a better music streaming experience, take advantage of this feature and learn how to view and remove Apple Music recently played right now.

Part 1. See and Delete Apple Music Recently Played on Mobile Phone
This part will show you how to see Apple Music recently played on your device for iOS and Android. What you also need to know is that Apple Music will recommend songs based on your recently played songs, so you can adjust your recently played song list by deleting and removing it. Now read the following actions for managing Apple Music’s recently played on your mobile device.
How to See Recently Played on Apple Music
You can take the easy steps on your iOS device or Android below.
1) Head to the Apple Music app on your device.
2) Choose a song to play and tap the Now Playing bar at the bottom of your screen.
3) Then tap the menu button in the lower right corner on the Now playing screen.
4) Swipe down to view the History section, then you can see the recently played songs.

How to Delete Recently Played on Apple Music
If you want to delete the history of these recently played songs entirely, this can also be done with just one additional action.
1) Go to Apple Music > Now playing > menu icon on your device.
2) Swipe down to access the recently played and tap the Clear button.
3) Tap Clear again to confirm this action.

How to Remove Recently Played on Apple Music
If you just want to delete a particular song from your recent play history, Apple Music also gives you the feature to remove it. However, it is important to note that this action is only available on iOS devices.
1) Use the menu icon in the Now Playing screen to get to the song list page, and then swipe down to find your recently played songs.
2) Locate the song you want to remove, then swipe left.
3) Tap Remove to delete it.

Part 2. Find and Clear Apple Music Recently Played on Desktop
If you are using Apple Music on a desktop, you can also find and clear your recently played history. Follow the steps below to carry out what you want to do.
How to Find Recently Played on Apple Music
You can launch the iTunes app on your PC and the music app on your Mac to carry out the following steps.
1) On the Music section, click the menu icon at the top of the screen.
2) Hit on the History tab, and then your recently played songs are displayed.

How to Clear Recently Played on Apple Music
If you want to clear those recently played songs’ history on the desktop, it’s just one click away.
1) Head to iTunes (for Windows) or Music (for Mac) on your device, then navigate Music > menu > History.
2) Then slide your mouse down to find the Clear button if you have a long list of recently played songs.
3) Click on the Clear button and confirm it.

Part 3. How to Fix Apple Music Recently Played Not Updating
Some users have reported that even though they know how to see and clear recently played songs on Apple Music. They find that the list of songs is no longer updated. It may be due to some issues with Apple Music, which you can try to fix in the following ways.
Solution 1. Update Your Device to the Latest Version
Updating the system version of your device to the latest version is one of the most common solutions to such software issues. You can follow the steps below to update your device and then see if the Apple Music recently played list has been updated.
On iPhone: Go to Settings > General > Software Update. At the last step, you can tap Download and Install to update if available.
On Mac: Navigate to Apple menu > System Settings > General > Software Update. You can also click Update Now if your current system version is not the latest version.
Solution 2. Force Stop and Restart the Apple Music App
Force-stopping your Apple Music app from running and then reopening it may fix some bugs.
On iPhone: Swipe on the Home screen or double-tap the Home button to open the application switching screen, then locate Apple Music. Swipe up to force stop it and then restart the app.
On Mac: Head to Go > Utilities > Activity Monitor > Apple Music processes > Quit Process. Then, restart the Apple Music app again.
Solution 3. Sign Out and In Your Apple ID
Or try signing out and signing back into your Apple ID account can also solve the issue with this Apple-related app.
On iPhone: Go to Settings > Your Name, then scroll down to find Sign Out and tap it. after a while, sign back again.
On Mac: Open the Apple Music app, then navigate your Account and click Sign Out. After that, click Sign In to sign back your Apple ID.
Solution 4. Reboot Your Device
If none of the above solutions solve your problem then you can also try restarting your device. For iPhones, just press the power button to shut down and reboot. For desktop, just click on the menu at the bottom of the home screen, then choose the power icon and reboot.
Bonus Tip: Enjoy Downloaded Apple Music Offline without a Subscription
As mentioned earlier, there’s a limit to the number of recently played songs you can track on Apple Music. And Apple Music lets you enjoy your downloaded music only for the duration of your subscription. So, you can have a better way to enjoy your downloaded Apple Music even without a subscription and manage the playlists more conveniently.
All you need is a downloader named Tunelf Audio Converter. It is the best Apple Music converter to help you convert Apple Music, iTunes audio, and Audible books to MP3, WAV, AAC, FLAC, M4B, and M4A. Besides, you can get 100% original audio quality music files and original ID 3 tags after conversion. With these converted music files, you can transfer them to your mobile devices or other supported devices easily and manage playlists at will.

Key Features of Tunelf Audio Converter
- Convert Apple Music to MP3, WAV, FLAC, AAC, and other audio formats
- Remove DRM from Apple Music, iTunes audios, and Audible audiobooks
- Preserve the converted audio with lossless audio quality and ID3 tags
- Support the conversion of audio format at a 30× faster speed in batch
Step 1 Import Apple Music to the Converter
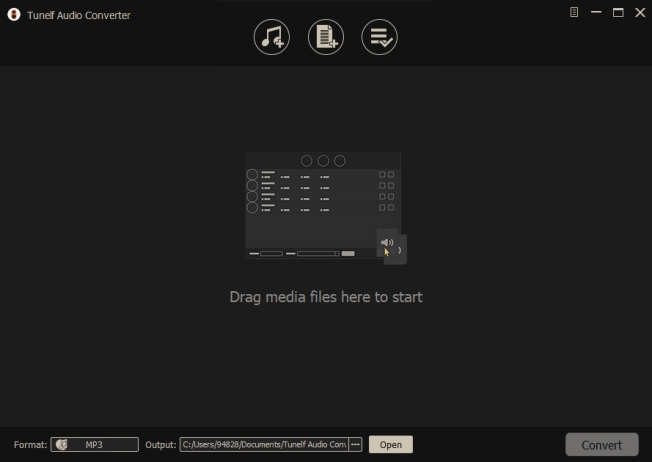
Install Tunelf on your device in advance, then launch it and your iTunes app or Music app will run automatically. You can click the Add button at the top of the screen to import Apple Music songs from your iTunes library. Alternatively, you can also drag and drop the target songs from your library into the converter directly.

Step 2 Go to Configure the Output Format and Parameters
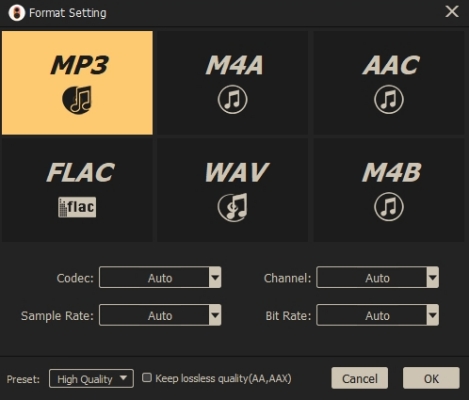
Click on the Format button given in the lower left corner. Six output formats are displayed for you to choose from. And you can also configure the codec, channel, sample rate, and bit rate according to your demand. After that, click OK to save your settings and go back to the interface of the converter.

Step 3 Download Apple Music to MP3 for Offline Playback
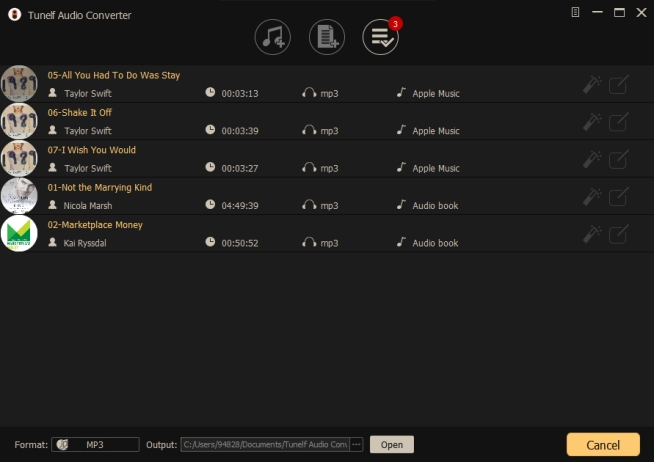
Now, you can click the Convert button to start the conversion of Apple Music songs. After a while, Tunelf will convert and download your selected Apple Music to MP3 on your device. You can also view them by clicking the Converted button.

Conclusion
In a word, seeing and deleting recently played on Apple Music is easy and simple to operate. You can follow the simple steps mentioned above to find and delete recently played songs. It’s also a great choice to use Tunelf Audio Converter to download Apple Music as MP3 files to manage the song list better. And then you can also enjoy these downloaded songs even without a subscription.
Get the product now:
Get the product now:


