Unlike the time when smartphones first came into the market, they have larger enough internal memory in today’s tech world. But, still, it is a fact if we continue downloading media content, including songs, videos, audiobooks, podcasts, and more, there will not be enough storage on our smartphones, tablets, or computers. Therefore, an SD card comes a great help for moving media files, especially when you want to transfer Apple Music to SD card for backup.
Luckily, many smart portable devices like Android phones have an option for extending your storage space by inserting an SD card. Through this, you can expand your device memory by different categories from 1GB, 2GB all the way to 512GB using an SD card. In this post, we’ll show how to download music from Apple Music to SD card no matter what device you are using.
Part 1. How to Download Music from Apple Music to SD Card on Android Devices
Globally, there are three leading operating platforms that run on smartphones, that is, Android, iOS, and Windows. iOS gadgets, typically, do not support SD cards. Therefore, you are unable to expand your iOS device’s memory. And this makes it impossible for you to download songs from Apple Music to your SD card directly on the iPhone, iPad, and iPod touch.
Apple updated the Apple Music for Android app, and now every Android user can save your songs downloaded from Apple Music to an SD card. The unique updated feature makes it pretty easy to save Apple Music to SD card. Read on and follow the detailed steps to move your favorite Apple songs to the SD card and save them on your internal memory.
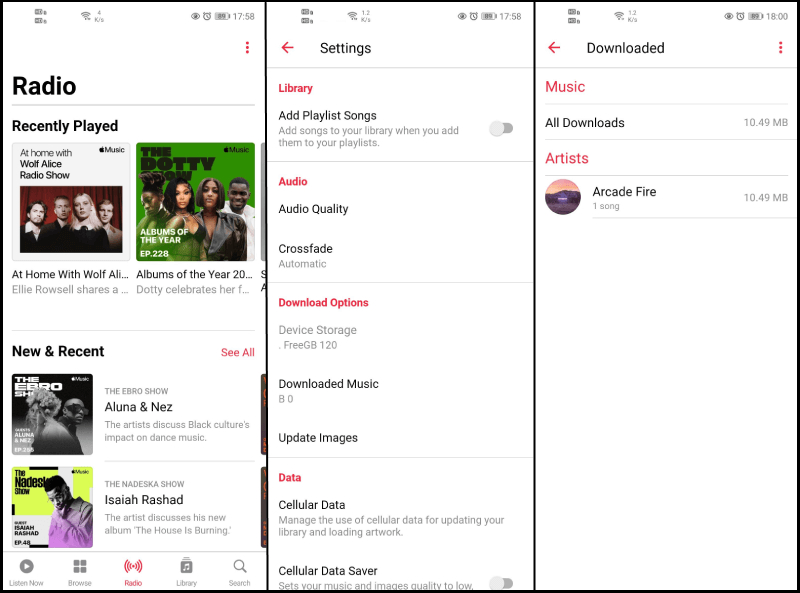
Step 1. Before you begin the procedure, make sure you have an updated Apple Music app. If not, just from your Google Play store, have it updated, and you are ready to go.
Step 2. Open the Apple Music app on your Android device and tap Settings, then scroll to find the Download Options section.
Step 3. Under the Download Options section, tap SD card and go to download songs you’ve added to your music library.
Step 4. In your music library, select the song, album, or playlist and touch it then tap Download. And all the downloaded songs will be stored on the SD card.
If you have downloaded lots of songs to your Android device, then you will find a message, prompting you to move all your Apple Music songs to an SD card, together with all future downloads. To agree to it, simply tap Yes and your Apple Music songs will be moved to the SD card. However, the downside is that you will not be able to use the SD card for playing Apple Music on other devices.
Part 2. How to Copy Apple Music to SD Card for Playing Anywhere
In addition to saving space, you can get to enjoy movies, music, and other media content from any device in a playback way when you use an SD card. But if you move those Apple Music songs straight to your SD card, then your music will not be playable on any other device. This is because Apple Music is made with DRM protection. Thus, you cannot freely move all the downloaded Apple Music songs to the SD card.
2.1 What You’ll Need: Apple Music to SD Card
For you to copy Apple Music to SD card for playing in any music player, you will need to remove DRM from Apple Music first. And to do this, you will need a powerful third-party tool. Tunelf Apple Music Converter is an excellent audio converter that will provide you with convenience when converting Apple Music to MP3.
With this tool, you can easily convert your songs from Apple Music to many common audio formats for playing anywhere and anytime. Also, you can get to handle the conversion of iTunes audio and Audible audiobooks. What’s more, it supports converting more than 100 common audio files to other popular audio formats.
Key Features of Tunelf Audio Converter
- Convert Apple Music to MP3, WAV, FLAC, AAC, and other audio formats
- Remove DRM from Apple Music, iTunes audios, and Audible audiobooks
- Preserve the converted audio with lossless audio quality and ID3 tags
- Support the conversion of audio format at a 30× faster speed in batch
2.2 How to Copy Apple Music to SD Card Freely
Tunelf Apple Music Converter is easy-to-use, and the interface is user-friendly. You don’t have to be tech-savvy. Here is a detailed guide on how to move Apple Music to SD card with the help of Tunelf software.
Step 1 Choose Apple Music songs to export
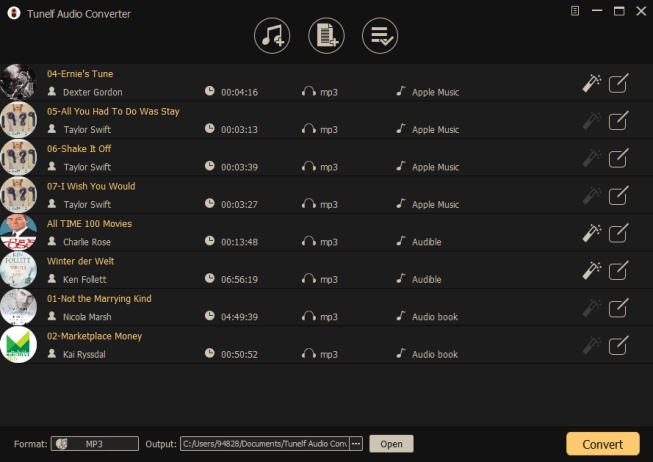
Launch Tunelf Audio Converter on your computer and click the Load iTunes Library button. A pop-up window will launch, and you can browse through your songs downloaded from Apple Music and select the songs you wish to add for conversion. For an easier way, you can add Apple Music songs from your point storage to the converter using drag-and-drop.
Step 2 Tweak the output setting for Apple Music
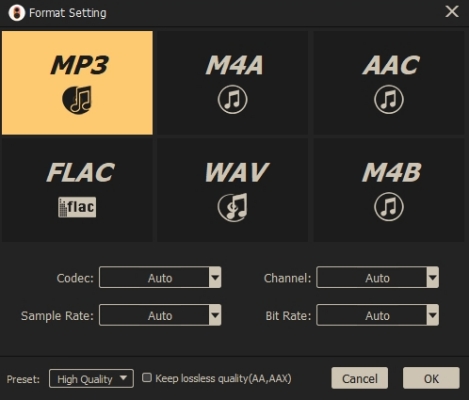
After adding your Apple Music files, click the Format button. From the launched window, there are several audio formats that you can choose. You have the option to adjust the bit rate, sample rate, codec, and channel to meet your audio preferences. Then proceed to click the OK button when done selecting your settings.
Step 3 Start to convert Apple Music to MP3
When customizing all the output audio settings, proceed to select the Convert button, located at the bottom right corner, and Tunelf software will start converting your songs from Apple Music to MP3. After the conversion is complete, click the Converted icon, and the default storage folder for your converted Apple Music will launch.
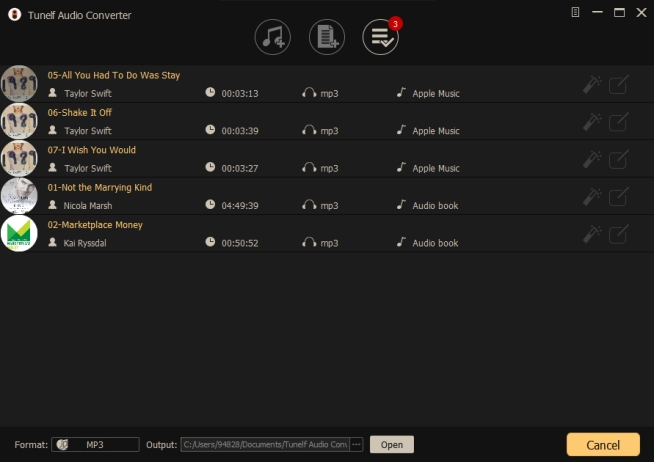
Step 4 Transfer Apple Music songs to SD card
Now insert your SD card into your computer by using an SD card adaptor or a built-in reader if your computer has one. Open the folder where your Apple Music songs are stored, select the converted Apple Music files, and then move them to your SD card. Or you can drag and drop your Apple Music files from the computer to the SD card.
Part 3. How to Move Music from iTunes to SD Card on Mac/Windows PC
Some users would want to know how to download music from iTunes to SD card. If you have purchased those songs on iTunes, you are able to put music on SD card from iTunes. But you should know those songs are only playable with iTunes or Apple Music. And here’s how to transfer iTunes music to SD micro card.
Option 1. How to Copy iTunes Music to SD Card
Step 1. Launch iTunes on your computer and click the Music tab at the top left corner of the program window.
Step 2. Find your purchased iTunes music and click the Download icon to download.
Step 3. Connect your SD card reader with the SD card to your computer, then the SD card will be recognized by the computer immediately.
Step 4. In iTunes, click the Downloaded button to find all the downloaded iTunes music you want to transfer.
Step 5. Go back to right-click the downloaded iTunes music and select Copy from the pop-up window.
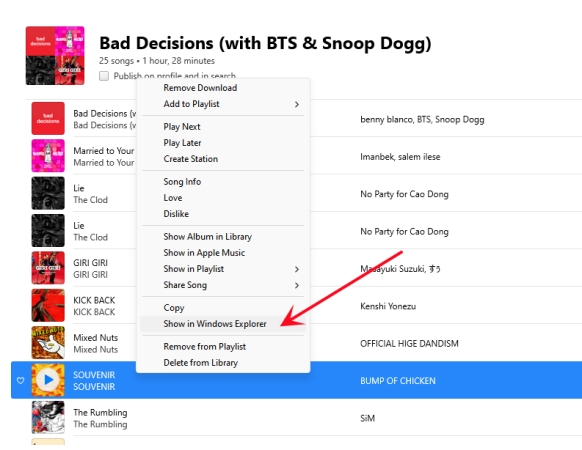
Step 6. Open the SD card on your computer and right-click to select Paste, then start copying iTunes music files to the SD card. After finishing the process, you can eject your SD card.
Alternatively, you can right-click downloaded iTunes music and select Show in Windows Explorer. Then locate the folder where you store iTunes music files. Go to transfer them to your SD card by drag-and-drop or copy-and-paste.
Option 2. How to Download iTunes Music to SD Card
Step 1. Go to insert your SD card reader into the port of your computer, then the SD card will be detected by the computer immediately.
Step 2. Fire up iTunes on your computer and click the Edit button at the top of the window.
Step 3. From the drop-down window, click Preferences, then you’ll find the General Preferences window.
Step 4. Click the Advanced button to switch to the Advanced Preferences window.
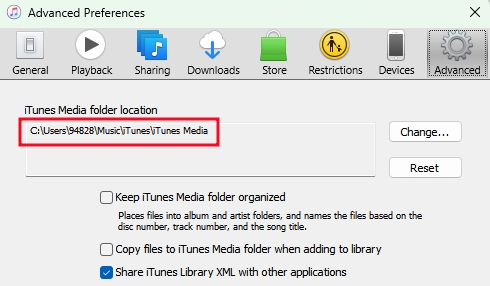
Step 5. To change the iTunes Media folder location, click the Change button and select your SD card.
Step 6. Go back to your library and find iTunes music to download. Then all the downloaded iTunes music files will be stored on your SD card directly.
Conclusion
To move Apple Music to SD card, you can choose either of the two methods depending on your device of use. For Android, you can download your songs from Apple Music directly to your SD card. But to have your music for offline use and transferable to other devices for playback, you better consider using Tunelf Audio Converter.
Get the product now:
Get the product now:


